Monday, December 27, 2010

Pouch with Tissue compartment and Car Seat Padding

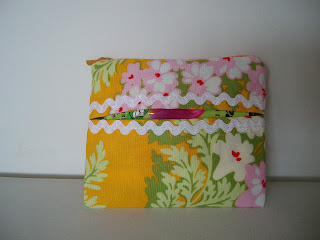
pouch with tissue compartment

car seat padding
I did 2 small projects that I will share how I did them. Its really simple and useful. The first was the pouch with tissue compartment which I find it very useful to have the tissue paper with me when I go out for a short trip like lunchtime or just going downstair to the shops to do some marketing. Keep my coins and keys well too.

The other round one that looks like a plate is actually a padded seat that I put on my car seat so that I don't have to burnt my butt when I get into it at the end of my work day. Singapore is really hot and average temperature is 30 degree celsius so you can imagine how hot the car will be parked under the scorching sun. The seat padding is a welcome change as now it's really cooling to seat on it since I've added padding into it.  Here's the tutorials for both.

Purse with tissue pouch
Measure 5" X 4" finished
1 pc outer fabric 7.25" X 6" (including seam allowance of 0.5" each side)
1 pc outer fabric for top fold of tissue pouch 2.5" X 6" (include seam allowance)
1 pc inner linning 9" X 6" (include seam allowance)
2 pc of medium interfacing for the 2 outer fabric. cut size slightly smaller than the outer fabric
1 zip 5"-6"

Cut the fabric and iron the shiny side of the medium interfacing to the wrong side of the outer fabric.
You can use the serger or zig zag stitch the edges of the outer fabric to keep them from fraying.


Take the small pc of outer fabric and fold in 0.5" on one of the long edge and sew with straight stitch. This will form the upper flap of the tissue pouch.

I've added some ribbon trimming so that it will not look so plain. Put the trimming on top and sew.

Do the same for the other edge of the bigger outer fabric. The two ribbon trimmed edge will face each other to form the opening for the tissue pouch.

Lay them top and bottom neatly on top of the lining pc (right side facing down). Pin around.

Sew around the edges with straight stitch

Put the zip on top of the outer fabric with right side face down. ie the zipper pull on the left face down. Pin in place. Make sure zipper is centralised.

Use zipper foot and sew the zip in place. My zip is abit long (7") as I don't have a 5" zip so I had to snip off the excess later.

Fold the fabric so that it align to the other side of the zipper.  Pin the zip to the other edge of the top fabric and sew with zipper foot.

Snip off the excess zip and sew the two side edges down. DIdn't have picture as my camera ran out of battery! Anyway, after you've sewn, turn it out and you have your nice purse.


Car Seat Padding
I just eyeball the measurement and decided that by butt will be contained within 17" so I just cut 2 fabric (1 outer and 1 under) as well as a batting.

To cut the perfect circle, you can try the short cut of folding the fabric over to cover at least 9" and then double up by folding upward by 9". This will ensure that your circle when you unfold the fabric will make it to 18" which is the 17" diameter plus 1" seam allowance. 

To draw that circle, take the ruler and measure 9" from centre out and make a marking. Do that all the way from bottom to the top and you have a curve line of dots. Then you link them in one line and it will form the quarter of circle.

Cut off the line and when you open up, it will form the circle of 18". 

Use the first cut fabric to be the template for the other fabric and batting.

Place them in sequence of backing fabric (right side up), upper fabric (right side face down) and batting.

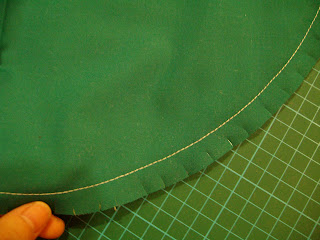
Pin and sew around the circumference of the circle with 0.5" seam allowance. snip around the seam allowance so that it will not be easier to turn and will lay flat. Leave 3"-4" for turning.


 Turn it right side up and iron flat.

Using 0.5" seam allowance, sew around the edge again and you are done.

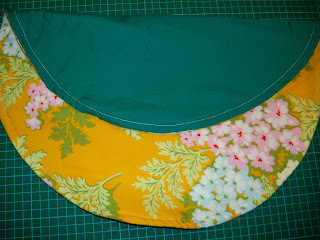
The view of the top and bottom of the seat padding.
P.S.
Now, I have a match set of my daughter's booster seat and the adult padded seat in the same fabric!

Friday, December 24, 2010

Final batch of christmas sewing and I'm done

It's Christmas eve. The feeling this week was kind of relax in office with alot of colleagues on vacation leave, including my bosses. The week felt so peaceful and passed by so quickly.

This whole week I went out to buy my sewing supplies during lunch time. Stock up on my colourful 5" zippers for sewing of more purses, paint and plywood (yes, these will be the surprise for my girl's birthday bash which I'll share more after Christmas when I have time to take pictures), clips and D rings etc etc. I made a few felt hairclips using the tutorials from the blogland. It was fun to cut up the felt and design each one of the clips. My girl loved all of them and can't bear to give them away. I had planned to put them in the goodie bags for her birthday party. but,..we'll see.

Anyway, I was very satisfied and happy that I've managed to finish off some more sewings. These are for my family. Some bags and purses. Oh, the one in yellow is a small pouch with tissue paper compartment. I had one bought from store and it was really useful. I've used it to keep my small notes and coins for lunch and having the tissue with it was really handy. Will give the tutorial in next post with another of my car seat pad.

These are the make over from pot holders. Bought them from Spotlight and sewn the sides to make into a padded makeup bag. The longish one had a zipper. I especially like the pokka dots one.


This pink bag was a bias tape bag from Prudent Baby. I've used the exact measurement from the tutorial and it looks kinda small. Will be giving them to my mother in law as she asked for a small bag. The tutorial didn't include the snap to close the bag. Realised it too late and had to use the velcro tape instead. I intend to do another bigger one but this time, with a magnetic snap. This bag has some body as I did a medium interfacing with the linning so that it looks more solid and not flat. Just iron them onto the fabric before you sew them.

Tuesday, December 21, 2010

While baby was sleeping..

As a working mom, I can only do my sewing late at night when my responsibilities of motherhoods end with my girls in bed. But for this Christmas, I had to burnt through lots of late nights and thank God my husband was very helpful. He puts the kids to bed (in the process, he slept through many early nights), so that I can do more sewing.

So while the baby was sleeping, I did a mass production of angry birds! These are the birds before they become 3D. My husband even helped me to cut around the fleece for the eyes! All 12 of them.

12 birds for 12 days of christmas!

Ta-da! 12 birds resting by the flowers!

I've also sewn some fabric coaster for my best friends - couple sets. Didn't take picture this time as was rushing to made them on Saturday night since Sunday is the present-giving day. It was 4" X 4" with batting in between 2 different fabric. I've used charm pack for this project.

Good good good..Now, it's time to make the goodie bags gift for my daughters' birthday bash coming up on 8 Jan. Yes, the 2 girls will be celebrating together since their birthday is only 3 days apart. Good time huh!

Spent the whole of Sunday afternoon making the inviation cards for her friends in childcare and church. It was simple but I've used the 3 colour schemes that she requested - Pink, Blue and Green. I've many ideas that I caught from blogland but not sure if I can pull of everything myself. My husband was like " why don't you just engage a balloon guy to do balloon scrupturing or facing painting". I guess he was afraid I might  be too stressed out with all the christmas sewings and all. But I really wanted to do the preparation work myself as a gift for my beloved daughter. hmm.. am I biting off too much that I can handle? well, we'll see how. I even thought of baking cookies for the party (I can imagine my husband will rolled his eyes and sigh...). : P finger crossed and keep sewing!! My girls have grown so much..I'm so proud of them : )

all big now!

hug me!


Friday, December 17, 2010

Christmas cards & angry bird

One more week and it's Christmas! Anticipating but yet stressful with all the christmas sewings going on. Well, I think I'm making good progress.

Most of my friends at work are clearing their vacation leave soon, so I had to give them their presents early today. I was rewarded with their smiles and appreciative 'thank you'. That's the reason why I sew my gifts. To see that the receivers are happy with my gifts from my heart. I'm glad they like it.

For the last 2 days, I was working on a project for some of my friends who are into 'Angry Bird' in the iphone. They can't stop playing them, including my 5 year old. Saw this cute Angry Bird Plush from here and decided to try to make some. It was a hit with my girl. 


For the fleece mentioned in the tutorial, I've used the fleece throw from Ikea. Recently I bought a lime green, cherry red, white and black fleece throws from Ikea, all the colours needed except for the orange fleece for the beak. No choice, went down to Spotlight to get 1/2 m of the yellow fleece. I think as long as the fabric is soft and stretchy, it should be fine if you can't find any fleece. Make sure that you read the instruction carefully as it says, stretch direction is from left to right. Didn't have the free motion foot so sew with regular sewing foot. Was tricky especially for the eye balls. Finally decided to hand stitch. Faster and more accurate!

Will also be making those green pigs too so that they can all have a good game of physical angry birds without breaking anything on the way.

I've also made some christmas cards for my friends. I caught this idea from the web where a mother send out a valentine day card with a lollipop stuck on it. I thought I could change the idea with a christmas twist. Have a early merry christmas everyone!

Tuesday, December 14, 2010

Alphabet keychains

Yippee! I've crossed another milestone in my christmas sewing. Just finish a batch of alphabet keychains for my colleagues in the office.  I've used the first alphabet in their names.  They are really my labours of love. Spent many late nights cutting, sewing, turning the tiny pieces of fabric inside out and stuffing with fillings and attaching the buttons and ribbons. Phew! Although, the sewing may need some improvements as my fingers are tweetching from holding the needles for toooo long, overall I liked what I see. All 15 of them!


If you are interested to sew them, it's actually quite easy. I've used jelly roll as the height was just nice. I've used 2 different types of fabric for the front and back. Put them with right side facing and trace out the alphabet. I've used free hand to draw. Sew onto the drawn line and leave about 1" for turning.  For the corners, I've snip off for ease of turning.  After I've turned them to the right side facing, stuff them with fibre fillings and hand stitch them close.  I've also sew some cute buttons on them and cut a 5" ribbon to attach to the alphabet and buttons. Insert the ring into the loop when you sew. There! You are done.

My big girl wakes up this morning and saw the alphabet keychains and asked for one in Pink! Sigh. I'm already so busy trying to finish up my christmas sewing without her asking me to sew her every single presents that I've sewn. So I said "ok, but can I give you after Christmas cause mummy can't finish my sewing as it is." She said "ok. but I want all my alphabet name". And I said "ok, I'll sew them for you coming birthday in Jan". Big smile from daughter.

Now, tonight I can get to do some more sewings.  Keep coming here to see what I've done.  I've saw some great ideas from all the nice blogs that I visited. Have no time to share now as I've many more sewing to do. Will post some links when I'm done with my christmas sewings. So, till then, merry sewing!

Saturday, December 11, 2010

Christmas sewing in progress

Got to say, I'm really happy that I've finished some of my gifts, so now, 30 more to go... : P

Here's a preview of what I've made these 2 days.
2 cute baby pillow
2 of my friends are pregnant so I've made some small pillows and baby changing mats for them. For the pillow, I've used the towels that I've bought earlier for this projects. The cartoon print are so cute.
the original baby wash towel
Basically, I just fold the towel into half and sew the long edge and one of the short edge. For the kitty one, as the print is in the middle, I've to fold the towel so that the kitty face is right in the middle. See below.  Then, sew along the long edge and on one end of the short edge. The other edge let it be open for you to insert the inner case.
fold them at the wrong side and sew along edges
As this is only the case, I've sewn an inner case and fill up with fibre filling to be inserted back into the case.  Easy right?

Before I go and talk about the changing mats, I have to show you another cute cushion I've made for my girl. She saw the hello kitty baby pillow and demanded to have one! I explained that its' for a baby and besides, it's too small for her. Then, she cried....I'm shocked. Anyway, thank God I've another hello kitty towel. So I made her a cushion to hug in the car. I've used 2 towels to make the front and back so that it's duo-face.  She's finally happy. And Daddy said that it's well done and he thought it was bought from somewhere! : )


front

back

Basically, I just sew the 2 towels together along the 3 edges on the wrong sides. Then I turn them out to the right side and insert the inner cushion and then the stuffing. Sew them tight.


Ok, now back to the baby changing mat. I've created a simple baby changing mat from a big changing mat that I've bought.  As it was really big, I've cut them into 2 and added my own fabric and sew ontop of the plain side.  I've made 2 changing mats from there.  One for a girl and one for a boy. Added the ribbon and it's all done.


Any, finally, for all of you who are rushing the Christmas sewing like me, keep it up and keep smiling as you work!
happy girl with her new cushion!

Thursday, December 9, 2010

Christmas gifts in the making..

Oh. I'm in a furious mode of crafting and sewing now that Christmas is around the corner. Not sure if I'm able to finish up all the presents. hmm.. last resort, will have to buy them at the shopping malls.. But I would really like to sew or made something specials to my friends this Christmas.

Do you want to see what I've made so far. Not a lot but that's all I can do after I've put my kids to sleep at 10pm and worked till 2am. My mind is not really in the good stage as I'm really tired. Somehow, I've made lots of green. It's the Christmas colour after all right? They are pretty easy to make as a slip cover over a note book. Just that I'm using jelly rolls and had to sew the long stripes together and find the right combination of fabric takes up alot of my time. I especiallyl like the one with ruffles but my husband likes the one with pokka dots and stripes. Which do you prefer?

4 fabric book covers and more to come...

Did I mention that my girl is having her 6th birthday bash in January? Gosh..I'm so busy up to my neck to make something for her. In Singapore, parents usually will do a big celebration for their children's 6 year old birthday as they are in Kinder 2 and this will most likely be the last big birthday party thaat they will be having before they step into Primary 1 of serious studying and examinations. So sad right. So for now, I'm also rushing out her invitation cards. That little lady has requested that we go for Pink and Yellow colour schemes because Pink is her favourite colour and Yellow is the favourite of her BFF Jun Kiat. But yesterday, she told me to change it to Blue as Jun Kiat has changed his favourite! Children are so flickle-minded nowadays. sigh..

Wait till I'm done with the inviation cards designs and I'll post them here again. So long..back to work and sewing tonight. Gombatte!

Friday, December 3, 2010

It's a season to be giving...

December is a very busy month for me, like all Christians. Thinking about gifts, buying them, wrapping them and even trying to get hold of friends during church service on Christmas Day is itself a tiring affairs. I'm always grateful and happy when Christmas draws near every year. But at the same time, the panic feeling that I've not done with the Christmas shopping list keeps me on my toes till the Big Day arrives.

This year, I thought maybe I could make some of the projects for my friends. My sister told me that her friends read from my blog about the lovely dolls and crafts and had wished that she could buy them. So, I thought it would be a good idea to give them away.

Well, it's just 3 weeks from Christmas so I'm getting real Busy now with the sewing. Could hardly get things done these few days. Bought a new Ikea wardrobe for big sister to keep her things. Isn't the colour cheerful?
Kept her stay at home clothes in the drawers and her books and play sets in the upper decks. She loved them and was jumping up and down when she saw the re-arranged room. I took the opportunity to clean up her room and sorted out her things. My, she really keep lots of junk in her drawers! That took me a whole day. I was actually on vacation leave for the last 3 days but never got to do any sewing at all. The 2nd day was a hairdo day. Went to rebond my hair (make my curly wavy hair straight) and coloured them. Was at the salon chair from 11am till 5.30pm! My bottom ache after the long hours of sitting. Today is the last day of my leave. Guess what I'm doing? Well, my mother in law had to visit a doctor so I'm taking care of baby today. Hence, no sewing again. I'm actually taking a break writing the blog while she's having her nap..shh...

And Christmas is drawing nearer and nearer....EEkkks...What am I to do!! I've not yet done with my sewing : ( Got to burnt midnight oil now till christmas. I"ve had in mind so many things to do and sew. Got to prioritise them now else I'll never be able to finish.  Will post the gifts soon, if I can get to them tonight, at least.

Last month was my husband's birthday and my daughter made him a nice photo-card in a frame. Bought it from Ikea and she decorated it with stickers, draw lots of hearts and draw the whole family of 4.  So sweet of her. isn't it nice?