Thursday, April 28, 2011

I'm back!

Did you think I'm gone for good? Well, I almost did : P

Had to wash, fold and pack the clothes back into the respective wardrobes. Clean the house, map the floor did so many housework that I don't have energy to step into my sewing room to do some sewing. I know if I did. I'll never stop and then the work get piles up and I'll get more depressed by days. My husband is very sweet that he didn't complain about the dirty house and messy table which I've piled up high with the things I've bought from our trip to China. Still finding a way to sort them before I put them away. Also, gosh, those many many photos that we took (actually, it's my husband who took most of them). Got a total of 9G!

Anyway just to share some of our trip to China here while I get my act together and sew something I can share. We've travelled, in the span of 13 days, to Shanghai, Hangzhuo, Wuzhen, Suzhuo, Wuxi, Nanjing, Tao Hua Dao... Lots of bus trips and long rides and of course, shopping for Xihu LongJing tea leaves, Silk pillow and mattress protectors, etc etc.


At the airports with our luggages

Famous xiaolongpao shop at Chenghuang temple

see any resemblance? At Shanghai Mdm Tu's wax museum

pretty flowers at Suzhuo


special black maize. it's natural and not coloured

my girls went mad with the big tub!
Nanjing bridge with 2 levels
 
flowers again
and again. can't stop. they are so pretty!

baby with the rattle at a store


Add caption

bought her a bubble sword

pretty food

Tao Hua Dao


 I love to travel. We did a few Free and Easy trip to Japan, Hong Kong, Switzerland, Austria and Australia. I would love to do this the same way but not with the kids. China is too vast to cover alone without a guide. With kids, it's mission impossible. Maybe I should ahve another blog on travel and I can post more photos and even my detailed itinerary. My friends said I'm crazy when she saw my plan. It's detailed with train schedule! Sigh,, maybe next time when I've more time. Till the next time, my friends! Enjoy the photos

Friday, April 8, 2011

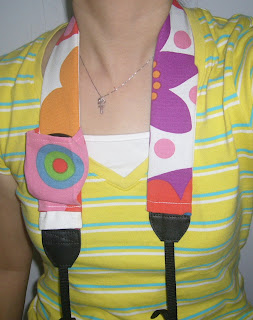
Camera strap with len pocket

I'm going on a long trip overseas next week, so I will most likely be absence from the blog.. Will you miss me ?  : P

In preparation for the trip, we had made a big purchase - a D60 Canon DSLR! My husband had one Minota DSLR but we decided to buy another newer one so that I can also share and use it sometime to take picture of my finished projects. Not sure if it'll help since my photography skills leave much to be desired. I"m always too eager to take picture once I have finished my sewing which is a bad decision since it's mostly at night and the lighting (or the lack of it) is apparent in the pictures. Must change this impatience nature of me..

Anyway, back to the topic on camera. I wanted to give my new camera a new image. So decided to sew a camera strap cover with len pocket. I saw alot of tutorials here, here and here. It was amazing.

Since I'm just a few days away from the trip and I need to finish up packing for the whole family and clean up the house, wash the clothes, dust the bed etc etc.. I decide to go for a quick and simple one.  Will make more strap to change when I have the time. Ideally, I would prefer to use different fabric scraps and sew them together but well, next time then. One thing for sure, it will have the len pocket as I feel that it's a necessity.

Use a medium weight fabric from Ikea and cut 2 pieces of strap measuring 25"X 3". This will differ depending on how long your original strap is. I've included seam allowance of 5/8".  For the pocket, it's 5"X 4.5". I intend for the finished strap to be 2"wide so the pocket piece will need to have box pleat for it to stay in shape with the strap.

You can read the tutorials from the blogland as I pretty much did the same steps. The difference is my pocket. I'll not post any tutorial or picture of the steps taken as I made a BIG mistake along the way and was in a rush to finish up the strap.  In my zombie state (I had a cough and had taken 10ml of cough mixture), I have accidentally sew the pocket upside down! Gurrh..can't even unpick since it was sewn to the 2 long side seams already! I had to discard the whole thing and start all over again.

So, here is the only 2 picture of the finished strap. I'm happy at the colour though. Can't wait to use them : )

see the nice len pocket with box pleat?

here's me with the strap on my neck and len cap in the pocket!

Thursday, April 7, 2011

Sewing gifts

Didn't realised that this post is sitting in my draft mode for 1 month!  Thought better late than never, here goes.

Although my baby is now a toddler at 1 year old, I still love to make babies things. Good thing that I've colleagues who are having babies soon. So, I can still sew and give them away.

I"ve earlier made them baby shoes and decided to make a matching onesies for them using the same fabric that I've used for the baby shoes. I've put a interfacing at the back of the hearts that I've cut out from the leftover fabric to give some body. When I sew, I've iron some freezer paper inside the onesies directly behind the hearts so that the fabric will not pull when I sew.

don't you think the shoes matches the onesies?

I've also finish a tutu skirt that I've promised my niece. Added a purple lining skirt as well so she can wear them out as well. For variation, I've actually pulled the 4 layers of tulle up at different height to give it volume and dimension. Hope she likes it.


Wednesday, April 6, 2011

Pretty pettiskirt

My wishlist has one item down and that's a pettiskirt! I've managed to make one for my girl this week. I've followed the tutorial from Made-it-and-love-it. It was a great tutorial. The pretty picture of her girl made me want to try one immediately. But wait, gotta order the non-fray chiffon overseas.

I took her advice to order from here and the service was great! My delivery was delayed due to the mixup at the Singapore Post office but the sale person Martin was specially nice and patience with me in directing me to the relevant people. Finally got it last week. I order 2 colour schemes as I wanted to make 2 for my 2 girls - blue and pink!


Since I"m kinda want to stretch my dollar, I order double of the quantity for 1 pettiskirt so that I can save more in bulk purchase. But, the result is, I got to measure and cut the longggg slippery chiffon. It got especially messy when I've to measure out 1080" TWICE! Sigh..on hindsight, should have just order the exact amount to save my time in measuring...Anyway, I've used my towel holder to help me roll out the chiffon for cutting : )
The ruffle part is particularly therapetic! I love how the sewing machine does the job and it felt magical.


And from the ruffles, came the final skirt!

skirt is really full as it's double layers and so so soft!

Notice the big safety pin infront?? I haven't got the ribbon in the correct pink shade so it's still 1% undone. Will sew that in later. I did 1 thing different from her tutorial. That is the elastic band. Didn't put it till I finish the whole skirt which I find it to be easier since you don't have the long pieces of ribbons getting into your way. The whole chiffon and ruffles really can messed up the sewing.

This is really a labour of love. It's not difficult but really time consuming to measure and sewing through longggg longgg pieces of chiffon. But the result is really amazing! Love the pink and can't wait for my girl to wear them. Will post picture of her wearing when I get the ribbon done!

If you are thinking of doing this, go ahead and order the chiffon. It's really save alot of time cutting the width. I don't see the pre-cut ones in Singapore. I've ordered mine 6" wide as my girl is 6 years old and needed the length. The satin waist piece is bought from Arab Street at $4/yard. But you actually don't use 1 yard for this. I intend to use the left over chiffon and satin to make a match top.

Now, I need to take a break before I start on the other blue one for the younger sister. Anyone wants to join me in sewing the pettiskirt? We can sew together virtually : )

Friday, April 1, 2011

handphone cozy

Did I mentioned that I've lost my beloved white samsung flipcover handphone? Sob, it went missing when I put in the toilet cubicle of a hotel that I went to attend my church friend's wedding dinner. I was very sad as all the photos of my baby are in it and I didn't back-up! My husband tried to call the number but the person who picked up the phone just shut down my phone. So, gone with the wind.

Anyway, had to get a phone. I didn't consider iphone as my husband already had one and it was heavily used by my girl to play games. Didn't want another at home, so I resisted and bought a new white (yes, white again) Samsung (yes, I love samsung design) Galaxy Ace. It was quite light and looks abit like iphone with touch screen and all. Bought a data plan at $39 monthly with it so now I can read my mail and blog anytime without turning on my laptop. Ok, I didn't use to have this as it didn't dawn on me that I need them. Well, now that I've it, I'm making lots of use of it.

To protect my phone from being dropped and accidentally smashed to pieces, I sewn a cozy to keep it. Used a turquois coloured polka dots and strips cotton fabric to make the main cover and inside, used a padded cotton fabric which was left over from my name quilt. I've added magnetic snap infront and attached a clip at side incase I want to snap onto a lanyard. It's about 5" by 3" finished size.  If you are interested, I've added a short tutorial below.

Material for outer cover
2 pieces of 5" X 3.5" stripped cotton fabric
2 pieces of 2" X 3.5" polka dot cotton fabric
2 pieces of 6: X 3.5" iron on interfacing

Material for inner cover
2 pieces of 6" X 3.5" padded cotton fabric [if not available, you can insert a padding with the inner fabric]

Other materials
1 piece of 4" X 2.5" strip to be the snap strap
1 piece of 1.5" X 1" strip to be the clip strap
1 piece of 4" X 2.5" iron on interfacing
1 clip snap
1 magnetic snap

Instruction
Sew front cover piece
1. Cut the fabric and sew the stripped and polka dot fabric together. You can decide if you want the polka dot to be top or bottom. I've choose the stripped to be at the top. Sew with 0.5" seam allowance. Do the same for the other 2 pieces.  Press the seam open. You now have 2 pieces of 6" X 3.5" fabric.


2. Iron on the 2 interfacing to the wrong side of the 2 pieces of fabric.

Sew clip strap
3. Fold the clip strap into half with right side facing so that it's now 1.5" X 0.5". Sew with 0.25" seam allowance on both long edges. Turn it right side up. Press. Insert the clip through the strap and fold into half again. This is ready to be inserted to the seam of the cover.


Attach 2 cover pieces tegether
4. Pin the 2 cover fabric with right side facing, matching edges. Insert the folded clip strap to the side of the cover, about 1" from the top edge. Sew around cover from right to left using 0.25" seam allowance, leaving the top edge unsew. Clip corners.

Attach magnetic snap to front strip
5. To attach the magnetic snap, draw the 2 slits on the top middle of the cover fabric (wrong side). You can just eye ball the position and use the snap back piece as a tracing tempalte.  Use seam ripper to cut the marked area to make 2 slits. For better reinforcement, insert a piece of interfacing before you put in the snap back piece and snap. The snap piece should be place on the right side of the fabric.

Sew inner fabric
6. Sew the inner padded fabric together with right side facing each other with 0.25" seam allowance but keep the top unsew. You pin them together, matching the edge, and start sewing from the top right corner, down to the bottom and up along the left seam. Same steps as above but you leave a little gap at bottom of the inner layer for turning later. Turn the cover right side out.

Assembly of both covers
7. Insert the inner fabric into the outer cover so that the right side face each other inside. Align the side seam and pin in place. 


8. Sew around the top opening circumference using 0.25" seam allowance.  Flip the cover out and through the gap in the seam of the inner piece. Push the inner layer inside the cover and you are almost done.


Snap strap [sorry, no photo here]
9. The last part is to attach the strap to put in the other part of the magnetic snap. Iron the 4" X 2.5" interfacing with the snap fabric strip.

11. Fold the fabric with right side facing so that it is now 4" X 1.25". Sew around along the long edge and one short edge (L-shape) with 0.25" seam allowance, leaving one side of the strip unsew. 

12. Attach the other half of the magnetic snap using the same method as above. Make sure that the front facing of the snap is on the right side of the fabric.  Once done, turn the strap over to the right side.

13. Sew around the top edge again with 0.25" seam allowance.  Fold in the raw edge of the opening and sew it to the back of the cover. 

14. If you like, attach a cute butterfly button on the snap using hot glue and you are done!