Tuesday, May 29, 2012

Sewing for Kids


I made a sleeveless hoodie for my girls last Sunday. It was a request from my older girl as she is into hoodie now.

It's all about attitude when wearing one!


I followed the pattern from the Japanese sewing book:

knit hoodie with attached skirt

from this book " Simple girls and boys clothes"

Didn't sew the attached skirt since it will be more versatile. My 7 year old is wearing size 130 and my 2 year old is wearing size 100.  I thought the hood and the kangaroo pocket were slightly small.  But since it's from stretchy jersey knit, it's still okay.

My kids love their new hoodies. I've bind the arm hole, pocket hem and waist band with ribbed knit that has more stretch to it.

Little sis ran forward to be in the same pic as Big sis

she waves her hand enthusiastically

Big sis not interested to have her in...
see disappointed look on little sis face! poor girl!

It was easy to follow instruction, even if you don't understand japanese since the picture is quite self explanatory.


Don't she looks lovely in those hoodie?


I'm working on some more knit sewing so come back again, cause I'm Sew into Knit!


Monday, May 28, 2012

New Look 6968 Dress


Made this dress a while ago but didn't have time to take photo of it. I love the pleated sleeves and darts at neckline. 

But this dress really has lots of pleats and darts! A total of 10 sleeve pleats and 22 darts on the neckline, bodice, skirts and the lining! I think after tying the knots at the end of the darts, I've gotten so efficient!

The fabric is Red cotton with polka dots that I got from Spotlight. I line it with a dark red polyester that was in my stash.  I used size 10 for the top and size 12 at waist and below. Shorten the hem a little.

I'm happy with the blind hem stitch that I did using the tutorial from Ashley.  Even though I don't have the blind hem sewing foot, I just sew very slowly and get the seam allowance to be consistent when I sew. Most of the time, I got a really nice blind stitch so I'm quite happy with it.

Wednesday, May 23, 2012

Dresses for dolls


I really love the Oliver + S book on 'Little Things to Sew' as the projects instructions are so clear and the end results are so pretty. But it does takes time though cause there are many details in sewing the project which makes the final product really professional looking.
I wanted to sew some doll clothes for my girls' dolls since they look so pathetic with the lone costume that comes with it. I measure the height of the dolls and went ahead to sew up the doll clothes from the book.
The dress came up so pretty with the mix of colours. But it didn't fit! My doll, even though says 18" tall, was too fat to squeese in the clothes. Thank godness the 16" doll can wear it, even though it was slightly long. I think I got to customise the doll clothes then. I've not even sew up the buttons yet.
To make up for my mistakes, I made elastic-band skirt for the rest of the dolls so that they have skirts, not realising that 2 of the dolls are actually boys. I really fail as a mum : (

So, need to sew up some pants soon before all the dolls have identify crisis!

Anyway, I also sew up a wrap skirt for my girl which she prefer to use it as a cape. Just some random photos. Enjoy!


Monday, May 21, 2012

Art Smock


I've long since want to make this when I saw them on many of the Japanese sewing book. It's useful since it's like a tunic that pull over the head and with the long sleeves, there is no worry that the kids will dirty their clothes.

I was browsing through one of my favorite magazine Cucito.


And then, I saw this art smock.


Find the similarity? Yup! I got the exact same fabric. Bought this polyester fabric from Daiso for $2 but it is only 70cm X 100cm or 27" by 39" so it was not enough to sew up the full smock. Just enough to cut out the front and back. 


So I went back to Daiso thinking of getting one more. But that color was out of stock! So I decided to get the blue and white stripe available there, thinking maybe it will still looks good with the mix. And I'm glad I did.


I think the mix of print makes the animal print pop up more.  It was really easy with only 3 pattern pieces - front, back and sleeves.  Add elastic to the neckline and sleeves and you are done.


The pattern calls for bias tape around the neckline to be use to enclose the seams as well as using it as a casing for the elastic band! smart.


So now, she is safe to play with the paint and messy stuff! 


It looks so cute on her. Maybe I should just sew up a few more for kids of my friends.

Saturday, May 19, 2012

Tapered chiffon top


I'm so pleased with this tapered chiffon top that I made using a yard chiffon that I got on sale from chinatown at $3. It was a steal cause the blue chiffon was so pretty.
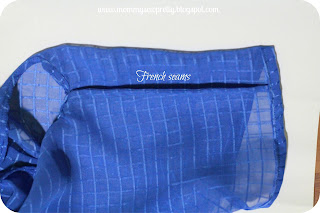
Since chiffon does fray alot, I decided to use french seams to treat all the seams.  For the neckline and sleeve, I fold over twice and enclose the raw edges.


I especially like the way I tried to match the checked lines on the chiffon. Added the small pocket in front since it appears to be on most chiffon tops that I saw in the shop. Next time, I'll make it bigger though.


For the hem, I did a rolled hem using my serger since I was having trouble sewing the curvy edge.


I cut the front to be shorter than the back so that it will have a tapered effect.  I wish I had made it longer behind. Oh well, nex time then.  Oops, I looks so awkward! 


Didn't follow any pattern for this as I trace my existing top for this.  I'll be making another version of this with a longer tapered back and more loose fitting to have a flowy effect.  

Thursday, May 17, 2012

Patchwork Pouch


I made this little pouch for my girl to store her Chinese word cards. The cardboard box that came with the cards came apart so I did a quick (or not so quick) sew to make her one so that she will not misplace the cards.


Instead of the usual one-fabric-sew-it-up thingy, I decided to do it differently this time to do a patchwork. I have alot of beautiful quilting cotton scraps that was left over from my previous sewing projects. It was a waste to throw them away so I just stored them and it gets piled up in no time.

I'll share a simple tutorial how I sew this patchwork pouch here.

Sew up all the stripes of scraps, try to find those with the same width so that it looks more or less consistent. But it is up to you. Sew up enough to make the pouch. I just eye ball the side. It's alright to sew more than less. Press the seams open.

Then, cut the pieced fabric into 2.5" long stripes, across the stripes that you have sewn. Cut up enough for the pouch. This will allow you to have different fabric print on the same stripe.


I use a earth tone long stripe of fabric to sandwich between the 2 colourful stripes for added interest. Sew up the side, with right side facing. This will make up the width of the pouch so cut the middle fabric to make up the required width. Press seams open.


Add another stripe below the earlier block to make up the required length. Top stitch on the stripes. Press seams open.

front view

back view

(Sorry, not photo here)
Next, for the inner layer, I get a floral cotton fabric, the same size as the pieced fabric and sew them together, right side facing. Sew all along the edges, leaving a 2" gap opening for turning over. Turn the bag right side out from the opening and press flat. Fold a 6" thin elastic band into half and insert both the raw edges into the opening and sew shut. Top stitch all the 4 sides and you have the fabric ready to sew the pouch.


Choose which directional print you like and with right side facing, fold up one short end to make the pouch pocket (make sure it is long enough to cover the cards). Sew up the 2 side seams, right side facing. You then pinch the bottom corner together and stitch across 1.5" from corner to create the base.  More instruction here. Make sure that the base is large enough to fit in the cards.  The portion above will be your flap of the pouch. I flip in the 2 sides to make it more tapered.

This is how the bag looks when it's close with the elastic band.


Simple and pretty. Good to use up those pretty fabric too!

Tuesday, May 15, 2012

Stripe Tea Dress


If you are following me on Pinterest, you will see me pining chevron and stripes on my pin board like crazy. I don't really see a lot of chevron print around here so I just make them using the regular stripe fabric.

Recently, we had a special Mother's Day celebration in our church called " Tea with Mum" where all mothers were encouraged to wear a 'tea-coloured' dress on Mother's day.  I think my orange chevron dress has the vintage 60s feel to it.

I took my inspiration from this dress that I pin in my board.

I didn't follow one pattern for this dress.  I used an existing bodice from New Look 6968 but changed it to V neck.  As I wanted the chevron effect on the bodice, so I piece 2 stripes on bias at the centre so that they create a chevron effect.  As I didn't want the waist darts to spoilt the effect, I pivot the darts using Gertie's tutorial. It's a bit hard to visualise the method but I think I did ok.  I especially like how the stripe meet at the centre quite nicely.


For the skirt, I wanted a really full skirt like in the 60s so I used the entire width of the fabric and sew up 2 rectangles.  I did have to pleat ALOT to make it fit the top bodice. 


I also added pockets since recently I fell in love with pockets and feel that all my skirts should have them. I needed to keep my handphone with me all the time and I don't carry handbag with me all the time.

The cotton stripe fabric is abit light weight and hence see-through, I underline it with a white cotton that I've on hand. Maybe I should use some polyester cause it make the dress a quite heavy but then, it makes the skirt really fluffy and full!

I love love how the dress looks so 60s and the orange is so bright and springy. Do you know what?

I got a prize for dressing up to fit the theme on Mother's Day!  I was so surprised and happy. I think nobody in church realized that I made the dress and I was really pleased : )

Monday, May 14, 2012

Paper Pieced Tote Bag

I've a new found love - Paper Piecing or foundation quilting. 

Paper pieced quilts are made by sewing pieces of fabric onto a temporary or permanent foundation. You cut the fabric pieces according to the pattern and add in the seam allowance and sew along the drawn line on the pattern. When you use different fabric print and colour, it create some interesting pictures.

There are many free pattern available online for you to try it out.  I love this at Pinterest.  For a start, I decided to start simple and downloaded this free flower in a pot pattern to try.  It was supe easy since all the pieces are labeled so that you know which sequence come first.  It also helped to used up some of my odd shaped little scrape that I find it hard to tose away since they are so pretty.

After I've sewn it up, I was contemplating if I should just frame it or make it into a min quilt or bag for my mum. Since Mother's Day is coming, I had in mind to sew my mum something. She doesn't hang picture on walls except for family photos and she doesn't need a quilt. So, it will be a bag then.


I iron a medium weight interfacing behind the pieced flower motif and sew it to another fabric, Right side facing and then turn it Right side out to make into a big pocket for my little tote bag.

The bag has fleece padding inbetween the outer and inner layers. I sew the fleece to the Wrong side of the inner fabric with rows and rows of straight stitches. Added a pocket and sew the inner and outer bag together.


I was excited to try out my new pink leather handle straps which had to be sewn on by hand. It is a bit tricky to sew through the layers and although it looks crappy inside, it looks good on the outside though : )


I gave this bag to my mum for Mother's Day and she was very pleased with it : )

To all the Mothers out there, Happy Mother's Day!


Thursday, May 10, 2012

Skirt Tankini Tutorial - Sewing (3)


The final post on the Tankini tutorial.  

Read the Part 1 on Pattern and Part 2 on Cutting first. 

Bodice
1) Pin the front and back bodice, Right side facing, along the side seams.  As I'm using a ruffle fabric, do remember to match the seams/ruffles. Pins as many as you like so that it will not shift out when you sew.


2) Using a stretch needle and increase your stitch length slightly, sew the side seams together.  You can serge the seams for a neater finish.


Skirt
1) Pin the side seams of the skirt, Right side facing, together. Try to align the ruffles at the side. Sew.


2) As I've cut the skirt using the full width of the fabric, I need to do some gathering to fit the skirt to the bodice. Using the widest stitch length (4 on my machine) and longer tension (8 on my machine), I sew a row of stitches near the waistline of the skirt. This will automatically gather my skirt. Leaving a long thread after my last stitch, I cut off the thread and use the leftover thread to adjust the skirt width to fit the bodice. 


Sewing the skirt to the bodice
1) Position the bodice and the skirt like so. With the front bodice facing down, Right side face out and the skirt facing up, Right Side face in.

sorry, this is the pic of skirt before I sew the gather
2) Pin the skirt to the waistline of the bodice, matching the side seams as close as possible. Be care to ensure that your ruffles stays in same direction too. 


 3) To allow for stretch, I use a zig zag stitch to attach the skirt to the bodice.  Sew all around the skirt waistline.


4) Pull out the gathering stitches that you've sewn earlier so that only the final zig zag stitch remain.


5) Flip to the Right Side and you have your tankini with attached skirt.


Bottom Pantie
1) Place the ruffle, Right Side face up, to the back pantie (right side face up). Pin the sides and baste it using the biggest stitch.


2) Then, place the back pantie over the front pantie, align the sides, with Right Side facing each other.  Sew the side seams together. You can serge the seams if you like.


3) Sew the crotch together. I actually sew the crotch Wrong side facing and then flip it out and sew again to encase the raw edges, similar to that of a french seams. I think it will be more comfortable this way. 

4) Sew the elastic band to the leg area using the tutorial from Creative chick at play or Zaaberry. Just remember to keep the elastic about 1" shorter than the width of your leg opening. Pin the elastic to the edge of the opening so that the elastic lay flat for the front part but slightly stretch in the back portion. Using zig zag stitch to attach elastic to the leg opening and then fold over the elastic so that it is hidden and use the Stretch Twin needle (note: It's STRETCH twin needle) and finish the leg opening.


5) for the waistband, I use 2 methods to finish up both pantie so you can see which one your prefer. For the little sister, I fold over the waistline and sew it all around, leaving a 1" gap to insert the elastic. I've used a 1" elastic for the little sister.  For the big sister, I use the same method as the leg opening and sew up using the thin 3/8" elastic.

front

back
Straps
1) To encase the raw edge on the top of the bodice, cut a piece of lycra, 2" wide and attach to the front, Right side facing together. Sew.


2) Cut a piece of elastic same length as your strap and sew it on using zig zag stitches. Then, flip the lycra to cover the elastic and fold over to the wrong side. Using Stretch twin needle, sew the strap to cover the edge.  [Zaaberry's tutorial has more pictorial explanation]


2) Sew the strap on with the elastic, following zaaberry's tutorial.  For the 2T, I use a shorter strap like 38" and the 7T I use 46". You can use longer strap and then cut accordingly but make sure that the elastic encased in the straps are slightly longer than the strap. I also crossed the strap behind so that it will not slip off so easily.


The final version for Big Sister.


Little sister's version

The back view

Can you see that she enjoys her new Tankini?


That's all folks!
I'll be most grateful if you can share with me your finished tankini.
Let me know if my instruction is not clear.