Tuesday, December 31, 2013

An Update of my Winter Sewing


Whew!  A month has flew past so quickly. I'm back from my 2 weeks Japan trip and back to reality... Past 2 weeks was wonderful.

We went from freezing Hokkaido to modern Tokyo to Bayside Yokohama. Experienced skiing, visited the famous Shiroi Kohibito Park and bought music box from Otaru, made a trip to Studio Ghibli, Odaiba's Trick Art Museum, Asakusa and finally Yokohama's Nissin Noodle Museum and Hakone onsen trip etc etc...

Rusutsu Ski resort

The weather in Hokkaido in Winter is no joke. We experienced -5.5 degree celsius.  So how did my home-made clothes fare in this cold weather?

I'm pleased to say that it was holding up well, as my kids says they felt cozy.  We just had dinner and they went out of for a while to run in the snow.


Disclaimer: They had heat-tech inner layer before putting on the sweater.  Usually, when its really cold, we add a long sleeve t-shirt and an outer coat. So, 4 layers in total.

I also made them wool coats using Ottobre patterns from 6-2012.


My version.


I interface the pieces according to the pattern instruction. In addition, I also interline them with 3M thinsulate so it was really bulky.  I sew them together with the lining pieces and treat them as one piece. Only interline the front, back and sleeve so the sleeve was a bit tight. But the girls love the coats and said it was warmer than the store bought ones : )

A closer look at the internal of the coats. I used satin for the lining so that it will slip off easier.


Size 104 suits my almost 4 year old while my older 8 year old is using 134. Even with 3 layers inside, the coat fits, although snug fit.

Fabric is a wool blend from Fabric.com and the buttons and interfacing were from Textile centres.

I've learnt a lot from sewing these coats and I think although they are not perfect, I'm really pleased with the outcome. But I don't think we will get a lot of wear since Singapore is so hot! Anyway, the coat cost way lesser than store bought, even though I pour many hours to cut and sew them. It was really a labour of love so I think I will not sew any coats in near future.

And of course the velour tunic is so pretty.


I'm still sorting the photos from the trip and I thought of starting a new blog on diy travelling with kids to Japan since I really did a lot of research and travelled quite often to Japan.  Let's see how it goes.

Rainbow bridge at Odaiba, Tokyo


Tuesday, November 26, 2013

Furry Vest - Simplicity 1787


A new warm vest for the upcoming holiday in Japan.


Pattern from Simplicity 1787 size 8.

The faux fur is from the earlier Neck Warmer project. I've used up most of the 1/2 yard that I got from Fabric.com. It's a pity that I got just 1/2 yard cause it is really soft and furry.  The inner layer is micro fleece in lilac.


Size 8 fits her well and I added the ribbon ties so that the vest will hold together.


Now, I just need to finish up my 3 wool coats and I'm all set for the trip in December!


Tuesday, November 12, 2013

black knit dress


Made a simple dress for my winter trip to Hokkaido.

Pattern from the japanese book that I had earlier made a ribbon dress from.


The pattern is for non-stretchy materials but since i've used knit, I skip the zipper. But my knit is quite thin and stretchy so I underlined with with a thick lycra in black. I sew the them together, wrong side facing, and treated them like one piece before sewing them together. So, it was a bit heavy since my lycra is quite heavy.


It is quite loose for me and just nice for layering. The V neckline is also quite flattering.  I thought I can pair with a belt and see how it looks.


hmm.. looks quite nice.  Another option when I feel more dress up. But I think it will still look nice with tights and boots.

Tuesday, November 5, 2013

Quilted Winter Coats


This time, my winter sewing is from one of my Japanese sewing book. This one even has an adult version, if I so wish to sew one myself I can do it.


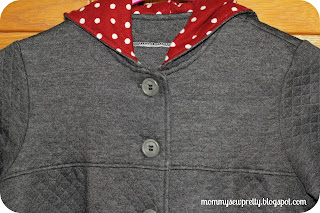
This is a simple coat and only the hood is lined.  I've found this grey cotton pre quilted fabric from Spotlight recently and thought I can create this look with this coat. I lined the hood with a brown flannel with polka dots that I've in my stash for ages.


The dress has a front yoke.


Long row of buttons of course. There is some subtle pleats below the yoke. I love the button holes options on my machine, makes every thing really quick.  This time I even use the button sewing option and eliminated any hand sewing of buttons!


And 2 cute pockets.  I love the fold over details on the pocket top.  For my oldest at size 140, the pocket position is a bit low.  But for my younger at 110, the position is just nice.


Here's a close up of the front facing.


Here's the back view.  There is some pleats below the back yoke.


And of course, I've to make another one. How can I leave out the younger one? In size 110 which fits my 3 year going to 4 year old really well.


And there you have - 2 coats side by side.


Friday, November 1, 2013

Velour Tunic (Ottobre 6/2012)


Another sewing from Ottobre.  I really love Ottobre!

This is a tunic using stretch poly/cotton velour in purple that I got from Fabric.com.  For $3.99 a yard, it was a steal! I used the Aamurusko Velour tunic from Ottobre 6/2012 design at size 104 for my 3 year old.


My fabric is not wide enough so I cut my back bodice not on fold and add 1cm seam allowance.


When I first saw this tunic, I love the ruffle front layers. The pattern suggested using knit of the same color tone but I decided to use the same velour fabric so it frays a little and I had to treat the seams.  I was lazy and used small zig zag stitch on my sewing machine but the result is not ideal. So went back to my serger (thread the serger with matching threads) and this time, the result is much better!


The neckline is bind with the same fabric so it was really thick. Had to go slow. I used stretch stitch on my machine for the sewing.  I also used my serger for the tunic hem so that I don't have to worry about wonky hems.


I also love the long sleeve hems. The technique here to gather the sleeves with elastic and attach the hem band is interesting. It give a gentle gathers with the need to manually adjust the gathers.


The waist is also gather in the same way. So much easier.


There! I just love how the tunic looks.  The velour does shed a lot so having a serger is really handy but it is not necessary. You can also use zig zag to finish the seams.


Tuesday, October 29, 2013

Colour block hoodie dresses

Another Hoodie, this time a dress!


The hoodie on the left is from the pattern from Ottobre design 4/2013 'Pentagram Hoodie' size 140 while the one on the right side is adapted from 'Beagle Boy Striped Hoodie' size 104.  I said 'adapted' because I use the measurements of Beagle Boy hoodie but copy the design from Pentagram Hoodie because the smallest size offered is only 128.


Let's talk about the Pentagram Hoodie first.  The original pattern uses different knit print for the pockets, hood and cuff so I decided to color block using pink and purple. Both favorite colors of my girls.

On my oldest request, I change the combination so that they are not identical. Something about the 3 year old wanting to wear the same clothes as her Big Sister but the feeling is not mutual!  The fabric used is Winter fleece from Fabric.com. The fleece is not as soft and fine as the micro fleece but still soft but much thicker.


Changes made to the Pentagram Hoodie:
  1. Added lining to hood [cut hood lining slightly smaller so that lining will not show out at edge]
  2. Omit hood ribbing since I'm going to line the hood

I use the decorative stitch for the hood facing, sleeve hem and the joint between the bodice and hem band.

For my younger girl, changes I made:
  1. Lengthen the hoodie to tunic/dress length using 128 size of Pentagram hoodie
  2. Added a new Hem band of 5"
  3. Flare out the hoodie by 1.25" on both sides so that it is more A line [I think this looks much better than the original Pentagon hoodie]
  4. Add Kangaroo pocket using the same template in Pentagram hoodie
  5. Add lining to the hood


She loves to put her hands in the gigantic pockets.  Sleeve is very long and it covers her fingers.  The hood is large and totally cover her head when she pull it over. I think the A line shape is more flattering than the original Pentagon tunic straight cut design.  


Add bias tape to the pocket opening
I used another decorative stitch on my machine for my younger girl so that it will be different from her sister.  Notice the color blocking is different for both girls?

Note to self:
I used stretch stitch (2.0 zig zag and 2.5 stitch length).  The tension used is 5 and pressure foot is set at 3 to account for the stretch fleece.  I also used walking foot for the entire sewing.