Tuesday, November 26, 2013

Furry Vest - Simplicity 1787


A new warm vest for the upcoming holiday in Japan.


Pattern from Simplicity 1787 size 8.

The faux fur is from the earlier Neck Warmer project. I've used up most of the 1/2 yard that I got from Fabric.com. It's a pity that I got just 1/2 yard cause it is really soft and furry.  The inner layer is micro fleece in lilac.


Size 8 fits her well and I added the ribbon ties so that the vest will hold together.


Now, I just need to finish up my 3 wool coats and I'm all set for the trip in December!


Tuesday, November 12, 2013

black knit dress


Made a simple dress for my winter trip to Hokkaido.

Pattern from the japanese book that I had earlier made a ribbon dress from.


The pattern is for non-stretchy materials but since i've used knit, I skip the zipper. But my knit is quite thin and stretchy so I underlined with with a thick lycra in black. I sew the them together, wrong side facing, and treated them like one piece before sewing them together. So, it was a bit heavy since my lycra is quite heavy.


It is quite loose for me and just nice for layering. The V neckline is also quite flattering.  I thought I can pair with a belt and see how it looks.


hmm.. looks quite nice.  Another option when I feel more dress up. But I think it will still look nice with tights and boots.

Tuesday, November 5, 2013

Quilted Winter Coats


This time, my winter sewing is from one of my Japanese sewing book. This one even has an adult version, if I so wish to sew one myself I can do it.


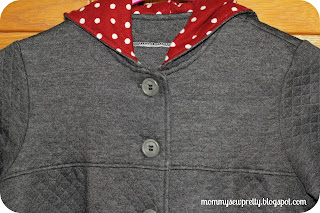
This is a simple coat and only the hood is lined.  I've found this grey cotton pre quilted fabric from Spotlight recently and thought I can create this look with this coat. I lined the hood with a brown flannel with polka dots that I've in my stash for ages.


The dress has a front yoke.


Long row of buttons of course. There is some subtle pleats below the yoke. I love the button holes options on my machine, makes every thing really quick.  This time I even use the button sewing option and eliminated any hand sewing of buttons!


And 2 cute pockets.  I love the fold over details on the pocket top.  For my oldest at size 140, the pocket position is a bit low.  But for my younger at 110, the position is just nice.


Here's a close up of the front facing.


Here's the back view.  There is some pleats below the back yoke.


And of course, I've to make another one. How can I leave out the younger one? In size 110 which fits my 3 year going to 4 year old really well.


And there you have - 2 coats side by side.


Friday, November 1, 2013

Velour Tunic (Ottobre 6/2012)


Another sewing from Ottobre.  I really love Ottobre!

This is a tunic using stretch poly/cotton velour in purple that I got from Fabric.com.  For $3.99 a yard, it was a steal! I used the Aamurusko Velour tunic from Ottobre 6/2012 design at size 104 for my 3 year old.


My fabric is not wide enough so I cut my back bodice not on fold and add 1cm seam allowance.


When I first saw this tunic, I love the ruffle front layers. The pattern suggested using knit of the same color tone but I decided to use the same velour fabric so it frays a little and I had to treat the seams.  I was lazy and used small zig zag stitch on my sewing machine but the result is not ideal. So went back to my serger (thread the serger with matching threads) and this time, the result is much better!


The neckline is bind with the same fabric so it was really thick. Had to go slow. I used stretch stitch on my machine for the sewing.  I also used my serger for the tunic hem so that I don't have to worry about wonky hems.


I also love the long sleeve hems. The technique here to gather the sleeves with elastic and attach the hem band is interesting. It give a gentle gathers with the need to manually adjust the gathers.


The waist is also gather in the same way. So much easier.


There! I just love how the tunic looks.  The velour does shed a lot so having a serger is really handy but it is not necessary. You can also use zig zag to finish the seams.