Friday, September 30, 2011

Naruto soft toy

Seen this guy around?

My girl loves to watch the animation. So, the next time she asked me was to make her a Naruto soft toy and costume. Compared to the orange jumpsuit, I guess the soft toy is a easier option.

She first drew out the Naruto (front and back) for me on a piece of paper.


I traced them out carefully using a fabric pen to a piece of muslin coth, front and back.


Then, I asked her to coloured them using fabric pens. After which, I pin them right side facing together and cut them out. Sew around them and leave a 2"gap for turning.

This is how it looks now, after stuffing and stitching back the gap. To make it stand better, I've snipped off the 2 corners at the bottom (just like how you are making a bag base).
front view

back view
She was so happy with this. It's so simple and totally handmade : )
Try this with your kids at home and you can just draw any cartoon characters and it's a fun activity to spend the afternoon.

Tuesday, September 27, 2011

KCWC 2011!


I've just signed up for the Kids Clothes Week Challenge!

Oh my! Am I insane? With the work and all??

But I wanted to try the challenge with other sewers. It will be fun, I think. And stressful too, but then, it's going to be very exciting! Can't wait for October to arrive.

Now, must go and find some inspiration. Already got plans to make a vest, a coat and a dres for my girls. I've even cut the fabric but just didn't get on to sew them. So, it's good that I can sew them just in time for the KCWC!

all cut up but no time to sew!

can you guess what this will be?
Now, to find some clothes for my toddler...let's look through my Pinterest board for some ideas.

If you are still thinking about this, come on and join us at the KCWC at elsie marley!

Monday, September 26, 2011

Sewing projects in the pipeline..

I fell in love with this dress that I pin on Pinterest.


So I took the courage and order it online at Butterick website. It was USD$8.99 for the online version. 

Was so excited last night when I downloaded the pattern pieces, all 30 pages of it! Lay them out and scotch-taped them, cut them and put them aside for cutting of the fabric later. Havent' bought the fabric yet but look forward to get one in the lovely fuchia colour. So bright and cheery.

Hopefully I'll not pull hair and shelf the project half way long the road and I'll be able share my dress soon. But first, I will do a muslin first, just in case I spoilt the precious fabric.

Also in the pipeline...on my Pin!


Friday, September 23, 2011

Bow-tie dress sew-along - Part 2

My dress is completed. Took me 2 days but here's the final product.

It looks quite similar to the one on the book cover. But maybe I used a lighter material, so it lay quite flat on the side but it looks okay when I wear since my hip hold it up well.

The fit on me is great, especially on the upper torso but the skirt is abit full which may make me look pregnant if I'm not careful. I hope the pleats stay cause it flare out along the dress part and disappear.

If you are sewing this dress, and don't know japanese, you can refer to the glossary of japanese sewing terms found on my tab above to help you along.

Japanese pattern book is quite easy to follow as there are alot of digrams and if you understand simple mandarin character, you will do fine. This dress have 8 steps:

1) make pleats on dress front and back
2) make bow tie and attach to dress front
3) sew side seams of dress
4) make pleats on sleeves
5) attach sleeves to dress
6) sew facing to neckline
7) hem the dress
8) insert elastic band to sleeve opening

I'm unable to share in details the step by step tutorial as this is not mine to share and I'm afraid this is a copyright issue. But I'll share where I made the changes and point to note when making this dress. But if you need more instruction, I'll be happy to share with you. Just drop me a mail or leave a comment.

How to inteprete the drawing on book
1) Seam allowance is 1cm unless otherwise stated in the pattern. For this dress, the seam allowance for the hem on dress, bow tie, neck facing and sleeve opening are not 1cm. Please refer to the book.

2) Polka dots on pattern pieces indicates interfacing being applied. For this dress, it is only the front and back neck facing. Apply to the wrong side of fabric.

3) Area coloured in stripped means making pleats. For this dress, you have pleats on the dress front and back, sleeves and bow tie.

Front and Back pleats
1) Always iron after you made the pleats, to make it neat and easier for you to attach the neck facings.

2) Refer to pg 49 for C1 pattern (step 1) on how to make and sew the pleats.

Bow tie
1) After you have gathered the pleats in the middle of the bow tie, the width at centre is around 5cm or you will not be able to fit into the centre flap.

2) Bow-tie centre flap is not given in pattern but since it is a rectangle, just need to cut out based on the size given in the book.

3) As my fabric is not enough for the layout as stated in the book, I sew 4 pieces together to make the bow tie piece instead of the one piece. So, please ignore the sewn line you see across the bow on the dress.

Sleeves
1) The original sleeve pattern call for 4 pleats but since I've not enough fabric, I take out the 2 pleats at side and keep the middle 2 pleats on sleeve cap.  I also take in some length.  If you want to do that, you need to adjust the sleeve curve after taking out the pleat to make it smooth. So my final sleeve appear less puff and smaller as compared to the original.


2) Sewing sequence: sleeve cap's pleats > underarm sleeve length > elastic casing on sleeve opening.

3) Refer to the diagram on pg 50 for C1 to get the direction on sewing the sleeve (step 4) and attaching sleeve to the main dress (step 5)

4) I use this special tool that I got from a shop at Textile centre to help me move the elastic band through the casing. It really works and is less tiring than the safety pin.


5) Note facing when you insert the sleeve into the arm hole of the dress. Be sure to align the seams. The sleeve piece have front and back direction so make sure you check the direction of the sleeve before you insert to the dress.


Neck facing
1) Follow instruction on pg 50 for C1 pattern (step 6) to sew facing to dress.

2) Make sure you align the side seams of the facing and sleeve when you sew the facing to the dress.

3) After you have turn the facing to the inside of the dress, to prevent them from flipping back to the front, sew over the pleat lines on dress front and back.


Okay, will show you more photos when I wear the dress. For now, do keep sewing and drop me a mail if you need clarification on sewing steps.


Thursday, September 22, 2011

Sew along for Front Bow-tie Dress - Part 1

Hi Hi
I hear you and I"m with you in the choice of the dress. I"m going to do a sew along for the Front Bow-tie dress that was on the cover of the book.


It was my favourite too and I decided to sew it for my colleague's wedding this Sunday.

So, if you haven't bought the book yet, get it. You'll not regret it. I'll give a step by step guide here but the pattern pieces will not be available here as it is copyrighted. 

So here, part 1 of the sew-along. Oh, by the way, I've uploaded a list of useful Japanese sewing terms in my new tab. You can refer to them if you stumble over any of the words in the book.

Pattern pieces for C3 (page 32)
Front piece (C)
Back piece (C)
Sleeve (C3)
Bow-tie front piece (C3)
Front neck facing (C)
Back neck facing (C)

Material
Light weight fabric like cotton, linen or seeksucker should do fine.  For S and M size, the book recommend to buy 2.3m of 150cm wide fabric. 

I'm 160m with small bust but big butt, so I went for size M.  As this is like a A-line dress, the bust size is more important so take reference from here.  You can refer to the size chart given in the book to find your size.

Other material includes some light weight iron-on interfacing for the neck facings and some elastic band (0.7cm or 1cm) for the sleeves.  Need about 30cm for M size. Or you can just measure your arm to get the measurement.

Preparation
1. Cut out the pattern pieces, add in the seam allowance.  It is all 1cm unless otherwise stated on the cutting diagram. Mark the notch, tuck lines and centre of the sleeve.

2. Iron on the interfacing to the Wrong Side of the 2 neck pieces as shown. Don't iron on the seam allowance.


To be Continued for Part 2 tomorrow on sewing the Tucks/pleats.

So run down to Kinokuniya tomorrow to buy the book and sew along with me : )

Wednesday, September 21, 2011

Another Sorbetto Top, with Sleeves!

Remember the Sorbetto Top that I made?

As I said, it was a wonderful pattern and so simple. So, I decided to make another one. This time with sleeves since I actually don't really like to show my flabby arms.

Had intended to draw a simple sleeve pattern and adjust on the way but....Yippi!! I found a sleeve pattern on the blog made just for the Sorbetto Top! Amazing hah!

It's wonderful and you can drop by Sew, incidentally to take a look. I've made a link to her blog and you can get the sleeve pattern from there.

Basically, I sew  the top exactly as how I would do for the Sorbetto Top. You can download the FREE pattern from Collette website.  Then I serge the arm sync and sleeve before pinning them together, Right Side Facing. Note that the sleeve pattern has Front and Back so do be careful when you attach the sleeves.

I'm using size 4 so the sleeve is abit larger than the arm sync.  No problem at all. Just align the side seam with the arm sync and then do some gathering near the top of the sleeves so that it is abit puffy at the top. 

The sleeve stuck out more at the end so I pinch 1" in from the outer edge at the middle of the sleeves and sew it close. It looks better now. 

From the cutting to sewing, it took me less than 2 hours! I think I'll do better next time since I spent some time to figure out the fit for the sleeves to the arm sync and adjusted the form of the sleeves.

You like how my top look? I've used a satin black bias tape for the neckline and leave the sleeves as it is.


Detailed look at the sleeves.

I wore it to work with a black pencil skirt. It looks so pro! I got lots of  compliment in the office : )


But since I've tucked in the top, it's abit short. So, if you intend to wear the top tucked in, please add another 2" to the hem.

Tuesday, September 20, 2011

Angry Bird toy Carry-all

Did you see these Angry Bird toys from the background of my Angry Bird lantern project?

Found this from one of the shop at Hougang Central. It's a pack of plastic angry bird toys.  They so adorable that I had to get one for my girls. At least, the toddler can play with this one, while the older one plays it on her dad's iphone.

The set has 4 angry birds, 3 pigs, some building blocks to build the pigs' castle and a catapult.

As the toys are made of hard plastic and some of the paint came off from all the throwing and smashing on hard floor. So I thought that it will be good to find them a nice and cosy home to carry around when not in use. The fabric cover can also double up as the field for throwing the angry birds. It definitely prevent some serious injury to those poor birds!

This is what I've made. 
 
<>
<>
 
inside of the carry all with fleece pockets

Nothing fancy or too precise. I just used some fleece that I had and made pockets with flap to keep all the angry birds and the pigs in their separate 'home'. I was thinking that if I make a big bag to put them together, the constant knocking and brushing of the toys in the same bag will knock off some paint.


See, they are happily hiding in their home : )


To provide some padding, the inner layer is made from a sandwich of fleece and canvas that was left over from my other projects. The front cover is Tree pink, from the Doohicky Designs Hoo's In the Forest series. I just made the outer layer slightly bigger than the inner layer, and fold over the edge of the outer layer twice and sew the edges to the inner layer like a little quilt.


I also made a small pouch to keep the building blocks for the Pigs' castle and the catapult. The fabric is from Ikea. The house print is just the nice size for all the blocks. I sewed a velcro strip at the opening.


doesn't the catapult looks exactly like the iphone game's version?
 Now she can carry them around the house and keep them properly when not playing.


all rolled up and ready to go!

I haven't decided how I want to tie the bag together. Maybe a ribbon or velcro?

Monday, September 19, 2011

Angry Bird Lantern

Let me share on my girl's pre-school's lantern project for the mid autumn festive that I did with her a week ago. It was a environmental friendly project and we were supposed to use only recycled materials.

Well, as you can guess, my girl wanted an Angry Bird lantern.  We brainstormed and came up the idea of making a Pig's castle with the King pig inside and the red angry bird swinging onto the castle.  The angry bird will be suspended mid air using a fishing net from one end of a cloth hanger while the King pig will reside in his 'castle' with the eggs!

The main 'castle' is made from a discarded chicken essense box with cut out infront and on the top so that I can insert the candle and King Pig.  Did you get a glimpse of the King Pig sitting in there?

Here's the closeup view.

I've used an empty chicken essense glass bottle for the green pig. Paint it green with acrylic paint all over and paste the eyes, ears and nose in with mod podge.  The eyes, ears and nose are basically drawn on white paper, coloured over with markers and outlined with black marker.

We attached the 'crown' on top of the pig using mod podge.  Do you recognise the 'crown'? It was part of the christmas tree ornament ball, the top part that is attached to a string. 

King pig drying out the paint with the Angry bird in upside down posture!

My girl wanted the Bomber Bird but since I only have Red paint, we go for the Red Bird instead. We use one of the Christmas tree ball and paint it all Red and overlay with white for the tummy.  Waited for it to dry before sticking the eye brows, eyes and orange beak. The eye brows and eyes are pain white paper but the beak was from the cut-out discard from the chicken essense box. I just draw free hand and cut it out with the outline.  Looks like the real thing yah!


I attach the angry bird using a fishing net to one end of the cloth hanger and on the other end, attach the 'castle'! Totally recycled and home-made! Now, the angry bird can swing over and hit the 'castle' as you carry the cloth hanger. So fun!

I lit the tea candle and insert through the cut-out into the 'castle' to make it lantern-like.  The yellow paper trim on top of the 'castle' was done by my girl as it is suppose to look 'castle-like'. We even got the eggs infront!

The king pig in the 'castle' with the eggs and the 2 cotton cording on both ends to attach to the hanger.
We are so pleased with this lantern, except that we got the acrylic paint all over us and the floor!! It's hard to paint a round ball and it kept tripping and rolling on the floor while we dry them. We inserted one end of the paintbrush through the top of the ball and dry it upside down on a bottle. Not very stable and hence the frequent trip overs when we accidentally touch it.

Anyway, these were the paper lanterns that I bought for them that is less accident prone. It had an LED flickering light in it and it's light weight because it was made from paper. My girls walk around with it, or rather, my little one drag her's on the floor as the lantern was abit big for her. 


We walk around our place on the night of the mid-autumn festive (13 September) and ate mooncakes and drank green tea! It's part of the must-haves for this festive which celebrate reunion of families under the Full Moon!

image source: http://www.chinatownconnection.com/

Sunday, September 18, 2011

Japanese Sewing Book & a Sew-along

Oh, how I loved the Japanese sewing book. The instruction is so clear with the picture. Since the last time I blogged about it, I went to town and bought some more! 

More books on woman and girls. I couldn't resist the pretty photography and lovely dresses.

Do you like the dress that I sew from one of the Japanese sewing book?

How do you like sew along with me using a pattern from the Japanese pattern book?

Sounds good?

This one is Feminine Wardrobe (フェミニンワードローブ) by Jinko Matsumoto (松本 仁子)


There are so many pretty outfits in there and I'm not sure which one should I start first? I have a wedding lunch next Sunday and I hope I can wear one of these dress to the lunch.  Beside the sweet Ribbon Bow dress on the book cover, I'm also considering the 2 below.  What do you think?

riboon ties one piece
2 tone slip dress
If you are keen to try it with me, you can buy the book (at Kinokuniya if there's one near your place or at Amazon). Do let me know which pattern you are interested to try. I'll start sewing on Wednesday so will announce the sewing design on Tuesday.


I'll be doing some simple translation from Japanese to English for those of you who had trouble with the language. But if you have the book, you will know it's quite simple to just look at the picture and follow.  The translation will be over at the new page at my tab.

Happy 1 year anniversary!

I just checked my past blog history and realised that it's one year since I started blogging on my sewing projects.

How times flies. I remembered when I first started, I was comtemplating if I'm up to steam in sewing and posting every week. But I guess the weekly posting helped to push me to keep up with my sewing. If not, I'll have piles of ideas in my head and all still collecting dust up there and none that come into fruitition.

Want to guess what are my more popular posts?

1) Neck pillow  2) Doodle chalkboard  3) Toddler vest with harness

The past 1 year had been an exiting time for me. Juggling work, sewing and the kids. But I'm glad I took the challenge to have this little blog here. My horizon had widen greatly as I found so many creative and talented bloggers' wonderful blogs for inspiration and encouragement.  I'm aspiring to be like them on day to be confident enough to live that dream.

For now, I'm still dreaming a dream to open a little shop to sell my home made items but do I dare to dream this unthinkable dream? Time is tight with my work and the children and all. But I really drool when I look at the shops at etsy and dream that one day I can too have my little shop. It's a step of faith but I would like to see myself stepping closely to the dream. Hmm....shall I? Shall I not??

My dear friends reading the blog, should I try? What do you like to see in my shop, if I've pucked up courage to open one? Do give me lots of suggestions and feedback.

So, for the first anniversary, I shall do another blog giveaway. Would you like to receive a set of the Colour Pen roll? It will include the 6 colour pen/markers.  I'll be giving away to 3 readers.


Just post a comment and let me know what you like to see in my blog for a chance to win a set. Don't forget to leave your email address so I can contact you for the mailing address. I'm also accepting overseas readers for this giveaway so join in.  The giveaway will close on 24 September 12 midnight Singapore Time.

Saturday, September 17, 2011

A visit to the Museum

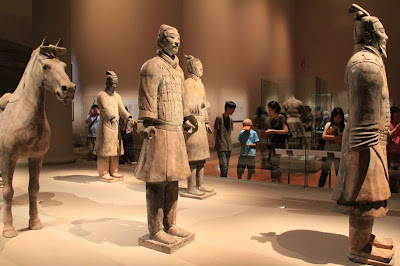
We visited the Asian Civilisation Museum not too long ago with the kids and all. They had the "Terracotta Warriors: The First Emperor and His Legacy exhibition which my hubby and I were interested to see.


We had always been curious about the terracotta warriors and if we had an opportunity in future, we would like to visit Xian to see for ourselves the tombs and terracotta of the First Emperor of China.

Here's some photos we took at the museum.


horse pulled carriage

close up on the armor

ancient monies

write up on the coin system


Well, if you are interested to see them, drop by the ASM before they are gone. It's a good place for the kids to learn more about history too. Oh, if you are PAssion card holder, you have discount. Child less than 6 is free entry.