These few days of travelling on the car really make me realise the importance of a good neck pillow. My girls were sleeping on the car and their poor heads are either swayed to the extreme left or right. So, I decided to make one for them that will bring them some comfort while on the road.
I didn't look for any tutorial online as it was a last minute project and I thought I could just draw free-hand and adjust as I go. I've also uploaded the template below. You can click on it and use it. Please do not make them to sell as this is for your own use only. Thank you.
Material
Any soft material like Flannel.
Fibre filling
Instruction
1) The template is actually 1/2 of the neck pillow folded along the short edge. So you will need to place the template along the folded edge of the fabric before you cut.
2) Fold the fabric so that right side are facing each other. Then place the template with the short edge along the folded edge of the fabric. Make sure that the fabric cover the whole template as you will be make a mirror image of the template.
3) Trace the template on the fabric and cut the pattern out using a 0.5" seam allowance. You will need 2 set of these pattern to make the front and back.
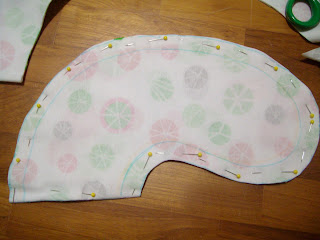
4) Open out the pattern so that you see the full neck pillow and place the 2 neck pillow with right side facing each other. Pin in place.
 |
| I've forgotten to take picture for this step. You can see this one which is already sewn |
5) Sew along the 0.5" seam allowance along the neck pillow. I started from the top of the neck pillow ( the convex side) that is the back of the neck pillow as later you will need to hand stitch the opening and I prefer this portion to be away from the kid's neck. Keep sewing slowly along and leave about 3" gap at the top for stuffing.
6) Before you flip the pillow over, you have to snip around the curve area. See the picture at step 4. The Concave portion, I've cut out a 'v' shapes so that it will not look crumpy when you flip over. For the other edges, I've used the scissor to snip around the seam allowance. Just be careful that you don't snip off your sewn line.
7) After you've done the above, flip the pillow over so that the right side face out. I've tried to stuff it to quite full so that it will give more support. Hand stitch the gap close and you are done!
I've really pleased with the end results. My niece and nephew have asked for one when they saw the one that I made for my baby. So I ended up making another 3 more!
If you are not sure what to make, I would recommend that you try this. It's so easy and cutting and sewing takes less than 1 hour. And the end result is amazing. Do share with me the picture of you neck pillow!


18 comments:
Thanks for sharing this tutorial! I always have to use my hand to support my 2YO when he sleeps in the car. This neck pillow will be useful for him :) Where do you get the flannel fabric? Looks good!
Thanks for your kind words. I got the fabric online from fabric.com. It was on sale then and I got a few designs.
wow, Eunice...it's great.
I used to try to make turorial but finally couldnt continue due to my laziness he he......
ps. can you log in to our 41th blog? I cannot neh, thesedays.
The picture of your baby is just so cute and precious. Thank you for sharing!
is the template the actual size?
Very beautiful and original blog! So many amazing ideas! Thanks for the inspiration! Glad to get acquainted, and go to visit me))))
http://handmade-by-mom.blogspot.com/
Could you tell me how much fabric to buy to make this?
hi
the pillow uses very little fabric. I think I use a fat quarter or a 1/4 yard. Just have to be careful with the grain of the fabric.
Thanks a lot for sharing this tutorial with us!!!
I will make some couples of home made neck support pillows for my kid to give them a perfect whole night's sleep.
Keep it up!!!
I was looking exactly this tutorial- thanks a lot!
Thank you so much ! This is really really useful ! Thanks for sharing !
what size is the pillow? How tall and wide? Can you post an actual size template?
Hi
The neck pillow measure 12" from neck to bottom and the widest across is about 11.5". It fits my 2 year old quite well. I think you can make it bigger to fit older kids. sorry, I don't have the time now to scan and upload my template. Hopefully I can do it soon since I got a lot of query on my neck pillow.
hello, thank you so much for the pattern :D it's very useful. just need to re-size the pattern to fit my brother or my little baby cousin :D
here's the photo of my neck pillow based from the pattern http://1.bp.blogspot.com/-R3aI2_ExvKI/UsuiLgn5zcI/AAAAAAAABGw/arp4posZjf4/s1600/C360_2014-01-06-13-02-30-787.jpg
What did you use to fill it
Hi Erin
I used polyester fiber fill which i got from Spotlight.
I wanted to make some also but kept thinking I need to use those "special" beads that they fill them with. I didn't even think of using fiber fill. Thanks you so much for sharing.
Post a Comment