Tuesday, September 28, 2010

Reversible lunchtime bag

I've always been interested in bags since young. I'll never have enough of bags, and my husband can testify to that! Bags for work, bags for church, bags for baby things, bags for shopping, etc etc. Big, small, fabric, leather, I love them all! So, I thought, the next step will be to make some with the beautiful fabrics that I've.

And so I did! Last night after I've finished making that blue lining for the blue tutu skirt I've made earlier, I went on to finish a reversible bag. I was thinking that I could use it when I go out for lunch. As it's a reversible bag, I chose a pretty pink floral print and a matching solid pink cotton so that both sides looks very sweet.  See the pretty bag below? I love the flower print and the reversible matching handles : )

It's not very difficult but tricky if it's a first time for you. Game to try?

Materials (you will actually use about 0.33m but if you are buying, min cut is 0.5m)
0.5m floral print cotton fabric for the outer piece
0.5m cordinated pink cotton fabric for the inner piece and base
fusible interface for the handle or bag if you like

Cutting Instructions (included a seam allowance of 0.7cm)
Floral print fabric
Main outer body -  30.4cm X 27.4cm (2 pieces)
Pocket - 14.4cm X 12.4cm (2 pieces)
Handles - 26cm X 5cm (2 pieces)

Pink fabric
Inner body - 30.4cm X 53.4cm (1 piece)
Base - 18.4cm X 13.4cm (1 piece)
Handles - 26cm X 5cm (2 pieces)

Sewing Instructions
Pocket
1. Place the 2 pieces of the pocket fabric with right-side (floral printed side) facing each other and sew around the pocket like a U shape leaving the top middle portion (about 4cm) unsew. Do take extra care if you are using print fabric as you don't want your motif to be upside down when sew the pocket. The opening side is the upright facing.  I've used the same fabric for the pocket but you can use the pink fabric for the inner layer of the pocket if you like.


2. Turn the fabric inside out from the gap on top so that the right-side (floral printed) face outside. Sew the top (unsew edge).


Sew pocket on inner bag
3. Fold the pink fabric for the Inner bag into half with the wrong side facing in. The folded fabric is now measured 30.4cm X 26.7cm.  Then, cut a 6cm square piece off the folded edge corner for both sides.


4. Place the pocket piece on the pink fabric. Placement of the pocket is up to you but it should be centralised and not too high or low as you will cater for the handle and base of the bag. Pin the pocket in place.


5. Open up the pink fabric so that it now looks like a Fat I. Sew the pocket in U shape leaving the top unsew.  You don't want a sealed pocket do you? : )

back view of the pocket sewn onto the pink fabric
 Inner bag
6. Fold the pink fabric again but now with the pocket-side facing in. Sew down the 2 side seams as shown.


7. Open the side seam and fold the botton opening (6cm square hole) inward and sew a straight seam across to close the hole. Do it for the other seam.


8. Now this will be the inner bag waiting for you to insert into the floral outer fabric. Keep this aside first.

Outer bag
9. Next, place the 2 floral fabric (wrong side up) with the pink fabric for base (wrong side up) in between as shown below. The pink fabric will form the base of the bag and note that the 0.7cm seam of the pink fabric will overlay the seam allowance of the floral fabric.


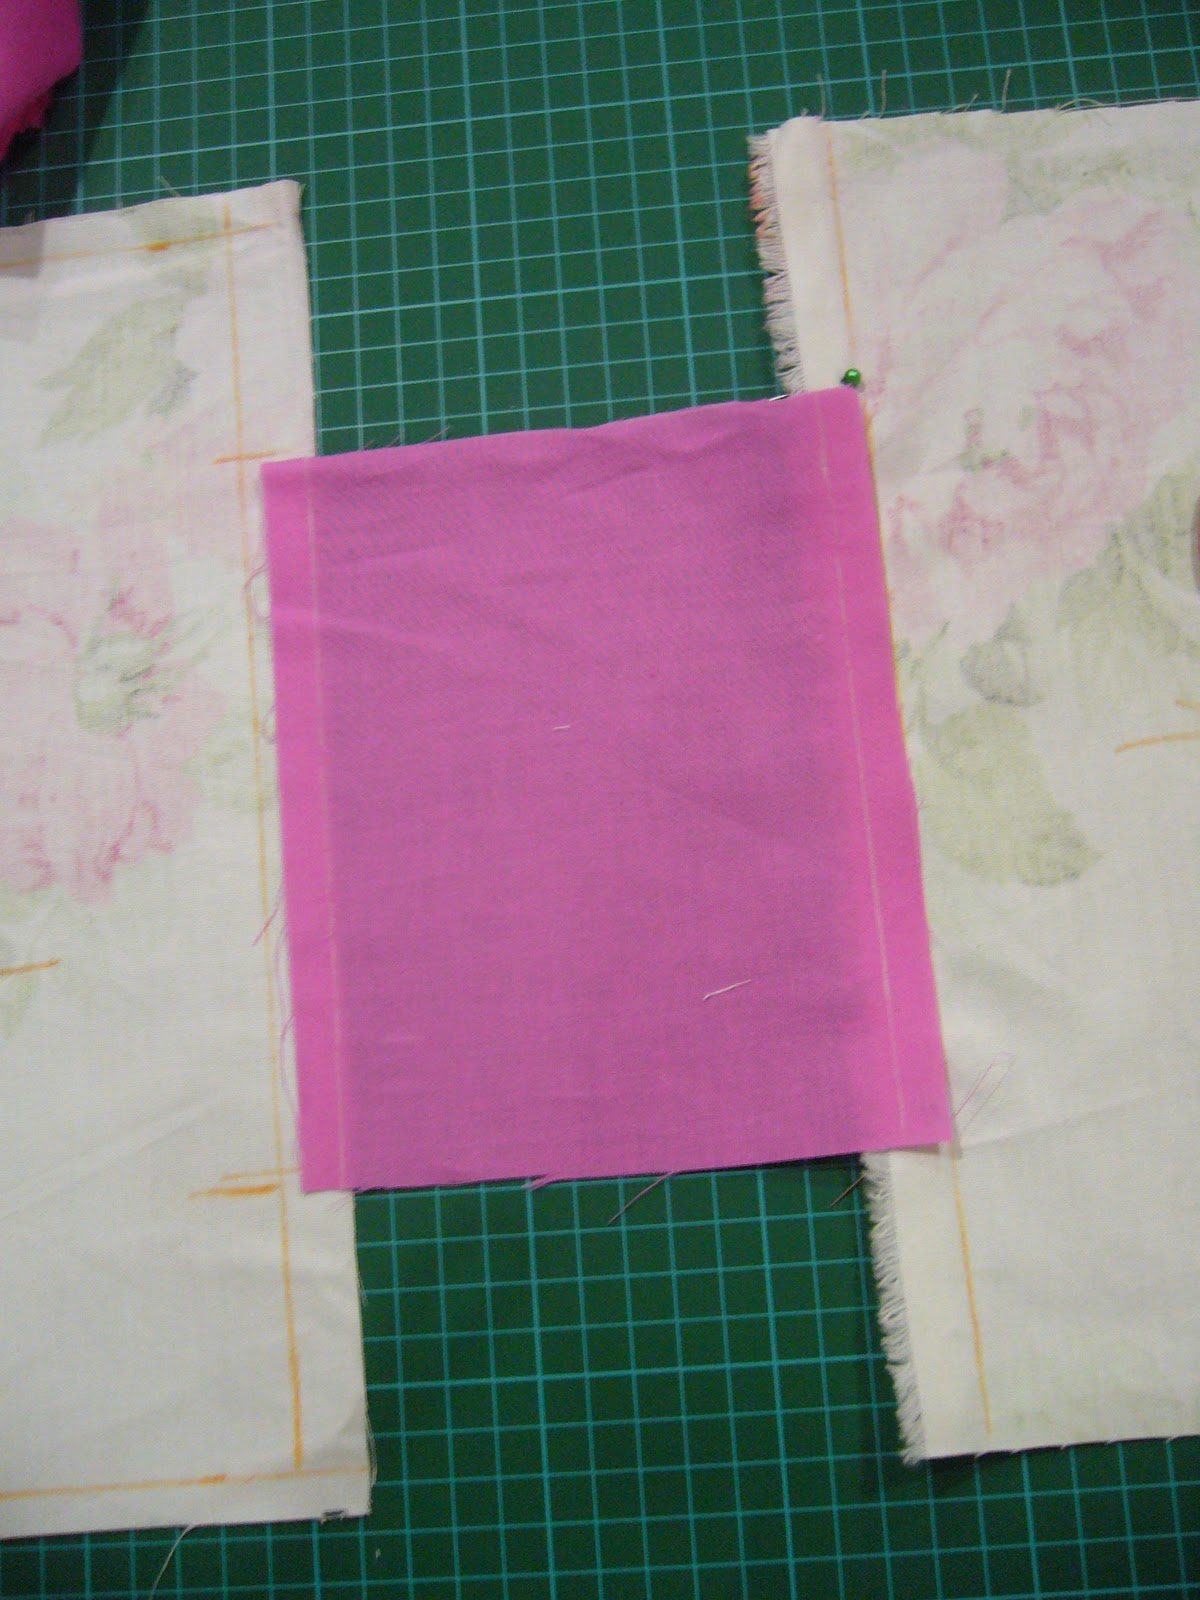
10. Sew the long edge of the pink fabric onto the long edge of both floral fabric as shown. Make sure that alignment of the pink fabric is in the middle of the floral fabric as you don't want your base to be loopsided.


11. Fold the floral fabric with right-side (floral print) facing in and sew the side seams, just like how you did the inner piece. Open the seams and sew the bottom opening together to form a base.

sew along the left & right seam with fabric print face in

sewn seams at bottom of both bags

Put 2 bags together
12. Put the inner bag (right-side facing out) into the outer bag. The outer bag is right side facing in. Note the side seams should align. Pin them in position and sew around top edges, leaving a 4cm gap.

2 right sides face each other or if you turn it out, wrong sides face each other. align side seams

13. Turn the bag inside out through the gap and sew the gap close.

Handles
14. Fold the 26cm fabric (right-side outside) lengthwise from both sides so that it is now 2.5cm in width. Do so for all the 4 strips. You can iron to make the seams straight.


15. Put a fusible interface on the wrong sides between the floral fabric and the pink fabric so that it is like a sandwich. Iron them in place and sew the 2 long edges, wrong sides together. Do that for the other 2 strips.


16. Pin the strip in position that you desired. I've used the pink facing strip for the floral outer side and floral facing strip for the pink inner side for contrast.  Secure them in position by sewing 1 round along the edge of the whole bag. Make sure that the strip seams are sewn inside.


17. Tada! You have your nice reversible bag. : )


Saturday, September 25, 2010

Tutu for 2 sisters

My fabric finally arrived! yeah! It's Layer Cake - Breakfast at Tiffany's by Fig Tree Quilts for Moda. Not sure what I'll do with it but since it's abit expensive, I need to think hard. Hmm..I've got many ideas but let's see....

Anyway, the last few days I've made 2 more tutus for the girls. Decided to do one for the baby too. I did 2 different methods from my previous tutorials. You can try this if you like this version which involves alittle bit more sewing but just as nice.

Blue Cinderella tutu (name given by D1)
pale blue tutu with satin ribbon bow

Material
tulle 3m long by 60" wide
1 elastic band (please include allowance for sewing)
blue satin ribbon (optional)

Instruction
Same steps as my previous tutorial in cutting the tulle and fold the 60" width twice lengthwise.  Final width of the folded tulle is 15"as I intended the length of tulle to be 15". So, you can adjust accordingly to your desired length by multiplying by 4.
can't see very clearly as tulle is light blue, folded into 4 layers (2 raw edges & 1 folded edge)

Sew 1" from top of the folded tulle lengthwise to make ready for the waist band.
pin 1" lengthwise throughout the whole 3m
Insert the elastic band through the 3m long waistline and sew the ends together.  The elastic band should be waist length of your child + 1" excess for sewing. Arrange the tulle equally around the wasitband so that the skirt looks full.  You can add the ribbon or any assessories if you like. 
insert the elastic band through the waist line. Use safety pin if you have difficulty pushing the band through

My hubby felt that the skirt looks abit translucent even though I told him that it's like this as you wear the leotard with it. But since D1 loves to wear it outdoor, I'm thinking of sewing a detachable lining that she can wear with it if she's not going for her ballet class. Else, you will have to wear a slack or pants underneath.
happy girl in her blue tutu

White tutu for the baby
simple white tutu

Material
tulle 2m long by 36" wide (2 pc)
1 elastic band

Instruction
This is very easy and can be done within 15minutes if you don't include the cutting of fabric. First cut 2 pieces of tulle of width 36". I've using 36" as I intended the final length of tutu to be around 9-10".  As this is for my baby (waist 17"), I don't need so much volume, hence reduce the tulle length to 2m.

Put the 2 pieces of identical tulle on top of each other and sew down the middle length wise.  I've used a blue thread as I want the blue thread to be visible on the finished tutu.

Fold the tulle lengthwise along the sewed line. Sew another line below the middle row about 1" from middle sewed line. This is the create a waistband.


Insert the elastic band into the waistline and sew the ends together. Arrange the tulle to cover the sewed elastic band.  You will see that there is 2 tier layers, one shorter infront and the longer behind.  See finished tutu below.
Cute baby in her new tutu

Wednesday, September 22, 2010

Pretty Fabrics

I had recently ordered some fabric online for my sewing endeavours. The array of fabrics really excites me and I wish I can buy all but limited $$. Some online store like Fabric.com offers really good values especially now that USD has dropped against SGD. So, I took the opportunity or rather excuse to buy some for my projects. You can see some of my purchase here. 

can't resist this. I love Amy Butler fabric
Kate Spain for Moda

Fandango by Moda

Couldn't resist to buy a Amy Butler. Probably use them to make a diaper bag or something. Bought lots of Moda fabric as I was thinking of making quilt for the 2 girls and maybe trims for their dresses, bags etc etc. : )

To save cost (as the purchase is in USD), I've made use of VPost at Singpost to purchase.  I've used them before, so quite ok with the arrangement. Basically, you can make use of the free shipping within USA and just pay for the shipping cost from USA to Singapore.  VPost will provide the USA address for you to key into the website so that the package will be delivered to that address and from there, Singpost will compute the shipping cost and inform you to pay before they ship to Singapore. Hopefully, I can see my fabric next week. yeah!

Monday, September 20, 2010

Knick Knacks Tutu

Over the weekends, I've sewed a nice tutu for D1. I've read about a tutu online that you can insert little knick knacks into the tutu skirt and has nice ribbon running around the waist. Think it was Martha Stewart's show.  I've made some localised adjustment in terms of size and measurement.


For those of you who are game to try this, it's pretty easy. Just some basic sewing skills (you don't even need a sewing machine, just that it'll save time if you have one) and lots of imagination.

Materials
60" X 1.3 m length of tulle
1" riboon of length 82" (cut into 2 strips of 22" and 60")
knick knacks / confetti or pretty things etc
same coloured thread
pins

Instructions
1. Lay the whole length of tulle and fold twice lengthwise so that now it's 4 layers and the width is 15". 1 side is the folded edge (which will be the waist) while the other side has 1 folded edge and 2 raw edges.


fold twice lengthwise


1 folded edge and 2 raw edges

2. At the folded long side (opposite to the raw edges side above), measure 1" and tack with pins the whole length. This will be your waist.


1" waist
3. Next, fold the short side in by 0.5" and sew tight. This will ensure that your knick knacks don't fall out when you sew later.

Here the waist line is below and the side 0.5" is pinned down

sew 0.5" side seam down
4. Now is the fun part. Throw the knick knacks into the other open side seam. I've used D1's hairband, hairclips and necklace for this projects. She seldom use them and can't bear to throw them away. So I've recycled it and put them in here so she can admire them twirling when she spins! You can use anything you want with your imaginations. Sew the 2nd side seam down so that they are trapped into the tulle pocket.

5. Use the biggest thread length on your sewing machine (or use gathering stitch) to sew the 1" waist length that you have earlier pinned. Be sure to leave a long thread at end of your tulle so that you will be able to pull the thread later to gather the waistline.


6. Take the centre of the tulle at waist length and mark with a pin. Then take the 22" ribbon and find it's centre and pin it to the centre of the tulle. I've use 22" as D1's waist is 22" so you can adjust it accordingly. After you have pin it down, flip the tulle over so that the ribbon now is below the tulle.


flip the tulle over so the ribbon lies below the tulle
7. Pull the gathering stitch on 1 end so that it gathers nicely and fits into the length of the ribbon. Wrap ends of ribbon on tulle and pin the position. Do the same for the other side of the tulle.
pull thread at end to form nice gathers at waistline
Wrap end of ribbon to tulle after you have gather the stitch

View of tulle with all the pins and gathers
8. Next, lay the other 60" ribbon on top of the tulle so you have the sandwich of ribbon, tulle and ribbon. Find the centre of ribbon and pin to centre of tulle. Try to fit the tulle inside the ribbon so that it is not visible outside the ribbon sandwich.

front of tulle with 60" ribbon pin nicely on waist
see back of tulle with ribbon edge folded nicely in the 2nd ribbon
9. Sew the ribbon to the tulle slowly from the short side, making sure that the tulle is within the ribbons sandwich. If you are using the sewing machine, at end of short edge, leave the foot but keep the needle in the tulle and turn the tulle and start sewing lengthwise down to the other end.
Start from short end first

Finished tutu
That the end of the tutu tutorial. The final length of tutu is 15". You can adjust the length if you want it to be shorter or longer. I'll post the picture of her wearing it soon!