Tuesday, October 29, 2013

Colour block hoodie dresses

Another Hoodie, this time a dress!


The hoodie on the left is from the pattern from Ottobre design 4/2013 'Pentagram Hoodie' size 140 while the one on the right side is adapted from 'Beagle Boy Striped Hoodie' size 104.  I said 'adapted' because I use the measurements of Beagle Boy hoodie but copy the design from Pentagram Hoodie because the smallest size offered is only 128.


Let's talk about the Pentagram Hoodie first.  The original pattern uses different knit print for the pockets, hood and cuff so I decided to color block using pink and purple. Both favorite colors of my girls.

On my oldest request, I change the combination so that they are not identical. Something about the 3 year old wanting to wear the same clothes as her Big Sister but the feeling is not mutual!  The fabric used is Winter fleece from Fabric.com. The fleece is not as soft and fine as the micro fleece but still soft but much thicker.


Changes made to the Pentagram Hoodie:
  1. Added lining to hood [cut hood lining slightly smaller so that lining will not show out at edge]
  2. Omit hood ribbing since I'm going to line the hood

I use the decorative stitch for the hood facing, sleeve hem and the joint between the bodice and hem band.

For my younger girl, changes I made:
  1. Lengthen the hoodie to tunic/dress length using 128 size of Pentagram hoodie
  2. Added a new Hem band of 5"
  3. Flare out the hoodie by 1.25" on both sides so that it is more A line [I think this looks much better than the original Pentagon hoodie]
  4. Add Kangaroo pocket using the same template in Pentagram hoodie
  5. Add lining to the hood


She loves to put her hands in the gigantic pockets.  Sleeve is very long and it covers her fingers.  The hood is large and totally cover her head when she pull it over. I think the A line shape is more flattering than the original Pentagon tunic straight cut design.  


Add bias tape to the pocket opening
I used another decorative stitch on my machine for my younger girl so that it will be different from her sister.  Notice the color blocking is different for both girls?

Note to self:
I used stretch stitch (2.0 zig zag and 2.5 stitch length).  The tension used is 5 and pressure foot is set at 3 to account for the stretch fleece.  I also used walking foot for the entire sewing.


Friday, October 25, 2013

Neck Warmer


I was tempted to try out these Minky Sherpa in baby pink from Fabric.com earlier.  It was quite pricey at $11.98 per yard so I ordered only 1/2 yard to try out.

When I saw it, it was really very soft and cuddly.  But also very dirty! They must have stored it at some corners and it got really dusty and dirty.  I wash it and it was good as new.  I'm thinking of lining the winter coats hood with these soft sherpa since I don't really have a lot.  But first, I decided to make these - Neck Warmers!

Scarf is nice but for kids, it looks really dangerous since the kids tend to tag and pull and i always have this fear that someday someone may pull it too tight and the kids may get strangled!  So, a short neck warmer will solve the issue.

It was super easy and I did it my way so here's a simple steps if you are interested.  I used the sherpa for the front and the back, I used the remanent micro fleece from the earlier hoodie projects here and here.

Materials
70cm long, 15cm wide of Minky Sherpa in baby pink
70cm long, 15cm wide of Microfleece in lilac
6" by 4" scrape of microfleece

1) Fold a piece of micro fleece of about 6" long and 4" wide, right side facing, along the 2 short sides and 1 long side, leaving a gap to turn it right side out.  Stitch opening close.


2) Pin the strap to the right side of the micro fleece. About 2" from the side, try to centralized it to the middle. Sew the 2 short ends down. 


See the strap become a loop for one end of the neck warmer to pass through.

3) Then sew the 2 long piece of sherpa and micro fleece together, right side facing.  Leave a gap for turning later.


My micro fleece fabric is not long enough since I'm using left over from my previous project so I sew 2 pieces together.

4) I decided to round off the corner after I've sewn the sides so I just hand drawn the curves and sew across it.


5) This is how it looks after I've trimmed the corners and also trim the sherpa along the seam allowance to reduce the bulk.  Turn right side out through the opening and stitch the opening close.


6) This is how it looks when you insert the end of one end of the Neck Warmer through the loop. 


That's all. So easy right? i think the size can even fits me! See it fits my dress form.


My girl loves it.  So does my colleagues in the office who saw it.  I've got many request to make but alas, I only have limited sherpa and its only in pink! Should I buy more?


It was so quick and easy that I made 2.  In a house with 2 girls, what do you expect. Everything times 2 or else!

Next up will be color block hoodies

Tuesday, October 22, 2013

Drawstring Flannel Hoodie


Another hoodie.  This time for my 8 year old.  I've adapted the hoodie from this jacket from Ottobre 4/2012 "Born To Run" size 140. [I'm making full use of my subscription to Ottobre : )]


I've used Alpine flannel in spring flowers for the outer piece and line the hoodie with soft micro fleece in sweet lilac, both from Fabric.com.  I wanted it to be slightly bigger so that she can layer it so went 1 size up. The fit is roomy but not too big, but the sleeve is already long with the cuff and hem band. So, I decided not to put it in. Also line the hoodie since it's going to be rather cold in Japan come December.


Since I've lined the hoodie the direction for attaching the hoodie will be different.  I follow the instruction in Ottobre 6/2012 Kettu Pettunen hooded velour jacket with faux fur knit lining as a guide.  But I also changed some steps since I didn't bind the front edge of the hoodie with ribbings.

no raw seams! all encased : )

Here's the steps that I did:
  1. Stitch pockets with zippers on front bodice
  2. Stitch the raglan sleeve to front and back bodice, top stitch
  3. Stich hoodie, insert grommets and attach to jacket
  4. Repeat step 2 and 3 (except for grommets) for Lining piece
  5. Place the 2 hoods Right Side Facing (RSF) and stitch the face edge, turn RS out and stitch 2.5cm from face edge to make the channel for the drawstring. [I use some cotton cord instead]
  6. Pin necklines of outer and lining seam allowance (SA) together and stitch back neckline SA together.  [This will ensure that your outer and lining hood stays together and don't move around when you wash or wear them]
  7. Pin the hem of outer and lining together, RSF, stitch. Turn RS out and your raw edge is now nicely concealed. 
  8. Stitch sleeve edge [This part is more complicated] Bring bottom edge of outer and lining sleeves end to end, pin and stitch together RSF. THe sleeves are not within one another. Pull the lining sleeve through the main sleeves and you will have your raw seams encased. No raw edge!
  9. Fold in the front edge for inserting of separating zipper so that your raw edge is nicely encased as well.  I'm sure there is a better way to do this but for now, this will do.  
  10. Insert cotton cord or drawstring through hood channel, stitch in the ditch along centre seam line on hood so that cord will not slip out accidentally.
There! You are done.  I managed to finish it in 4 hours, a long time i know, but I was trying to figure how to line the hoodie and hide the seams plus first time inserting grommets on a hood.


Closer look at the grommet.  I didn't have the tools to insert it so I just use my craft hammer and hammer it in! I covered the top with a piece of fleece though. Not too bad from afar.


Summary of the changes that I've made:
  1. Add lining of micro fleece
  2. Remove sleeve cuff and hem band
  3. Remove the zipper trim since my zipper is already so colorful.
  4. Conceal the zipper edges between the front edges so that all raw seams are enclosed.
front edge fold in seam allowance to wrong side and insert zipper.

I used ballpoint needles and walking foot to sew my fleece.  For the flannel, I just use regular 80 size sewing needle.  I realized that my stitch is even when I use Gutterman thread.  My cheap thread always result in skipped stitch and jammed my machine. So I decided to save the agony and just buy them, though they are quite expensive.

My girl loves the hoodie because it's so colorful and has drawstring in the hood with zipper pockets! It is also ultra soft. I was sad that I didn't buy more of these micro fleece for myself.

Since the sleeve is so long, she can fold up and show some of the cute lilac lining!


Friday, October 18, 2013

Elephant Hoodie


A new hoodie for my 3 year old.  The hoodie pattern is adapted from Ottobre 6/2012 "kettu Pettunen". 


This is a lined hooded jacket using size 104.  The fit is great for layering and not too wide.


I used the flannel with colorful elephants print for the outer shell and soft micro fleece in hot pink for the lining.  All the raw seams are enclosed between the lining, even the zipper edge. So proud of myself : )

Cute details like crescent pockets which is also lined in soft micro fleece.  I omitted the knit binding on the pocket opening and just use the Sew both shell and lining Right Side Facing (RSF) and leave a opening to turn RS out and top stitch.  Do remember to add in Seam Allowance (SA) if you are doing this way.


The instruction is great but I was stumbled for a while on how to sew the sleeves together for the main and lining pieces but it was a good experience and I'll use that for future lined jackets.  I am especially proud of the sleeve cuff that actually works.  I didn't use the ribbing but the micro fleece that is really stretchy. Just remember to cut the cuff so that the stretch is across  for your toddler to insert her hands though!


The seams are all nicely concealed and not raw edges. If I've used a reversible zipper, the jacket can be reversible. But I didn't thought of it when I buy the zipper but it is still nice to conceal the ugly raw edge away.


If you are doing the same way as I did. Do remember to add in SA on the pocket opening, front facing and hood facing because you need to sew the main and lining RSF and turn RS out so SA is needed.

The hood is nice and big for her head.


Don't you just love the bright colors and cute pockets!

Tuesday, October 15, 2013

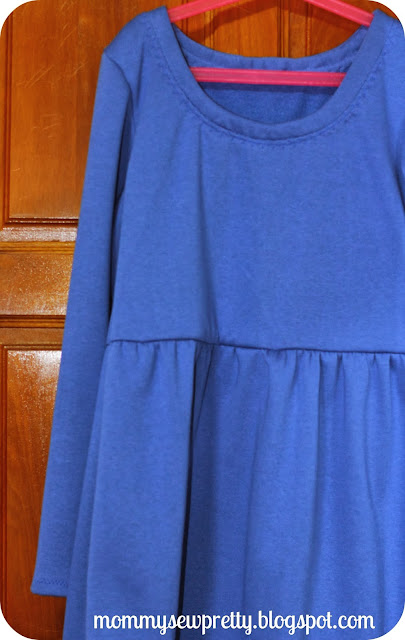
Blue fleece dress


Another Winter sewing for me!  Pattern is from Ottobre 5/2009 Tunic pattern.

I used some blue fleece that I got on sale from Spotlight at $4/meter for this dress.  Lengthen the sleeve to my wrist and added a inseam pocket. I used size 36 which is slightly bigger but good for layering I guess (good excuse for poor judgement : P)

I love the neckband which is quite unique. I use a decorative stitch on my machine to top stitch around the neckband.


The color for the dress went off when I use my handphone to take photo. See how nicely flat the neckline is on me even though it is big. Yes, I wore it to office today cause the air con is seriously cold...


Dress with a belt to clinch it in. Waistline seems to be rather high but I think it is a design factor. 


This one is without belt.  See the difference?


I think it is also very twirling too since it is so big.  I love the dress though but next time, I'll go one size smaller.  It is nice and warm. Length wise it is just nice, touching my knee. The skirt was gathered using clear elastic which I think is really useful for having evenly space gathers. I just zig zag the clear elastic onto the seam allowance of the skirt panel. Length of the elastic is the same as your bodice so your final skirt will match the bodice width! easy.  


I also clear elastic on the shoulder seams which help to stablise the seams. The clear elastic is from a shop at Textile centre. I'm always happy to learn new sewing techniques from Ottobre.


I will definitely sew this again, in size 34.  I added inseam pocket for the dress so it was really good to put in my cold fingers. Next time, I'll try using a lighter knit or lycra for this.  

Friday, October 11, 2013

Chevron Knit Tunic


Pattern from Ottobre 5/2009 issue. The one on the right.  I was thinking about making the coat on the left too.. Well, we'll see.


I've used a medium weight knit with chevron print for this tunic. I think I bought it from Chinatown or something. With only 3 pattern pieces, it was a quick sew.

I eliminated the 2 puffy pockets but added one pocket which I think it will be more interesting.


I love the way it was constructed.  I really learnt a lot from Ottobre's instruction, although I do have to get use to the wordy instructions with no graphic step by step guide. The clear elastic at the shoulder seams help to reinforce the area.  Bought these clear elastic from a shop at Textile centre.


I omitted the elastic casing at the sleeves cause I don't like the puffy feel. So, it was a bit wide and flappy but not too bad.


The neckline is gathered using the elastic. I like it that it is not too tight, like a peasant blouse.  The length is just nice and really goes well with jeans.  I also love the curvy hemline which is so pretty.


 I cut size 36 but could have gone down 1 size smaller but since I'm going to use it as a layering piece.  It's a basic tunic but oh so pretty and such a quick sew that I finish the tunic in 1 hour's time! So satisfying.


.