Sunday, March 27, 2011

Because I love them

I love my kids. Because I love my kids, I will do all kinds of things for them. Like my girls said, mommy will take care of everything!

Well, that's why I did what I did. All the sewings and crafting. My friends asked me where I find the time to do them. I said, while they were sleeping at night. It's not easy to do alot of sewing when you are holding a demanding full time job while taking care of the family after work as well as 2 very active young children. But, because I love them, I hang on there with my supportive husband and extended families.

What I did since my last post? Well, not alot. I've been trying to spend time with my kids. Bringing them to the library, went swimming and get together with my sister's family. But I did sew 2 things. One for my kids and one for my car.

I saw this fabulous idea for a magnetic doll using photo of our kids from ikat. Thought it will appeal to my big girl who loves to change clothes for her dolls. Printed our their photos and paste on the magnetic sheet and laminate them before cutting them up. The clothes are done in the same way. If you are interested to do, you can buy the magnetic sheet from Daiso at $2 per piece. I bought mine from Vivo city as not all branch carry them. I've used my leftover stash of fabric and lace to make the dresses. More to come. The white board holding the dolls is from Daiso too.  For the crowns, I've bought some stickers and paste them on the magnetic sheet. I didn't laminate the clothes as I wanted the fabric to stand out.  You got the idea that I love Daiso as much as Ikea : )


Another sewing that I did was to have a Car Caddy to keep all the stuff in my cars. With 2 kids, I got lots of papers, tissues, toys and stuff lying around. So, I followed the tutorial from Sew4home.  Brought some coordinating thick fabric from Ikea to match with my orange fabric that I've bought earlier from Ikea for my Table runner.  The bias tape was made from the black fabric myself.  I didn't curve the corner like the tutorial and left it squarish. It looks good. As I don't have the buckle in 1"size, will have to wait till I get them before I can use it on my car.


If you intend to sew this, remember to use a thicker fabric which mean a thicker needle. I've use leather needle to sew through the 2 layers of back fabric + 2 layers of pockets with their interfacing! You need thicker fabric to make sure it retains its shape at the car seat. I intend to hang it behind the driver seat to hold my kids things plus tissues, car par coupons etc. The buckle, grommets, etc can be bought from the Textile centre at Jalan Sultan Road. The same place that I bought my clips for my toddler vest.

 Okay, got to stop.  Will be sharing soon 2 more sewings that I'm currently working at.

Sunday, March 20, 2011

A surprise giveaway

I've just bought some fabric from Spotlight since they were having a sale last week. Had wanted to make a dress for my girls and also more neck pillows. My best friend had asked me to sell her the neck pillows for her 2 kids as she saw the one that I made for my kids. I felt so happy that someone had really thought the pillows were good enough to sell.  Anyway, I couldn't charge my friend since I really wanted to give them as gifts to the 2 kids. 

For the girl, I used the pink pokka dots flannel that I made for my girl earlier and for the boy, a cute monkey print in green background.  Since I'm in it, I decided mass produce and give away 3 neck pillows to anyone reading my blog! But, only for readers in Singapore for now. Maybe in future, I will consider overseas if there is request. But for now, as the first giveaway, I"m starting it slowly.  : ) More will be coming in future if I've more confidence and time to do mass sewing.

If you would like to receive a neck pillow, you can drop me a comment. If there are more than 3 readers, then I'll draw lots.  Entry close next Wednesday.   

Friday, March 11, 2011

Toddler vest with harness

I'm really not sure if anyone here agrees with me on the use of child harness on your kids. I had always thought that the kid looks so sad. But now, I had no choice but to consider this for my toddler. sigh..My mother in law said that my baby dashed off the road once and she couldn't catch her in time. Thank God a stranger came running and caught her! I was petrified when I heard from her. It's a strain for her to take care of a active toddler as she had problem with her legs and couldn't bend her knees.

I didn't like the look of the child harness that I see around. It's either nylon strap that looks like something you put on a dog or a cute bag-cum-harness backpack that will be quite warm for my toddler to wear in this humid Singapore. My baby perspire alot. So, the birth of the toddler vest with harness.


Not sure any of you will be interested in making one. It's not too difficult. I took some time to draw out the template and made adjustment on the way. If you are interested to make one, email me and I'll try to re-do the template for you. If you are not sure of the work involved, I'll jot down a few notes and photos below and you can see if you will like to try them. My finished vest measure 10" X 8.5" at the front.

Material
Cute cotton fabric of medium weight (use about 22" X 9")
Inner fabric
Bias tape in matching colour (I've used white)
heavy weight cotton twill tape (0.75") about 60"
1 slider (0.75")
1 buckle (0.75")
1 D-ring (0.75")
2 rotatable clips of width 0.75"

Note. The width of the buckle, slider etc will depend on how thick is your twill tape. Some use nylon tape but I prefer the cotton ones as it is softer and I can't find a suitable coloured nylon tape.

Ready to start?

Instruction
1) First cut the fabric and quilt inner fabric. I've used a pre-made quilt fabric in white which I've used for my earlier Name quilt project. The fun and challenging part is cutting the cute japanese fabric to capture the cute cartoon as the centre piece.
front cotton piece and quilt inner piece

back cotton piece and quilt inner piece
2) Place the front and back piece of the cotton pieces together with right side facing, align the shoulder and side seams.  Pin and sew in place.  Then do the same to the quilt inner piece. Turn the cotton piece to right side facing out and iron down the seams.
sew shoulders and side seams together. print aligned nicely : )

3) Now the tricky part. Insert the quilt inner piece into the outer piece so that the wrong sides face each other. Make sure that the shoulder and side seams are aligned.  Pin in place. Use as many pins as you like so that neckline and arm holes are pin nicely together.
front view
back view.
you can trim away the excess fabric later.
4) As it's abit thick, I've used a serger to sew around the seams for the back, neckline and hem. You can also use the regular sewing machine for this job, although a serger really makes this a breeze. Start from the back seam at the bottom and sew all the way up to the front neckline and go behind to the back seam. Then, sew the hem as well.

finished seams at the back

5) Next, sew the 2 arm holes. As the holes are quite small (it's a toddler size), I've hand stitch around. Don't worry about the stitches as later you will put bias tapes around them.

Bias Tapes
6) Open up your bias tape and align 1 side (right side) of the opened tape to the edge of the seam on the RIGHT side of the vest. Pin as you go. Clip off a little extra at the end. Your bias tape should go round the front neckline.

7) Sew the bias tapes to the seams along the line that you've just pin. Try to sew close to the edge or on the folded line. After you've sewn on the first folded line, flip over the bias tape to the WRONG side of the vest and hand stitch the raw edge of the bias tape to the vest. My tape is quite narrow, so it's a bit tricky to try to keep the wrong edges within the tape.
Front view of the neckline with bias tape sewn
7) Now do the same for the hem at the bottom of the vest. Pin the bias tape along the raw edge of the hem on the RIGHT side of the vest. Start from the corner of one side and pin around the front and return back on the right side of the vest.

8) Sew the bias tape around the hem, removing the pin as you go. Hand stitch the tape on the inside of the vest when you flip over the tape.

finished hem
9) Likewise, hand stitch the bias tapes to the 2 arm holes starting from the bottom and work your way around the hole. Give alittle allowance tape at the end. Remember to start stitching on the RIGHT side of the vest first. No photo here as my fingers were curled up with the tiny sewing around the small arm holes and I was trying to finish it as soon as possible.

10) Now you have finish the vest. Actually, it looks quite cute as a vest. You can attach a button over the back and use it as a vest if you want.  For those still interested in the harness, let's continue...

Harness
11) Cut 2 piece of cotton strap of length 25" and 35" each. Take 1 end of the the 25" tape (length depend on how wide your vest will be + some allowance for extension in future) and put it through the buckle on the female side (the hollow side) from top in. 

12) I've actually used my serger to sew the edge first before I sew the ends down. To secure the stitch, I've sewn a box stitch. It's quite thick so be sure to use a bigger needle and increase the tension slightly when you sew.

13) Place the strap over the vest so that you get the placement of the strap on the vest. Be sure that you dont' twist the strap. The buckle will be at the back of the vest.  See illustration below for explanation.

for the other end of the strap, pull strap through the upper bracket (above middle bar) of the slider

slide the strap over the middle bar and into the next slot

Pull the strap taut.
Insert the rotatable clip (not sure what's this call officially).
This is for you to attach the hand strap later.

Then, insert the strap through the male part of the buckle from below and out from the other slot.

Pull the strap down. You should adjust the length now to be the width of your child
Pull the extra strap through the rotatable clip as shown

Pull the strap through the slider on the right
The extra length of strap is now nicely secured.
I've used the serger to sew the ends to keep them from fraying.
Pin the strap in position at the front of the vest.
Make sure that the strap is not twisted at the back.
Sew the strap along the two long edges with straight stitch to the vest.
You only need to sew on the front vest.
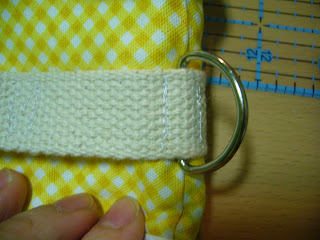
At the side of the strap, I've inserted a D-ring so that I can attach the hand strap sideway.
Secure the D-ring by sewing down on the 2 sides
Hand Strap
14) Now you can make the removeable hand strap to attach to the vest. I've used the use the other cotton twill tape of 35" and inserted the rotatable clip to it.
Put the clip through and sew down the ends.
You can also serge the end to keep from fraying.
15) For the other end of the strap, I've fold in about 6" to create a loop for ease of holding on to the strap. Sew down the ends.
Fold over 6" to form a big loop and sew down the ends with box stitch.
I've added a strip of left over cotton fabric on the joint to decorate it.
16) The finished vest (back view)!
The removeable strap can be attach to the back of the vest.
Vest size is adjustable with the slider and buckle.

Or, if you like, you can also attach to the side!

Here's a picture of her with the vest. She loves it and we got many curious looks and amused comments from the neighbours at the coffee shops!


Friday, March 4, 2011

Fabric hairband & Coasters


Recognise the fabric used in this hairband? It was leftover from my previous pillowcase project. I decided to make a hairband for my girl from the scrap and the size was just nice for a little girl's head. I even added the fabric flower for colour.  She had a fever yesterday and I thought I could cheer her up with this colourful band. Not going to give any tutorial here since this is quite simple and I did see something similar in blogland before but can't remember where.

Fabric Coaster
Anyway, the main tutorial will be the fabric coaster that I made. I've made something similar for a christmas present using a charm park. But this time, I've used a piece of japanese small cloth.  Hmm..not another one of the small cloth project you may say. Probably I should just rename all of them Japanese Small Cloth Projects!

8 coasters
Like I said, I've used a piece of Japanese small cloth that already have the squares nicely printed. It's just nice to make 8 dual-face fabric coasters. Each coaster will finish measuring 4" on both sides.

Other Materials
Battings

Instruction
1) Cut out the squares with about 0.5"seam allowance between each square. It was just nice to cut all 16 pieces out along the columns. Sort them by their print. I've 4 sets of 4 designs each.

2) Place 2 pieces together, with right side facing. Then, cut a similar size batting and place on top of the 2 fabric to form a sandwich. Pin in place.


3) Sew around the edge of the fabric square, leaving 2"gap for turning.


4) Trim the edges and clip the corners. Then, turn it inside out and iron on the right side to make the 3 fabric lay flat.


5) Sew around the edge again, close to the edge. Do take note to sew close the gap that you have left earlier for turning. Your coaster is ready to be use. Enjoy!

Thursday, March 3, 2011

Personalised Pillow & Bolster cases

Remember that I mentioned in my previous post that I've a surprise gift for my parent? Well, I've just finished them. Althought it could have been better made and I made a mistake (I'll share about this later in my post), I think my parent will love them nevertheless for the effort : )

It's a personalised pillow and bolster case that I've sewn the chinese character for Dad and Mum and even our Family name.  I've bought the bedsheet with pillowcases and bolstercase from Aussino and added personal touch. Do you want to try doing it? It's actually quite simple.


Material
bought this set of Queen size fitted sheet+2 pillowcases+bolstercase at Aussino
Ready bought pillowcases & bolstercase
3 jelly roll [it's a pre-cut long strip of fabric measuring about 44" X 2.5"]
3 small pieces of linen cloth [slightly bigger than your word that you intend to print]
fabric dye & brush
some lace for decoration

Instruction
Pillowcase
1) Cut 2 jelly rolls to 39" each as we are going to wrap this strip around the short width of the pillowcase.  Mine measure 19"across the short side so [19 X 2 + 1" allowance]

2) fold in the edges along both of the long sides by 0.25" & iron flat & set it aside.

3) Print out the name, in this case, the chinese characters on the non-shiny side of a piece of freezer paper. You can adjust the size to make sure that it fits between the width of the jelly roll (with long hem ironed in). I actually had a hard time finding these freezer paper in Singapore. Got this from Cold Storage at Leisure Park Mall at B1.

4) Use a sharp pen knife, cut out the words carefully, especially the small pieces within the words.

5) Then iron the freezer paper with the word on a piece of linen cloth. Make sure that the shiny side face the cloth. Place your iron on them enough for the paper to stick to the linen.  Too long and your paper may melt. My linen measure about 3" by 2.5" as the jelly roll is about 2"after folding in. This includes a 0.25" seam allowance for all the 4 sides.

5) Use a small brush (I've actually used my lipstick brush) and paint over the word. Be careful to place them on a piece of paper so that the paint don't go through and stain your table. I've left them to dry overnight and paint a second coat in the morning before I went to work.

6) When it's dry, you can peel off the freezer paper.

7) Iron a piece of medium weight interfacing behind each linen pieces to give extra support.  Using the soluble pen, draw the seam or the finish size.

8) You can either sew around the 4 sides of the linen piece before sewing them to the jelly roll or sew them later when you attach the jelly roll to the pillowcase. I've tried both. 2nd method is neater but require alot of pins and precision to get the hem all tucked in. Below shows the 1st method. I've went round the 4 sides, trying to sew as close to the edge as possible and tuck in all the raw edges. Make sure that the whole piece fits within the jelly roll. You should place your jelly roll on the pillowcase and mark off where you want to place the words.

9) Next, mark 2" along the short edge of the pillowcase using a soluble pen.

10) Cut out a piece of lace measuring 19.5"and place along the drawn line. My lace is only for the front of the pillowcase. If you want the lace to go around it, you should cut double the length.  Next, line your jelly roll with your word slightly overlapping the lace. I've chose my wording to be in the centre. Pin in place.

11) Flip over the pillowcase and continue to pin the jelly roll along the 2" line. For cleaner look, the start and end of your jelly roll should be at the back. Just make sure that you fold the raw edges at both ends in before you sew them. Sew around the jelly roll along the 2 long sides. If you choose to sew the linen pieces now, make sure you go over all the 4 edges of the piece.

Congrats! You've just finish 1 pillowcase. You can do the same for the other pillowcase but make sure that you now do the sewing on the other side of the pillowcase cause you want them to mirror each other when you place them on the bed. I made the grave mistake of happily sewing on the same side : ( Don't make the same mistakes okay?

Bolster Case
1) Cut the jelly roll to length 40", including a seam allowance of 1"as the circumference of the bolster is 39".

2) Same step as above to iron the hem on both of the long edges in.

3) Cut the lace to be 40" long as I wanted it to go round the bolster since this is round and has not fixed front facing.

4) Sew the linen piece on the jelly roll after you have decided on the position on the bolster. Place the lace, jelly roll on 1 end of the bolster. Pin and sew in place. You are done!

I didn't sew any on the fitted sheet since it gathered around the edges, making it impossible to sew a straight piece of jelly roll on them. I can't wait to see them on my parent's bed. : )