Monday, May 30, 2011

T-shirt Refashioned


I finally did it! Saw lots of the refashion tutorials around the blogland and made many mental notes to do them one day. But, it's kinda scary to cut up a good piece of T-shirt and mess up the whole thing. What if I cut out too much? What if my final product is worse than the original T-shirt? What ifs..what ifs... These goes through my mind alot and most T-shirt here in Singapore are quite expensive. At least, for me to cut them up.

Well, then I decided to just do it. It surely liberated me and I"m game for more : ) Cut off the sleeves and used them as ruffles for the neck line and sleeve hems. Didn't refer to any particular tutorials but just goes with what I have.  Here's the short tutorial below if you want to try.

Instruction
1. Find a long sleeve T-shirt. I bought 2 long sleeves white spandex T-shirt at $10 a piece from This Fashion.


2. Cut off the sleeves at 3/4.  I've used my old T-shirt blouse as a rough gauge.

3. Open up the sleeves by cuting away the side seams.

4. Use a ruler and measure out 1" strips before you cut them all out. We will not be using the sleeve finished hem.

5. Using the widest stitch width on your sewing machine and increase the tension, sew the strip individually in the middle.  I've used stitch width 4 and tension 6.  Do for all the strips.

6. Afterwhich, you can pull the bobbin thread so that the strip become ruffles-liked. 

7. Pin them around the neckline using pins. Start from the shoulder seam area and make the round to the other shoulder seam. Just lay the next strip after the first one ends.  I've also inserted a piece of lace on top of the centre neckline.

8. Do the same for the sleeve hem. Start from the side seam area and move round it. Pin in place.


9. Using the normal stitch length and tension, sew around the neckline to attach the ruffles.  Sew in the middle of the strip, right on top of the earlier gathered stitch.  You can trim away these extra threads after you have finished sewing the ruffles.  Go very slowly so that it curves around the neckline.  Before I sew the ruffles, I use a straight stitch to sew the piece of lace on.


10. Do the same for the sleeves, except that the area is much smaller and you will need to be careful not to sew the sleeve shut! The finished T-shirt. Maybe next time, I'll be more adventurous and go for some colours. What do you think?


close up on the sleeve hem

Tuesday, May 24, 2011

Zipper pencil case


Sew this under 30minutes as a gift for my girl's childcare teacher who had her birthday last Saturday. It was pretty easy. The more time consuming part was the choosing of the fabric and deciding on the size.

My girl had bought the 2 pens for her teacher and I took that size to roughly come up with the measurement of the case to be 7"X 3.5".  I'll not be doing any tutorial since there are many tutorials in the blogland on this and you can google around. But, do let me know if any of you still prefer me to do one : )

My zipper is 8"and used 0.25"" seam allowance. However, it was give and take as I use the design print on the fabric as a guide. This piece was very pretty. I got that at a shop at Chinatown. The inner layer was linen.  I"ve also attach a ring at the zipper tab for the ribbon tie.

So pretty. I shd make one for myself too...: )

Monday, May 23, 2011

Cupcake box pleat dresses


Back view

fabric flower pin
The only ''proper" photo of them together!

no flower pin. she refused to pin them cause her sister has none.
I didn't have time to make another.

The only time she will sit still is for FOOD!


I've finally finished the 2 dresses for my girls. They are exactly the same with one size 6T and the other 1T+. Had in mind to make the 2nd dress a bit different but my girl objected it cause she wanted her younger sister to look identical to hers!

The pattern drafting took some time as I was trying to figure out the measurement as I roughly based it on a similar pattern found in a pattern book but I've adjusted the arm hole size, added the waist band and extra lining at the skirts. Overall, I'm happy with the results. Don't they look sweet? They wore them to church this morning and got many 'likes' from friends : ) (beam). But did you notice the mistakes I did?

Well, for one, my toddler had a bigger head so the one button neck hole doesn't allow her head to go in when I tried it on her this morning! I did the dress late last night and didn't have time to take the exact measurement from her. Kinda hard to get her to stay still so I've used her old dress for measurement. Last minute I've got to cut the opening wider. Guess, she needs 2 buttons allowance for it to work on her.

2nd, also happen to be on my youngest girl's dress, I"ve accidentally cut the print of the cupcakes upside down for the front skirt! Yucks! It was too late to rectify as I didn't realised till I"ve done up the whole skirt! I"ll do better the next time. So, if you are cutting fabric with print, do note the alignment before you place your pattern pieces! Else you will end up like me, Ouch. It's an eye sore everytime I look at the photos : P

The fabric was light weight cotton that I bought at sale from Spotlight at $4.50 per metre. Love the cupcakes design, so sweet and cheerful.  If I have the time, maybe I'll draft out the other sizes and put them up, that is if, I've the time after my regular office work, housework, childcare, wife duty etc etc...hmmmm...

Friday, May 20, 2011

My pretty models!

This is how the skirts look on both of my girls.  Didn't manage to take any photos for them till now. But, better late than never I guess. : )


my sweety pies!

Well, big sister ran away to play and only the little princess is here to stay....

Photo shoot is such tiring chore..have a break, have a potato chip!

It's so good to have a shower after the shoot. Nice and fresh now!

She is wearing a little ruffled dress from Baby Fox. It's layered with ruffles and lace. Really nice.  Will make a version of this dress when I get the time. Maybe an adult version for me!!

Padded Polaroid Pouch [3 Ps!]

My friend gave me an instant polaroid camera many years ago and I put it away in the digicabi and forgotten all about it until one day, my husband was clearing the digicabi and found it stowed away in the corner of the box.

Once we put in the batteries, it was good as new. But our films are all expired and we had to get new ones.  It's really expensive at $10 for 10 pieces! Anyway, we bought 10 just to try out the camera. My eldest girl was very excited about it and was so eager to take pictures. I must say, it was quite good for a 6 year old.

sample of what she and her daddy took.
She begged me to sew her a pouch to put her camera so that she can carry them around with the films.  So, I went to make her a padded pouch using a pre-quilted cotton fabric as the inner lining and the 1/2 pieces of the Japanese small cloth as the outer fabric. 


It's quite easy to sew as basically, it''s a drawstring pouch. I've used a pink satin ribbon instead of the normal cord. I've slightly burnt the ends of the ribbon to keep them from fraying. Added the stopper as well as a velcro strip in the opening so that the content will not fall out since it's a little girl who will be handling the fragile & bulky camera.


padded inner layer for extra protection and the velcro for extra extra protection!

just nice for the camera and a box of film!
Ok, now got to go back to my other sewing. I'm drafting a dress pattern for my girls. Finished sewing the 6T dress and now drafting the 1T dress.  Hopefully can finish sewing by Saturday and get the photo shoot up with my girls and post them by Sunday! Till then! Keep sewing : )

Monday, May 16, 2011

Another pettiskirt & doodle bedsheet

Time flies. I guess as we age, time flies even faster.  Just a twinkle of my eyes and now it's May! It seems like yesterday that I was in Shanghai with my family. It reminds me that I must make the best out of each day and not live to regret it.

Finally, I did some sewing and will now post some of them.  Didn't actually got to sew much as I was so busy with work and being sick.  My whole family came down with cough and flu real serious. The baby got it first and then pass to my husband and then my eldest girl and finally me.  And then, my mother in law caught the bug from my baby and it went round and round. The whole clinic was full of people cough and sneezing! Well, I finally got better now and did a little sewing.

The handle on my beloved luggage was coming apart after the trip. Since we moved hotel every day of the tour, it had been over-handled and the fabric kinda came apart in the middle. 


So, when I was back, after unloading all the items from the luggage, I decided to sew a fabric cover over the luggage handle.  Will not be giving a tutorial for it since it's so simple.  Just measure the length of the handle and cut the fabric and sew velcro strip on the opening sides and it's done! I've used the same fabric which I've used for the camera strap.  As the handle is already padded, my fabric cover is a simple one so that the handle is not too bulky.  Nice! I'm happy with it. It's easy and functional. Try it if you have the same problem as mine. Now, I will be able to recognise my luggage way ahead on the luggage convayer belt at the airport!


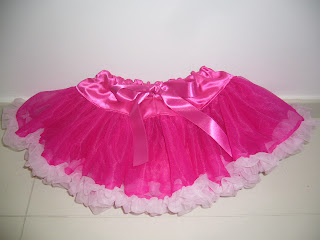
The second thing that I sew was another pettiskirt for my littlest girl : ) Since she is only 15 months, I did away with the 2nd tier and just have 1 tier. It's still double layer with the 6"non-fray chiffon that I've used for her sister's pettiskirt, but shorter.  I've adjusted the length of the chiffon to make a smaller version for the baby.  I can't wait for her to try them on!


The last thing that I did was a non-sewing craft with my older girl.  We did fabric painting for her new bed sheet! When I saw the white bed sheet selling at $4.50 at Ikea, I was thinking that it would be a fun painting on them with my girl.  We use the Pentel Fabricfun Pastel Dye sticks which I bought ages ago, to draw and doodle on the bed sheet. 


It was really fun for her and she enjoyed it very much.  I"ve yet to put them on her bed but I know it will be very fun.   Want to try it at home? Get the bed sheets at Ikea. It says that it can fit 8"high bed so should be ok for any single mattress and it's so cheeeap! and of course, FUN too!

Simple skirts


Do you like what you see? I'm so pleased with myself and my sewing machine. Not that I invented the steps to sew the skirts, but my dear sewing machine was so cooperative today and I finish both skirts at one go : )

Friday is the dress-down day of the whole week for me at the office.  I had on many occasions, open my wardrobe and found nothing that it exciting or interesting to wear on Fridays. It's always jean + T-shirt or knit blouse.  I don't really have a lot of informal skirts. Not sure why but I've tons of work wear and dresses. I love dresses and like my husband said, my favourite work colours are black, dark blue and grey. Well, it's easier to coordinate office wear with these 3 safe colours but not very exciting.  I had in mind to sew myself a nice skirt when I'm free and then I chance upon a simple skirt tutorial by Dana.

I know for simple skirt you don't really need a tutorial. But when I saw those pretty skirts that Dana made, I'm really inspired to try too. I've got this green polka dots with red flower fabric that I bought from Spotlight some time ago and had in mind to sew a dress. But I guess a skirt will also do since I don't really have a lot of time to measure myself and I thought I want to wear it tomorrow!

Ha. It's really easy. You should try it. In no time at all, you will be sewing tons of them : ) I know I did.  Sew a smaller version for my eldest girl.  The only difference between the 2 skirt is the width is 1.5 times of the waist as I don't want it to be too full while my girl's is 2 times.  I've also adjusted the fabric print so that the position of the row of flowers will look slightly different.

Hehehe...I can't stop grinning...I'm definitely going to try some more to give away.