Friday, March 30, 2012

Why I sew


My friends from work and church often asked me where I find the time to sew. They were amazed when they saw my kids in church wearing matchy matchy dress or skirts and asked me how I did it?


I'm not sure it has to do with time cause I really find it lacking oftentimes.  Between fetching my kids to school, work, fetching them back home, coaching them on school work etc, I've very little time. It's a choice of either resting infront of TV or chatting with husband who most of the time worked late and didn't have much time to chat during weekdays. Instead of letting my brain rot infront of the TV and sometimes I get so hocked up on the Korean Drama series that I was out of sync from the routine boring life I'm living...The guys in those shows are so dreamy, charming, understanding and romantic...do they appear in reallife? I've digressed..

Back to sewing...I get lots of satisfaction when I made beautiful wearable clothes for my kids. Not that they need it. They have so many clothes that I don't think they will need any homemade ones from me. I mean, my friends, sister and all hand me down many 2nd hand clothes that their children outgrown and their wardrobes are stuffed with them. But, I can't help sewing for them everytime I see those pretty designs from the Japanese sewing book like these..

Are you tempted yet? So, I get myself into the KCWC to sew up, more systematically, more clothes for my kids. Sewing is very theraputic too. I'm stressed out at work, with kids and their grades etc, so sewing is an outlet for me to do something creative. I'm not so good at sewing yet so I've lot to learn and sewing regularly help me to hone my skills and hopefully one day, I'll be able to sew up clothes that fits for me!

What's the reason for sewing? Do you sew when you are upset or you sew because it's a creative outlet for you? For me, it's both but I've got to remind myself not to be so caught up in sewing that it becomes an alterative avenue for me instead of Praying to God. I thank God for His grace and faithfulness in my life that enable me to pursue my interest while juggling the demands of work and family. I have to be careful to balance the time for family, work, God and personal hobby like sewing. Hopefully one day, my sewing will help to bring smiles to someone in need or it can be use for the work of God, maybe : )


Wednesday, March 28, 2012

KCWC Spring 2012

Hey! Have you heard it? The KCWC Kids Clothes Week Challenge is here again!


Last year I made some very nice clothes for my kids during the KCWC.  


 Vest with cute print

big pockets skirts


knit sweater with cute button

floral sunshine dress with butterfly back button

checked shorts with nice pocket details
 
blouse with rows cute buttons

simple skirt with lace details


I can't wait to participate this time round. Not that I can't sew up kids clothes myself but it's really fun to have some organized sewing to get things done.  Am now browsing through my sewing books and Pinterest to get some inspiration..

Are you On it yet? 

Monday, March 26, 2012

Patterns patterns


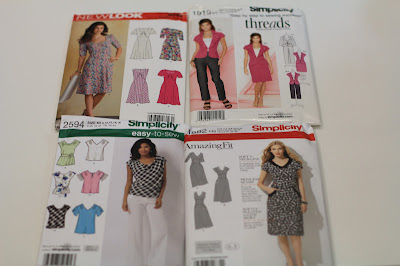
I bought all these pattern recently from Sewing Patterns.com during their Simplicity USD2.99 sale! Even with the international shipping, it is still cheaper than getting from Spotlight.   

I really envy the sewers at the States where they can pop in their local fabric store and find 99cents patterns! I'm not sure where else can I find sewing patterns in Singapore except for Spotlight. 

SO when I saw the sale at USD2.99, I grab the offer.  To make the shipping worthwhile, I order a lot, as you can see.  I waited anxiously for the shipment to arrive since they go by United State Postal Service, I don't have a tracking number so I was worried it will not arrive.

It finally came last week, one pattern got some tiny tear, but it doesn't affect the paper patterns.  The rest  are in good shape. I can't wait to open them and sew up some fabulous dresses.  

As you can see, I love dresses. My resolution in 2012 is to sew fitted clothes for myself. I thought starting with pattern will be good idea. I got some pattern reviews online before I pick these few (er..many). I'm happy with my purchase.


The 2 patterns were from Spotlight.  Have already cut out the fabric for the above dress and my girl had ordered her version of coat and dress so hopefully I got some good items to show soon. 

Friday, March 23, 2012

Pretty Floral wallet


Remember my last post on wallet?

This one is about the same design but slightly longer and wider. About 8.5" by 4.5" when folded.  This time, I remembered to sew on my label! Let's look inside shall we?


Inside is about the same as my last wallet except that one side has 7 card slots facing upright while the other has the usual 6 slots facing the other direction.  Here's how it looks with the cards all in.


The floral print is cotton from Spotlight and the dark blue is quilting cotton by Robert Kaufman. What I love is I got 3 hidden card slots behind the 7 card slots! Look, I can keep more cards, and doesn't add bulk to the wallet : ) I can also use it as receipt pocket too.


On the other side, behind the 6 card slots, I've the cash compartment.


The back receipt pocket that is made bigger from version 1. Good size to fit in more cards or receipts or any rubbish that I chuck here.  I can even fit in my handphone nicely and still remain slim. 


And, because it's bigger, my coin compartment is also bigger.


I love this version. And I got an order from my sister to sew up one for her too! Maybe I should put in the strap so it can function as a clutch. What do you think?

Wednesday, March 21, 2012

Fat quarter wallet anyone?


I had many fat quarters that I bought some time ago and I only used them to make some laptop bags and they have been lying in my room, being pretty and all.  So, I decided that I should cut into them and make some useable items instead of storing them away.  

It is still a struggle for me to use them cause I can't bear to cut into them! Do you feel that way too? I"m not sure or maybe it's just me.  I'm afraid that I'll waste them away if my project turn out bad or I cut them wrongly. 

Anyway, back to the topic of sewing wallet.  I decided to do it differently from the last 2 time.  I wanted lots of card compartments so made 12 card slots for this one.  I keep it simple and flat so that it will still look slim.


The yellow fabric is from Hullabaloo by Urban Chika for Moda and the grey one is Dandelion flora by Patty Young for Michael Miller.  Love the color combination. I've bind my wallet with bias tapes as the interfacing is too thick for me to turn it right side out.

  
I've put the coin compartment at the external back because I find it more accessible for me and I don't need to flip open the wallet to put in the coins. It has a back receipt pockets for me to insert the receipt from supermarket! But I find it too small so in my version 2, I make it bigger.


Inside, I've 2 cash compartment behind the 6 card slots.  Love the nice dandelion print.  I've also took some time to match the fabric combination.  All in all, I use less than 1 fat quarter for each color. 

I didn't really take photographs of the steps as I invent along the way. I did another wallet cause I thought if I change the direction of the card slots it will be more interesting.  Look out for my next wallet post.

Thursday, March 15, 2012

Modification to Lisette 2064


Sorry for the late post but I was kinda caught up at work but here's the tutorial on how to make the 2 tier skirts from Lisette 2064 skirts.

Before you cut the pieces out, you need to adjust the measurement for the outer skirt and work out the measurement for the inner skirt.  Here's how I did it.

My 7 year old is skinny so she took the size 6 but I adjusted the inner skirt to be 1" longer and the outer skirt to be the size 6 pattern piece.  For my 2 year old, the smallest size available is size 3 so I cut the skirt length to be 1" shorter for outer skirt and the inner skirt to keep to size 3 skirt length.  You will now have 2 more extra pieces for the Front and Back skirt.

Decide on how you want to use the 2 coordinating fabric and cut out all the pattern pieces. I've decided to use the pink polka dots for the waistband, bias tape on pocket and inner skirts. This will allow the pretty floral print to peek through from the pocket nicely.  It's up to you how you want to layer your colors.

Okay, once you have cut the pieces. Lay the outer skirt piece on top of the inner skirt piece, aligning the waist and pocket seams like so. Both pieces will have their Right Side face up. Do the same for the 2 back skirt pieces.


Then, pin the 2 pocket pieces on top of the front skirts, align pocket seams. The pocket pieces Right Side face up. Pin or baste all the 3 layers together.


Apply the bias tapes on the pocket seams, encase all the 3 layers.


Treat the waist and hem of both skirts either using serger or zig zag stitches.  Then, hem the Outer skirt like so.


Then, place the front and back skirts pieces together, Right Side facing, align the side seams.  Try to arrange the skirt pieces so that the front and back outer skirt seams are align. Pin and sew a basting stitch from hem and stop when you reach the outer skirt seams.


This will ensure that the outer skirt seams meet nicely at the sides. Then, you can continue to sew the skirt from the waist till you reach the hem at the basting stitches you have sewn earlier.


Press seams open and hem the inner skirt.


Make the waistband by sewing the 2 short ends close.  For one end, you need to leave about 1" gap for inserting of elastic band later.  You can refer to the instruction attached in your pattern package or follow my tutorial here. Then, fold the band into half lengthwise and press with iron. The 1" gap that you have made should be at the top edge of the waistband, facing in. Treat the seams with serger or zig zag so that it will not move when you attach to the skirt.


Then, just follow the rest of the instruction to gather the waist of the skirt to attach it to the waistband. Insert elastic band and you are all done.


Want to make an adult version?


For this I only make it one layer so it's a matter of getting the measurement right. I make the pocket 1" deeper but uses the same pocket pieces.  You can follow the measurement rules below that I used.

Waistband = Length (waist X 1.3) and Width (3.5") 
The skirt piece is not a rectangle but more tapered at waistline and getting slightly wider at hem. To get the measurement of the top of the skirt 
Front skirt piece waist width = (Waist X 1.6) divide by 2 - 0.5"
Back skirt piece waist width = (Waist X 1.6) divide by 2 + 0.5"
Front and Back skirt piece hem width = Waist X 2 [so you cut 2 pieces, each piece is waist length]     
Length of skirt  = your length + seam allowance for waistband and hem.

That's it. Enjoy making these skirts : )

Monday, March 12, 2012

Two tier skirts with pockets from Lisette 2064


Yup, I've got another pattern review here today.  I have recently turned to pattern shopping as opposite to fabric shopping since I've self impose a ban on buying more fabric till I've used them up! I'm not sure if it's working though cause I was tempted, yet again, by the recent Spotlight sale.  I was surprise to find Lisette sewing patterns and fabric on 50% sale! Can't passed them by and I grabbed 2 sewing patterns and fabric since it's 50% off!  

I've sew up 2 skirts for my girls using Lisette 2064. The instruction was really clear and I love it. Made the 2 skirts in a jiffy.  I think I took the most time trying to construct the color combination in my mind and matching the print using my existing stash.

You recall this color combination from my sister in law diaper bag? I really love the pastel color and I thought it would really look pretty as a skirt.  The pretty waistband and bias tape covered pocket edge were so sweet, don't you think? I had tried to arrange the flower print so that they will be by the side of the front panel.


I've followed the instruction pretty closely except that I made the skirt 2 tiers! Hence, a little time was spent trying to figure out how to sew the pocket on the 2 layers.  But once I got the hang of it, I was able to sew up another skirt quickly using cupcakes print and polka dots. This one is for little sister.


My girls love their new skirts. 

Me too.
So, I decided to, 
hmmm...hmmmm...., 
sew one for myself too : P


Took a little time to figure out my measurements and sew them up real quick. This time, I sew only 1 layer. The fabric is a vintage print cotton that I bought from Spotlight.  Really happy that I was able to use my existing stash : )  

I will share on how I amend the pattern to be a 2 tier skirts in my next post. So, come back soon!


Friday, March 9, 2012

Simple chiffon top

I saw this tutorial from Cotton and Curl on a rectangle top and told myself that I've got to try this.  So when I picked up this chiffon fabric recently from Spotlight (it was on sale for $6 per metre), I knew it was just the right material for this top. I've loved the stripe and the blue hues.

The tutorial is really simple but I did make some changes to the original tutorial. Here's how I did it. 

Decide how long you want your top to be and cut.  Fold the fabric into half lengthwise and lay it flat. I've put a lot of pins along the selvage so that the chiffon doesn't move too much when I cut.


I followed her tutorial and sew a rectangle at both lower ends.  The top part will form the arm hole later. So measure wisely so you have some allowance.


Then, fold the chiffon into half widthwise so that you can measure and cut the neckline.  I've used one of my t-shirt as a guide for the neckline. Remember the front neckline is always lower than the back. After you get the lowest point marked out, use a curve ruler and draw out the neckline.


Draw the back neckline also, slightly higher than the front neckline. See the 2 lines below.


Before you cut, pin the chiffon down first to prevent movement.  Then, cut off the back neckline (the one that is higher), taking note that you also cut the back folded portion of the chiffon.


For the front neckline you got to be careful not to cut through to the back. First cut the front layer carefully to avoid the back fabric, cut from the top to the folded edge.


Then, open up the folded edge and using the cut piece to trace out the other front neckline. This will be helpful to cut a really symmetrical neckline.


For the sides, cut off the fabric under the sewn rectangle.  If you like your chiffon to have some curves, you can cut off the bottom edge like so.


I cut the folded portion from armhole to armhole through the neckline so that you have 2  separates at the shoulder seams because I feel that the shape is better.  But you can leave it as folded and save the steps to sew.  Then, I sew bias tapes using the same fabric on the neckline.  For the armholes, I didn't sew any but just rolled hem on them. Also did the same method for the hem.

So, here's my top. I like it but next time if I make it, I'll make it longer so that it will have more drape.