Showing posts with label baby. Show all posts

Thursday, October 11, 2012

Baby Baby

One of my church friends recently gave birth to a baby girl. I thought it will be nice to sew something for her baby since she knows how much I love to sew.  And baby clothes are so cute.

Before I move on, if you are my friend Hazeline, and if you are reading this..please come back again when you receive your gift this Sunday okay? Don't want to spoilt the surprise here : )


Okay, where were we? Yes, the baby dress.


The pattern is from a Japanese sewing book that I got from ages. I made a dress, a romper and a cute bow headband. The size of the dress is for 6-9M.  I'm very happy with the whole assemble. 

I love the peter pan collar on this dress. Its one of the reason why I chose this pattern. Don't you think it looks sweet?


For the first time, I tried the snaps on this dress. Not very perfect and but I'm still happy with the result. I thought the snap will make it easier to dress the baby.


Now, let's see the full dress shall we? The fabric is very soft floral print cotton from Spotlight.


What's a baby dress without the cute diaper cover? I originally wanted to make one but it didn't turn out well so I change it to a shorts with elastic leg opening.


I use a lace elastic and sew it around the leg opening after I've turned in the seams. It looks so sweet and pretty.


I also sew a tiny ribbon bow in front for added sweetness.


And finally, I use the lace elastic and made a pretty headband for the baby since it is so soft. I hope it'll fit eventually since I made it slightly bigger. I sew a piece of white fabric to hide the elastic edges.


I hope she will love them when she receive it. Here's for your new baby Hazel! Congrats on being a new mama...I know it's tough in the beginning (and for the rest of her life) but believe me, it is rewarding : )


Monday, September 12, 2011

Simple sewing for baby

My baby really needed more bibs.  Her drools are all over the place.

BUT,

Sewing will take some time.... Not to mention cutting the pieces and adding bias tapes...

If I change the colour of the bias tapes, it will mean changing of coloured thread...

Do I have the time? Hmm..how many more sewing projects still on wait list??? countless...

Ok, I admit...I was lazy, so I thought of a quicky way to customised and spice up the regular bib.

Ikea-bought bib at $1.90

to

Fun and unique bib - priceless!

Just apply heat and bond to the back of the cut pieces and iron onto the bib. Sew around the edge for added security. You can spice up any bib with the scraps that is too wastefull to throw away. Good idea huh!

The toddler is appreciative too!

Thursday, July 28, 2011

Barpon


Have you seen one of these on blogland? First saw it here. Her kid was so adorable and I immediately wanted to make one for my girl. But then, had too many projects in mind and didn't take it up until recently. When my 2 colleagues came back to work after their maternity leave, I decided to finally make one for them and for my girl. 2 girls and 1 boy.

If you follow Jess's tutorial, it is really simple and you don't really need a sewing machine to finish up the job. Just print out the pattern piece, cut both the front and back fabric together and finish up the edge with bias tapes.

I'm not sure if it's me but the pattern was a tad too small for my 18 months. It was ok for my colleagues 6 months old baby though. So, I use free hand to draw a bigger pattern from the original design. Just that you will need to also adjust the length of the bias tapes so that it fits for the bigger size.


It took me less than 1hour to finish up the 2 baprons. Cutting the pattern and pinning the long bias tapes took the longer time. For the blue car bapron, I use ready made bias tape. For the pink ones, I made my own since I don't have one in that colour. How I wish I've the Simplicity's bias tape machine but sadly, it is not available here in Singapore and Amazon wouldn't ship in for me : ( Anyone got any idea how to get it shipped to Singapore??

It is a good design and perfect for my active toddler who wouldn't keep a bib in place. The ties at the back helps to keep it in place as she keeps pulling the regular velcro type off.


Sunday, July 17, 2011

Baby Bloomer and pants

When I did the pajama pants for my elder girl, I decided to make some pants for the younger toddler. Since I've 2 kids, I always try to be fair and make things for both. Well, it's nice to see them excited about wearing clothes that mummy sew.

As a no. 2, she has lots of hand-me-down from her bigger sister and my friends whose girls have outgrown their clothes. So, she has lots of pants but not alot of diaper covers or bloomers. I decided to make one, copied from an existing one that she already has. Bloomer is a short pants that has elastic band at the waist and leg opening and usually it's around the knee area. It'll compliment the tops that she has.

It's really easy if you are comfortable with sewing with thin strip of elastic bands. Ready to try?

Measurement
For a tall 18 month toddler
Waist = 16" (included diaper allowance)
Length from waist to crotch = 10"
Width of leg opening = 12"

Materials
Light cotton fabric
0.25" width elastic for waist area (16" long)
0.25" width elastic for leg area (2 pc of 10" each)

Cutting Instruction
1. Fold the fabric Right Side Together and cut out 2 folded rectangle of 9" X 12.75". [note, when you open out the rectangle, it should fully measure 18" X 12.75"].
2. Then cut off a triangle at the bottom corner of the fabric that is 2" by 2" to make the crotch. Do the same for the other piece.

Sewing Instruction
1. Sew the crotch area together, Right Side Facing, starting from the middle and down to the bottom, using 3/8" seam allowance. Do the same for the other piece.

2. Serge the crotch seams individually as well as the leg holes.  Press open the seams.


3. Fold up 0.25"of the leg hole and press.  Sew close to the edge.


4. Pin the 10" elastic band round the leg hole starting from the inseam area, about 0.5" away from the edge of the hem.

First, put the needle down at the beginning of the elastic band and then pull the band taut. Pull and sew as you go round the leg hole. Make sure that your batch stitch when you sew and back stitch again when you end.  Do the same for the other leg hole.

5. Turn one piece Right Side In and the other Right Side Out. Put the Right Side Out piece into the Right Side In piece, align seams. That means, Right Side of both pieces face each other.


6. Pin and sew the inseams together. Turn it Right Side out and you have your bloomer!

7. For the elastic band waist, serge the waist band and fold in 0.5".  Press and sew a straight stitch around the waist near the edge, leaving 1" gap for inserting of elastic band.

8. Overlap 0.5"of the band and do a zig zag stitch to close the elastic band.

9. Push the band back in to the waist band and pull it taut. Sew the gap close and you have your bloomer!


By the way, I sew her a pants too. But, it didn't fit my girl so I gave it to my friend's baby boy. It's a bit long but size should fit eventually. The fabric is from Spotlight. Looks so cute for a boy don't you think?

Wednesday, July 13, 2011

Diaper Cover

After making a few dresses for my girls, I realised that there's something missing.  Can you guess it? Clue - disposable diaper peeping out of her dress when she sits.

Yes! A diaper cover of course.  When I saw the perfect diaper cover tutorial by Dana, I know I've to try it. The tutorial is free and even with the pattern pieces for 4 sizes up to 24 months!

I took the 12-24 month pattern for my 18 month toddler and the size is just right with the diaper in : ) But I took out some length from the elastic as my girl is not as cubby.  Took 2" out for the waist and 1" out for the leg hole.

I't's super easy and fast. Love her instruction. Yes, the leg hole part could be quite tricky. I got it almost right at the third piece.  Just pull and adjust as you go will be the right thing to do.

I churned out 3 in one afternoon! hehehe...See for yourself here!

1 , 2 , 3!

with my label of course : )

Close up on the 3 covers


this one will make any dress red, pink or green!

this one will match her red checked dress


this one will go with her cupcake dress and crysanthmum dress
Try it! Churn out as many as you want. It's super super fast : )

Thursday, April 7, 2011

Sewing gifts

Didn't realised that this post is sitting in my draft mode for 1 month!  Thought better late than never, here goes.

Although my baby is now a toddler at 1 year old, I still love to make babies things. Good thing that I've colleagues who are having babies soon. So, I can still sew and give them away.

I"ve earlier made them baby shoes and decided to make a matching onesies for them using the same fabric that I've used for the baby shoes. I've put a interfacing at the back of the hearts that I've cut out from the leftover fabric to give some body. When I sew, I've iron some freezer paper inside the onesies directly behind the hearts so that the fabric will not pull when I sew.

don't you think the shoes matches the onesies?

I've also finish a tutu skirt that I've promised my niece. Added a purple lining skirt as well so she can wear them out as well. For variation, I've actually pulled the 4 layers of tulle up at different height to give it volume and dimension. Hope she likes it.


Monday, February 7, 2011

Neck Pillows

Don't be alarmed that I've another post here. I've actually done it 2 days ago but didn't have time to load up the pictures. So, here's another sewing that I did over the last 2 days.


These few days of travelling on the car really make me realise the importance of a good neck pillow. My girls were sleeping on the car and their poor heads are either swayed to the extreme left or right. So, I decided to make one for them that will bring them some comfort while on the road.

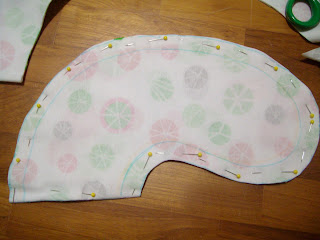
I didn't look for any tutorial online as it was a last minute project and I thought I could just draw free-hand and adjust as I go. I've also uploaded the template below. You can click on it and use it. Please do not make them to sell as this is for your own use only. Thank you.

Material
Any soft material like Flannel.
Fibre filling

Instruction
1) The template is actually 1/2 of the neck pillow folded along the short edge. So you will need to place the template along the folded edge of the fabric before you cut. 

2) Fold the fabric so that right side are facing each other. Then place the template with the short edge along the folded edge of the fabric. Make sure that the fabric cover the whole template as you will be make a mirror image of the template.

3) Trace the template on the fabric and cut the pattern out using a 0.5" seam allowance. You will need 2 set of these pattern to make the front and back.

4) Open out the pattern so that you see the full neck pillow and place the 2 neck pillow with right side facing each other. Pin in place.
I've forgotten to take picture for this step. You can see this one which is already sewn

5) Sew along the 0.5" seam allowance along the neck pillow. I started from the top of the neck pillow ( the convex side) that is the back of the neck pillow as later you will need to hand stitch the opening and I prefer this portion to be away from the kid's neck.  Keep sewing slowly along and leave about 3" gap at the top for stuffing.

6) Before you flip the pillow over, you have to snip around the curve area. See the picture at step 4.  The Concave portion, I've cut out a 'v' shapes so that it will not look crumpy when you flip over. For the other edges, I've used the scissor to snip around the seam allowance. Just be careful that you don't snip off your sewn line. 

7) After you've done the above, flip the pillow over so that the right side face out.  I've tried to stuff it to quite full so that it will give more support. Hand stitch the gap close and you are done!

I've really pleased with the end results. My niece and nephew have asked for one when they saw the one that I made for my baby. So I ended up making another 3 more!

If you are not sure what to make, I would recommend that you try this. It's so easy and cutting and sewing takes less than 1 hour. And the end result is amazing. Do share with me the picture of you neck pillow!

Saturday, September 25, 2010

Tutu for 2 sisters

My fabric finally arrived! yeah! It's Layer Cake - Breakfast at Tiffany's by Fig Tree Quilts for Moda. Not sure what I'll do with it but since it's abit expensive, I need to think hard. Hmm..I've got many ideas but let's see....

Anyway, the last few days I've made 2 more tutus for the girls. Decided to do one for the baby too. I did 2 different methods from my previous tutorials. You can try this if you like this version which involves alittle bit more sewing but just as nice.

Blue Cinderella tutu (name given by D1)
pale blue tutu with satin ribbon bow

Material
tulle 3m long by 60" wide
1 elastic band (please include allowance for sewing)
blue satin ribbon (optional)

Instruction
Same steps as my previous tutorial in cutting the tulle and fold the 60" width twice lengthwise.  Final width of the folded tulle is 15"as I intended the length of tulle to be 15". So, you can adjust accordingly to your desired length by multiplying by 4.
can't see very clearly as tulle is light blue, folded into 4 layers (2 raw edges & 1 folded edge)

Sew 1" from top of the folded tulle lengthwise to make ready for the waist band.
pin 1" lengthwise throughout the whole 3m
Insert the elastic band through the 3m long waistline and sew the ends together.  The elastic band should be waist length of your child + 1" excess for sewing. Arrange the tulle equally around the wasitband so that the skirt looks full.  You can add the ribbon or any assessories if you like. 
insert the elastic band through the waist line. Use safety pin if you have difficulty pushing the band through

My hubby felt that the skirt looks abit translucent even though I told him that it's like this as you wear the leotard with it. But since D1 loves to wear it outdoor, I'm thinking of sewing a detachable lining that she can wear with it if she's not going for her ballet class. Else, you will have to wear a slack or pants underneath.
happy girl in her blue tutu

White tutu for the baby
simple white tutu

Material
tulle 2m long by 36" wide (2 pc)
1 elastic band

Instruction
This is very easy and can be done within 15minutes if you don't include the cutting of fabric. First cut 2 pieces of tulle of width 36". I've using 36" as I intended the final length of tutu to be around 9-10".  As this is for my baby (waist 17"), I don't need so much volume, hence reduce the tulle length to 2m.

Put the 2 pieces of identical tulle on top of each other and sew down the middle length wise.  I've used a blue thread as I want the blue thread to be visible on the finished tutu.

Fold the tulle lengthwise along the sewed line. Sew another line below the middle row about 1" from middle sewed line. This is the create a waistband.


Insert the elastic band into the waistline and sew the ends together. Arrange the tulle to cover the sewed elastic band.  You will see that there is 2 tier layers, one shorter infront and the longer behind.  See finished tutu below.
Cute baby in her new tutu