Showing posts with label japanese sewing. Show all posts

Thursday, May 8, 2014

Galaxy Dress


I fell in love with this galaxy print cotton from Fabric.com. It reminded me of a dress I saw from this Japanese magazine Female Autumn 2013 issue.


I was contemplating if I should sew up the exact version but I think the loose fitting dress is going to make me look preggy.

So I decided to sew up this dress from the cover of this Japanese book.  It's Simple Chic by Machiko Kayaki.


I think the dress is quit unique since it has 2 diagonal darts from the side waist up.  You can just catch a glimpse of the diagonal dart from the photo below.


The lines on the dress is quite simple. A line with 2 darts so it will not clash with the busy print. The blue is so rich and it is a good weight to sew, not flimsy at all. I would recommend this if anyone is interested in galaxy print.


The above is the photo of the back view of the dress. The print seems to make the seams so invisible right? You can hardly see the invisible zipper at the centre back! I am so tickled!

The original pattern neckline is too high for my liking so I brought it down by 1". Maybe my neck is too thick. lol I line the dress with Japanese nylon lining fabric that I got from Spotlight. It is slightly expensive at $13 per metre but I think it is worth it because it is anti-static and feel so cool against my skin.


Here's how it looks on my dress form. I can actually zip up the dress! The original pattern dress length is really LOOONGGG. I took off almost 3" and it is just below my knee. I think might need to take off more. I'm 1.60m. Not sure if its because Japanese ladies like their skirt long or I'm too short.


Will be wearing this for the upcoming Mother's Day church service so no photo of me wearing it here. I might post a few celebrating photo later though.

My birthday is in May and I've a birthday surprise for my readers! Look out for it in my next post!

Tuesday, November 5, 2013

Quilted Winter Coats


This time, my winter sewing is from one of my Japanese sewing book. This one even has an adult version, if I so wish to sew one myself I can do it.


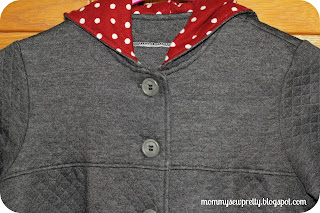
This is a simple coat and only the hood is lined.  I've found this grey cotton pre quilted fabric from Spotlight recently and thought I can create this look with this coat. I lined the hood with a brown flannel with polka dots that I've in my stash for ages.


The dress has a front yoke.


Long row of buttons of course. There is some subtle pleats below the yoke. I love the button holes options on my machine, makes every thing really quick.  This time I even use the button sewing option and eliminated any hand sewing of buttons!


And 2 cute pockets.  I love the fold over details on the pocket top.  For my oldest at size 140, the pocket position is a bit low.  But for my younger at 110, the position is just nice.


Here's a close up of the front facing.


Here's the back view.  There is some pleats below the back yoke.


And of course, I've to make another one. How can I leave out the younger one? In size 110 which fits my 3 year going to 4 year old really well.


And there you have - 2 coats side by side.


Saturday, June 15, 2013

Lace Overlay Tunic


June is a busy month for mummy in Singapore. With the month long school holiday, most family take the opportunity to travel overseas. We just came back from Hong Kong and boy, was it hot! We promised ourselves never to visit Hong Kong in June. It was too hot and I had headache every day! Maybe a visit to Malaysia or Australia will be the next best options.

Anyway, I did manage to do some sewing for myself.  This lace overlay tunic was from the Japanese magazine called Lady Boutique. I bought this from Popular bookstore at NEX shopping mall.


In this issue, they included 4 patterns for the 4 styles listed on the top left corner on the cover. I fell in love with the coral tunic with lace overlay on this page.


This tunic has only 3 pattern pieces: front, back and sleeve.  I love how versatile this tunic is and the magazine gave some suggestions on how to wear them: Casual, semi-formal and formal. I love it that the sleeves have the lace cuff that will show when you fold up the sleeve. It is also long enough for you to belt it if you wish.


For my version, I happen to have the chiffon that may just work on this tunic. I bought it at Chinatown for $3 a yard. The base is some turquoise blue cotton that I forgot where I bought it. I think I took one night to cut up and another night to sew. I did the sewing on Thursday night after work and finish it to wear to work the next day. It was really comfortable.


I think the sleeve is a tad too wide so if you are thinking about sewing this tunic, you can safely cut off 2" and taper to 1" at the arm sync.  The view below is when I fold up the cuff to show the chiffon overlay. Very cute.


The pattern recommends a longer invisible zipper but I only have this 20cm normal zipper in the right color so I just use it. Anyway, I was able to wear it over my head still. But I got some issue with the instruction as it calls for the zipper to be inserted after sewing the side seams. It would have been easier if I sew the zipper first, imho.


But, I still love the tunic. It hit the right length at my hip. Since it was a dress down friday, I pair it with my jeans. I tried to pose like the model but I've got a long way to go. Maybe I should wear a sling bag, no?


That's all for the poses. I had to rush off to work and fetching the younger one to childcare. Maybe I will take proper photo of this tunic outdoor someday.


Thursday, April 11, 2013

Purple Dress


I made another dress for myself. The pattern is from this Japanese sewing book that I got from Kinokuniya called "Dressmaking at home" by Machiko Kayaki.  The book is in Japanese but I think if you have sewn from Japanese pattern book before, this is not a very difficult book to understand. The book come in pattern for 3 sizes "9, 11 and 13".   For each pattern, they will give you the bust, waist and length of the finished garments in 3 sizes since these measurements will differ based on the design.


I have many favorites and one of it is the Folklore embroidered dress on page 10.  I love the silhouette of the dress but didn't have any fabric with embroidery so I made it up with Kona Purple Cotton. The lovely purple with swirl print is really pretty. The dress has very basic shapes and only few pattern pieces like the front and back bodice, front and back waist yoke and 2 rectangle pieces for the skirt. The sleeve is a continuation of the bodice so no sleeves to set, easy.


If you are familiar with Japanese pattern, you will know that they usually run BIG. So, I usually measure the paper pattern to get the 3 vitals on the bust, waist and hip.  For this dress, it is important to follow the bust and waist since it is a pleated skirt with fitted waist so I go for size 9 but use size 11 on the waist.


Although the dress is simple, it has some fine details that add charm to the dress. I like the little gathers below the bust area that define some shape. It helps the dress to look more feminine.  I also love the waist yoke that enhance your waist. The combination of the soft gathers at the bust area and the high waist yoke really gives the dress a nice shape. If you are long waist like me, the dress will be perfect. If not, good to try on the bodice before you sew on the skirt so you can adjust the waist yoke first.


The pattern called for double layer for the waist yoke but since I've lined the skirt, I only have the 2 pieces. The skirt is simple 2 rectangles with 3 pleats on each sides, front and back so not a big problem. But I did shorten the skirt a little to just touch my knee.


I had to complicate the matter to add lining on my own. That took me some time as I didn't know how to line a dress with a side zipper.  I think the side zipper is necessary since all fabric are cut on fold and putting it in the back seems to break up the flow, imho. Finally I resort to hand sewing the zipper on at the lining. Anyone can advise on other faster method? I also didn't have a purple zipper so make do with the black one that I got in the right size.


I just love the overall shape of the dress. If I'm to make this again, which I think I will, I'll try using a thicker material and do away with the lining.


Here am I wearing the dress. Pardon the crease as i had the dress on for the whole day. It was after the Good Friday service and we went for dim sum lunch and did some shopping before dropping at my mother in law place for dinner. You can see how fitting the dress was on me. : )


Thursday, April 4, 2013

Colour block skirt with Buttons


When I saw this skirt from the Japanese book that I borrowed from the library, I had in mind to make this skirt.


The skirt is knee length with color blocking. There is also a stripe of white in between the solid black and red.  What draws me was the row of buttons at the sides. The skirt don't have zip and the buttons are actually functional.

My color scheme was quite similar to the photograph. I use black and tangerine orange.  I added a strip of turquoise green piping in between them to give it some structure since my fabric was quite light. The piping really add some color pop and hold up the shape of the skirt well without the lining.


The construction of the button closure throws me off at first as I can't quite understand the diagram. Basically you interface the button facings and sew them to the back and front side of the skirt button placket. Then, you align the facing and sew them down at the front of the skirt. Hard to describe but you will understand when you see the diagram on the book.


The skirt has no waistband and you need to sew the waistband facing onto the button facing as well. There is a clear diagram on how to attach the waistband facing to the button facing.  Read carefully and just follow instruction. You will be surprise that everything just worked out when you turn them to the wrong side. It's kinda hard to explain but you will understand when you are doing it.

Got the golden buttons from Textile centre for the cropped jacket but didn't use them as my friends said  brown buttons suit the jacket better.  I'm glad the buttons didn't go to waste since they were quite expensive. The original design has more buttons but since my buttons are quite big, I used only 3.  Sewing buttonholes using my automated janome buttonhole options is really easy. I got 3 pretty buttonholes in no time.

My final skirt! I love the golden buttons closure and the piping and contrasting band. The skirt falls nicely at my knee and is so fitting like it's made for me. No funny gapping at waist or bunching at the hip. I think I'll use this pattern block for my future skirts, minus the button closure.


Monday, April 1, 2013

Short Cropped Jacket


Remember this cropped jacket from the Cotton Friends book that I got from the library?


Here it is!

front view

back view

I cut mine S size and it is still big on me.  I took it to my office and everyone tried the jacket on. Seems like it is able to fit quite a lot of body with S to L size! If you have keen eyes, you would have notice that my jacket don't have any buttons. My colleague has graciously helped me to try on the jacket and give me lots of advice on the position for the buttons.

The instruction diagram is very clear and you should be able to follow through. I was taking my time since I decided to line the jacket. The fabric is from Michael Miller Tweedle Dee Tile. I have lined the jacket with a soft flannel from Amy Butler collection to give it some shape and also makes it warmer for me to wear in office.  I didn't know how to bag a jacket so I just cut the same front and back bodice as the lining. The neck facing and collar are cut from the main outer fabric since it is visible on the outside. I didn't line the sleeve since I'm not sure if the arm sync is wide enough for the thick flannel.  I'm also worried that it will make the sleeve stiff and hard to put on.

Because I've lined the jacket with the thick flannel, it is very warm but at the same time, the pleats at the back wouldn't stay down! In the end, I just tack the middle of the pleat down. I've also make the pleat for the flannel but sew in down a little further than the outer piece. I can't omit the pleats totally as I need to hem both outer and lining pieces and they have to be of same length. Or should I have modify the pattern for lining to omit the pleats but add the width to the lining hem? Sigh..live and learn.


And because I line the jacket, all my seams are conceal so I didn't have to treat the seams.  Yay! The instruction called for using hong kong seams for the side seams [ie. bind the seams with bias tapes].  So, the inside is quite neat even without lining.  The diagram describing the attaching of collar to front facing and jacket is quite clear. I baste the outer and lining pieces together at the neckline so I treat them as one piece when I attach the collar and hand sew the collar to the lining.

First time attaching the sleeves for jacket.  If you notice the sleeves for jacket, the seams are actually off centre and they don't match up with your bodice side seams.  First I determine the front and back sleeve and pin the sleeve head first, aligning them to the shoulder seams of the bodice. Then, I find the marking on the back arm sync and pin to the sleeve seam line at the back. Then, I pin the rest of the sleeve to the arm sync and sew carefully. The seams for the sleeves are then bind with bias tapes to keep it neat.


I had second mind to just omit the buttons or go with one button at the collar but my friends were against it saying the 4 buttons were better.  The buttons on the patterns were actually not functional. They are closed with snaps.  I was happy to find 4 nice brown buttons at textile centre and sew them on the jacket. I decided to make the 2 of the buttons functional since my automated buttonhole option on my machine is quite fuss free. The other 2 are just for decoration.


The jacket is really easy to put on and I would highly recommend it, especially if you don't intend to line it. Next up, I'll show you a skirt that I've sewn from the same book.