Showing posts with label bag. Show all posts

Wednesday, March 12, 2014

Bags & Pouchers - Part 4 (Last episode!)


This post concludes the last series of my 1 yard Nico Nico Land fabric sewing.

The messenger bag is a request from my 9 year old.  She wants a cross body bag with a big flap and a zipper.  She also requested for a side water bottle holder if possible.  But alas, since I'm working with the remnant of my fabric, I had to go for a basic bag.

front view with flap

The bag a BIG flap in front with velcro closures.  I didn't use any pattern since I am using left over fabric and still wanted to match the print for the front flap to the side of the bag and the front of the bag.  But I refer heavily to Lier's post on gusseted tote tutorial.


But due to the limitation of my fabric and the need to align the print, I cut my flap, top and back in one continuous piece and then sew a line between the back and top portion to create an artificial line to demarcate the back portion.  See below.

back view
As I use a directional print for my side gusset, I sew 2 pieces of the gusset pieces right side facing so that the seam lines are under the bottom of the bag and out of sight.

side of bag
With careful placement, both sides of the bag has the same pink border print at the bottom which align nicely with the front flap print! I did try to make sure that side and front are same so I was extremely careful when sewing the velcro on the front.

front view without flap
The bag is really big and roomy.  It measures 14" wide and 11" tall.  I'm recording down the measurement below so that I can keep for future reference.


Flap+Top+Back = Height [ 26" + 0.5" SA + 0.5" SA ] X Width [14" + 0.5" SA + 0.5" SA]
2 Side Gusset Panels = Length [18" + 0.5" SA + 0.5" SA] X Width [4" + 0.5" SA + 0.5" SA]
Front = Height [11" + 0.5" SA + 0.5" SA] X Width [14" + 0.5" SA + 0.5" SA]


Here's the inside view with the pocket. I actually pieced the pocket pieces together since I've not enough. The top pink portion is actually from the bottom print but it works like bias tape here to cover the raw edge!


After I've sewn up the bag, I sew the straps.  I can't find the shade of pink in the right width for the bag.  Since it is so big, the strap should be at least 1.5".  Finally at the Textile centre, I got this 1.5" beige cotton webbing that is not too stiff and sew on a 0.75" pink nylon webbing in the middle to match the overall pink theme.


I also bought some black sliders and buckles from the same shop.  I can't find a pink or white ones so black will have to do.  Lier's blog has a good tutorial on how to sew the sliders and straps which is very helpful.


Here's the bag in action.  She loves the big bag. It's a good thing that I didn't add the side pocket. It will be too bulky and heavy.  She just flop the flap over and didn't even care if it match the sides. So much for my careful sewing! You just have to take my words that they really match at the side. lol


Tuesday, March 11, 2014

Bags & Pouches - Part 3


Without further ado, this is a sling bag for my 4 year old.


The bag is cut using the bottom of the border print for Nico Nico Land.  Pattern is also from the same magazine Cucito 2012 Winter/Early Spring issue.  Don't you just love this magazine.  It is packed with lots of Back to School projects and lots of bags/pouches/apron ideas.  The sling bag is no. 52 and no. 55 in the picture below.


The original bag uses a quilted cotton as the outer fabric.  I did the reverse. My lining is the pre-quilted cotton so it work out well.  The quilted cotton really gives the bag some structure but not too stiff.  I used it for the Shoe bag earlier.

Instruction is also given using diagrams but without photographs. I think it is still quite clear.  Here you can see the top of the bag is closed with velcro. I cut the fabric so that the top is framed by a border of flowers.


Inside of the bag.  See the quilted cotton? Give it a nice shape and padding. It looks like a bucket if you open up wide.


Here's the side view.  See the strap. Guess where I got them? haha... You are right if you say Daiso.  Both the D Ring, slider (at the bottom) and the strap are from Daiso.


The slides and the D Ring. A set cost $2 so you can make 2 bags with 1 set! Real deal.  Both the pink and red ones have small white polka dots on them. Super cute. I think they also got Yellow and Baby Blue [City Square Mall branch].


Here's the action shot of my girl with her bag. You can see the slider on the bag, making it adjustable and she can use it when she grow taller.


Ahh...when did she grow up so fast! It was just yesterday that she was a toddler learning to walk.  sob..My baby has grown up.

She loves her new bag and the height and depth is just nice to fit 3 A4 size colouring books and 2 big colour pencil cases plus a water bottle. Very roomy.


I love it that the strap is not too stiff. It is quite soft and the soft pink colour matches the bag perfectly.  A happy kid really makes my day.


Next post, I will conclude with a Messenger Bag for my 9 year old.  Stay tune!


Monday, March 10, 2014

Bags & Pouches - Part 2


Welcome back for part 2 of the 4-bags-with-1 yard-fabric post!

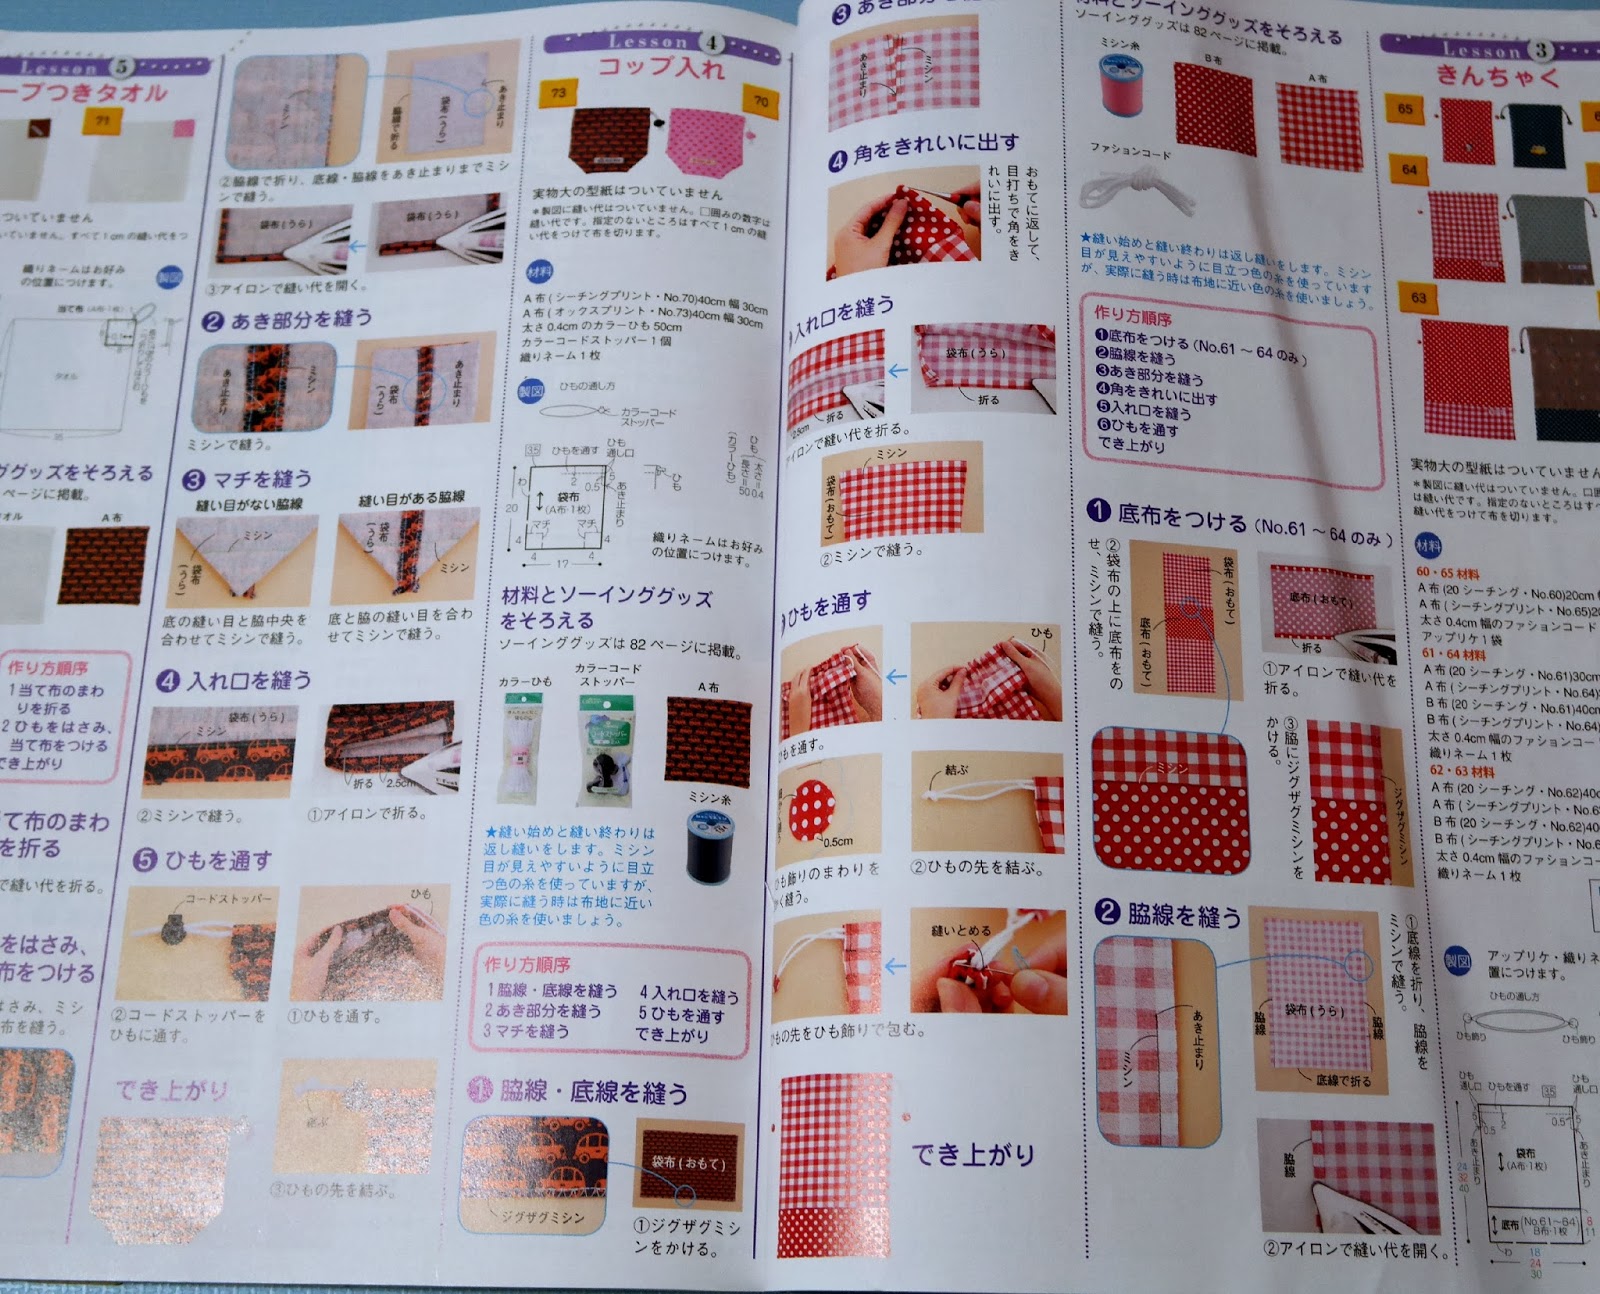
I also made a Cup Bag for the same little girl in Japan.  Cup Bag? What's that? I was surprised when I read the name on the magazine but it seems like in Japan, there is different bags/pouches for different items like shoe, cup, bento, lesson bag etc.


Anyway, I use the pattern from the same magazine.


The instruction is also a photo step by step so it was really easy.  Especially this one don't need a lining.


For this bag or pouch, I use the middle portion of the Nico Nico Land fabric which has lots of cute cakes, macron print all over the baby pink background.


Did you notice my cute pink stopper and beads? I got these as a set [2 stoppers and 4 beads] from Daiso for $2! Yes, you have to believe it. Daiso does carry some of these cute item that is really affordable and add a cute factor to your project don't you think?


Here's how it looks open up.  My Precious Moment ballerina figurine is modelling for me.


Side view.


That complete the set for my little friend.


So, come back again for Part 3! I know, I'm a tease : P

Monday, August 5, 2013

Kids Bag Pack


I finally tried my hands to sew a bag pack or a haversack for my girl.

Took the pattern from the Japanese sewing magazine Cucito for Kids and modified them.  Here's what I did:


  1. Upsize the bag to suit my 8 year old since the original one seems so smallish
  2. Create a side pocket for her water bottle
  3. Added the adjustable bucker to the straps


The fabric is left over from my last project from the Tiered skirt.  It's Tasha Noel's The Simple Life range.  I bought the 100cm 2 way pink zipper with 3 zipper tabs from Daiso. So, I managed to cut them so that I can use one for the front pocket and the rest for the main bag!

I forgot to take photo of the inner bag but it is exactly the same as the front without pockets. The back of the bag is quilted and interfaced with batting so that it will be sturdy to stand.

It is a labour of love but I'm so glad she loves it. So, the younger one is also asking for her bag. Time to cut up some more...


Friday, January 25, 2013

Faux Leather Foldover Clutch


Yup! I've caught the bug to sew one up myself. First caught sight of it at Kristen's blog "Skirt as Top" and really love her doily foldover clutch. Then, chance upon Cherie's faux leather accent fold over clutch and I'm sold.

Bought half a yard of faux leather from Chinatown at $7 per yard to try out. They come in a variety of colors and I bought a pink, turquoise blue and brown to try out.

I use a leather needle for this project and widen my stitch as suggested.  It works okay and I'm surprise how easy it is to sew.


I love the gold metal zipper that I got from a shop at Textile centre. They don't have a lot and size is limited but I'm glad I bought some pastel purple, pastel blue, pastel pink, green and even teal and mint.  The one I got is 10" instead of the required 9". It was okay but i've to adjust the stitch to be closer to the edge in order not to step over the metal teeth. Even so, I had to pick out the zip tab at the end to make the zipper teeth fit into the clutch length. I didn't want to run out to buy new zipper so I made do with what I've.


Want to peep inside?  I line the clutch with Heather Bailey Nicey Jane's Church Flowers in pink, green and yellow that I got last year. I was perfect. I love the sweet color. Not sure what I'll use it for but definitely this will not be my last.


Friday, December 28, 2012

Simple Cinch Pouch


As mentioned in my previous post, my 7 year old made this in 30 minutes. To be more specific, I've helped to cut the pieces out and helped her to do some pinning while she did the sewing and inserting the ribbons.  But I'm so proud that she did sew them up herself!

Material
- one layer cake (10" X 10") of fabric A for main pouch and 1/2 layer cake (10" X 5")  of fabric B for the ribbon channel.


We have used a layer cake (10" pre-cut square) that helped to speed up the process. Each layer cake can make 1 pouch. If you don't have a layer cake, it's ok. Just cut out 2 pieces of fabric 10" X 5" each.  For the ribbon channel, cut 2 stripes of 2.5" X 10".

- 2 grosgrain ribbons of 24" long

Sewing
1. Cut the layer cake A into 2 of size 10" X 5" each


2. Cut the layer cake B into 2 stripes of size 10" X 2.5" each. Keep the bottom portion for another pouch if you want.


3. Pin one of the 2.5" stripe to the main panel along the 10" side. Remember, Right side facing each other.  Sew using 3/8" seams allowance. Zig zag the raw edge or use a serger if you have one. Press the seams upwards towards the narrow stripe. Do the same for the other piece.


4. Pin the 2 pieces Right Side facing, align the edge as shown below. Take careful note of what I'll be explaining below.


a. When you pin the 2 pieces together, mark 1" below the top (see pink line). This will be the indication of the start of the ribbon channel that you will have to leave unsewn. 


b. Start sewing from the right top corner and stop before the pink line. Then start sewing again at the joint between the stripe and main pouch body, down the bottom of the pouch and up again on the left side of the pouch.  Remember to stop sewing along the joint and then start sewing again from the pink line to the top of the pouch. 


c. The reason for leaving the gap on both the left and right seams is to make the ribbon channel which you will understand in step 6.

5. Press the side seams open and zig zag or serge the raw edge on top.


6. Fold the strip about 1" to the Wrong Side of the pouch (i.e. fold the strip into the inner side of the pouch) like so. Pin and make sure that the gap that you have left earlier is nicely place along the top folded edge. 


7.  Sew carefully along the stripe so now you ribbon channel is completed with 2 openings along the side seams!


8. Cut 2 pieces of grosgrain ribbons about 24" long. Insert one ribbon from one opening though the whole channel and exit from the same start point.


Insert the other ribbon through the other opening and out again from the same start point. Tie a knot and make sure that the ribbon is not twisted in the channel.


9. There! Your finished pouch with the 2 ribbons.


This is how the pouch will look when you cinch it.


So, go ahead and make 4 more! They make a nice pouch to put in small gifts. We are able to put in a box of Evelyn and Crabtree hand cream in one since it is longish and is the perfect size. Now, don't you want to try them out yourself?


Thursday, May 17, 2012

Patchwork Pouch


I made this little pouch for my girl to store her Chinese word cards. The cardboard box that came with the cards came apart so I did a quick (or not so quick) sew to make her one so that she will not misplace the cards.


Instead of the usual one-fabric-sew-it-up thingy, I decided to do it differently this time to do a patchwork. I have alot of beautiful quilting cotton scraps that was left over from my previous sewing projects. It was a waste to throw them away so I just stored them and it gets piled up in no time.

I'll share a simple tutorial how I sew this patchwork pouch here.

Sew up all the stripes of scraps, try to find those with the same width so that it looks more or less consistent. But it is up to you. Sew up enough to make the pouch. I just eye ball the side. It's alright to sew more than less. Press the seams open.

Then, cut the pieced fabric into 2.5" long stripes, across the stripes that you have sewn. Cut up enough for the pouch. This will allow you to have different fabric print on the same stripe.


I use a earth tone long stripe of fabric to sandwich between the 2 colourful stripes for added interest. Sew up the side, with right side facing. This will make up the width of the pouch so cut the middle fabric to make up the required width. Press seams open.


Add another stripe below the earlier block to make up the required length. Top stitch on the stripes. Press seams open.

front view

back view

(Sorry, not photo here)
Next, for the inner layer, I get a floral cotton fabric, the same size as the pieced fabric and sew them together, right side facing. Sew all along the edges, leaving a 2" gap opening for turning over. Turn the bag right side out from the opening and press flat. Fold a 6" thin elastic band into half and insert both the raw edges into the opening and sew shut. Top stitch all the 4 sides and you have the fabric ready to sew the pouch.


Choose which directional print you like and with right side facing, fold up one short end to make the pouch pocket (make sure it is long enough to cover the cards). Sew up the 2 side seams, right side facing. You then pinch the bottom corner together and stitch across 1.5" from corner to create the base.  More instruction here. Make sure that the base is large enough to fit in the cards.  The portion above will be your flap of the pouch. I flip in the 2 sides to make it more tapered.

This is how the bag looks when it's close with the elastic band.


Simple and pretty. Good to use up those pretty fabric too!