Friday, March 9, 2012

Simple chiffon top

I saw this tutorial from Cotton and Curl on a rectangle top and told myself that I've got to try this.  So when I picked up this chiffon fabric recently from Spotlight (it was on sale for $6 per metre), I knew it was just the right material for this top. I've loved the stripe and the blue hues.

The tutorial is really simple but I did make some changes to the original tutorial. Here's how I did it. 

Decide how long you want your top to be and cut.  Fold the fabric into half lengthwise and lay it flat. I've put a lot of pins along the selvage so that the chiffon doesn't move too much when I cut.


I followed her tutorial and sew a rectangle at both lower ends.  The top part will form the arm hole later. So measure wisely so you have some allowance.


Then, fold the chiffon into half widthwise so that you can measure and cut the neckline.  I've used one of my t-shirt as a guide for the neckline. Remember the front neckline is always lower than the back. After you get the lowest point marked out, use a curve ruler and draw out the neckline.


Draw the back neckline also, slightly higher than the front neckline. See the 2 lines below.


Before you cut, pin the chiffon down first to prevent movement.  Then, cut off the back neckline (the one that is higher), taking note that you also cut the back folded portion of the chiffon.


For the front neckline you got to be careful not to cut through to the back. First cut the front layer carefully to avoid the back fabric, cut from the top to the folded edge.


Then, open up the folded edge and using the cut piece to trace out the other front neckline. This will be helpful to cut a really symmetrical neckline.


For the sides, cut off the fabric under the sewn rectangle.  If you like your chiffon to have some curves, you can cut off the bottom edge like so.


I cut the folded portion from armhole to armhole through the neckline so that you have 2  separates at the shoulder seams because I feel that the shape is better.  But you can leave it as folded and save the steps to sew.  Then, I sew bias tapes using the same fabric on the neckline.  For the armholes, I didn't sew any but just rolled hem on them. Also did the same method for the hem.

So, here's my top. I like it but next time if I make it, I'll make it longer so that it will have more drape.


Monday, March 5, 2012

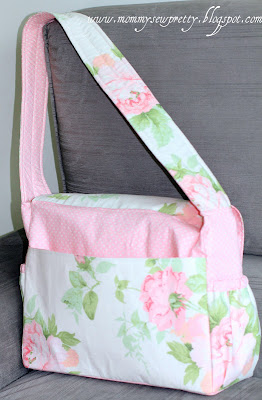
Diaper bag from Simplicity 2924


I found this pattern pack from Spotlight and love that it comes with so many pattern pieces for 7 items! Yes, 7 - 2 designs diaper bag, baby bib, tummy pillow, burp cloth, changing pad, diaper wipes bag and pacifier clip. Wow!  My sister in law is going to have twin babies come May and I thought a diaper bag will be nice for her.


I bought the floral fabric sometime ago from Spotlight and made a lunch bag from it but the rest of the fabric was sitting in my drawer waiting for another project.  I finally found a baby pink polka dot fabric that match nicely with my floral print.

back view with back pocket

I took some time to plan the construction as I use 2 fabric instead of 1 so need to be sure where each fabric goes.  With the interfacing pieces, it can get confusing.  But I love how it turn out!

The inside of the bag has 4 big elasticized pockets to carry all the necessities for the baby. I just love the beautiful floral print at the base!


The interfacing that I've used are medium weight but I feel that the bag is still too soft and didn't stand up well. I've followed all the steps in the pattern and it was really simple. Instruction is well written and clear.  Minor adjustment made was I cut the fabric to be 1" shorter as the original design was too big.  I also added batting to the strap as I thought it would be more comfortable on the shoulder.


I love the elasticized side pockets that is big enough to contain the water bottles and milk bottles.  I used the  inner fabric for the elastic casing so that it has a contrasting effect. Just need to cut the side pocket piece to be 1" smaller and add in the contrasting strip to be 2" and sew them before you attach the side pocket.


Another view of the side pocket with the big back pocket.


The bag view of the bag with strap.


Saturday, March 3, 2012

Sewing Buttons and Buttonholes - A Tutorial


Here's the tutorial on sewing buttons and buttonholes with sewing machine. 

My new tunic needs 5 buttons and 5 buttonholes, so I decided to use the sewing machine for this job to save me some time.  If you have not machine sew your buttons or buttonholes, here some simple steps to guide you on. 

First you need some sewing supplies that comes along with your sewing machine when you first purchase it.  

For the Button: 
Darting plate
Button sewing foot
Darning plate on left and button sewing foot on right

For buttonholes
Buttonhole foot

How to sew a buttonholes
1. You need to make the buttonholes first before you sew the button. So, get your button out and measure the size in diameter.  Mine was 1.5cm.


2. Mark out the buttonholes on the placket.  The buttonholes should be slightly bigger than the button diameter.  I've used 1.8cm here.


3. Attach the buttonhole foot on your sewing machine and mark out the starting point. See picture below on the position of the starting point of the needle with the pressor foot. 


4. Position your needle to the right of the buttonhole marking.  The marking that you've draw should be right in the middle of the window.


    a. Select the stitch option 1 for the buttonhole option and stitch length of less than 1. (this is the 4 step buttonhole option on my Singer sewing machine so find out what's yours and you will be fine)


    b. Start sewing from the right top of the buttonhole mark and stop when you reach the end.


    c. Select the stitch option 2 and sew a sew a few stitch.


    d. Then, switch the dial to stitch option 3 that will see your needle moving up back to the top again.  


    e. When your needle reach the top left hand side of the window, select stitch option 2 again and sew a few stitch again and you are done!


5. Place 2 pins at the start and the end of the buttonholes that you have just sewn.  Using the seam ripper, cut out the fabric in the middle of the 2 sewn lines.  Now do the same for the rest of the buttonholes.


How to sew Buttons
1. Place the placket with the buttonholes over to the other placket and mark out the opening using a water soluble pen.  This will be the position of your buttons. 


2. Attach the darting plate and button sewing foot in. Place the button onto the markings on the placket that you have just made.  


3. Your needle position should be the right side on the stitch dial and try to align the holes on the button to the needle. 


4. Once you have it, change the stitch length to between 1 and 0 and sew a few stitches on the buttonhole to secure the thread in the button.


4. Then, select the zig-zag stitch option that will allows your needle to fit just nicely into the 2nd hole on the left.  You can adjust the zig zag stitch till you get the right fit. Start sewing a few zig zag stitch to secure the button to the placket.  


5. Cut away the thread and you are done! If you have 4 holes on your button like mine, you just have to do the above steps twice.


That's it. Simple right? 


My tunic is now complete, with buttons!


So go...get out the supplies and start sewing!