I didn't like the look of the child harness that I see around. It's either nylon strap that looks like something you put on a dog or a cute bag-cum-harness backpack that will be quite warm for my toddler to wear in this humid Singapore. My baby perspire alot. So, the birth of the toddler vest with harness.
Not sure any of you will be interested in making one. It's not too difficult. I took some time to draw out the template and made adjustment on the way. If you are interested to make one, email me and I'll try to re-do the template for you. If you are not sure of the work involved, I'll jot down a few notes and photos below and you can see if you will like to try them. My finished vest measure 10" X 8.5" at the front.
Material
Cute cotton fabric of medium weight (use about 22" X 9")
Inner fabric
Bias tape in matching colour (I've used white)
heavy weight cotton twill tape (0.75") about 60"
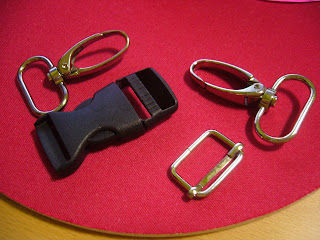
1 slider (0.75")
1 buckle (0.75")
1 D-ring (0.75")
2 rotatable clips of width 0.75"
Note. The width of the buckle, slider etc will depend on how thick is your twill tape. Some use nylon tape but I prefer the cotton ones as it is softer and I can't find a suitable coloured nylon tape.
Ready to start?
Instruction
1) First cut the fabric and quilt inner fabric. I've used a pre-made quilt fabric in white which I've used for my earlier Name quilt project. The fun and challenging part is cutting the cute japanese fabric to capture the cute cartoon as the centre piece.
 |
| front cotton piece and quilt inner piece |
 |
| back cotton piece and quilt inner piece |
 |
| sew shoulders and side seams together. print aligned nicely : ) |
3) Now the tricky part. Insert the quilt inner piece into the outer piece so that the wrong sides face each other. Make sure that the shoulder and side seams are aligned. Pin in place. Use as many pins as you like so that neckline and arm holes are pin nicely together.
 |
| front view |
 |
| back view. you can trim away the excess fabric later. |
 |
| finished seams at the back |
5) Next, sew the 2 arm holes. As the holes are quite small (it's a toddler size), I've hand stitch around. Don't worry about the stitches as later you will put bias tapes around them.
Bias Tapes
6) Open up your bias tape and align 1 side (right side) of the opened tape to the edge of the seam on the RIGHT side of the vest. Pin as you go. Clip off a little extra at the end. Your bias tape should go round the front neckline.
7) Sew the bias tapes to the seams along the line that you've just pin. Try to sew close to the edge or on the folded line. After you've sewn on the first folded line, flip over the bias tape to the WRONG side of the vest and hand stitch the raw edge of the bias tape to the vest. My tape is quite narrow, so it's a bit tricky to try to keep the wrong edges within the tape.
 |
| Front view of the neckline with bias tape sewn |
7) Now do the same for the hem at the bottom of the vest. Pin the bias tape along the raw edge of the hem on the RIGHT side of the vest. Start from the corner of one side and pin around the front and return back on the right side of the vest.
8) Sew the bias tape around the hem, removing the pin as you go. Hand stitch the tape on the inside of the vest when you flip over the tape.
 |
| finished hem |
9) Likewise, hand stitch the bias tapes to the 2 arm holes starting from the bottom and work your way around the hole. Give alittle allowance tape at the end. Remember to start stitching on the RIGHT side of the vest first. No photo here as my fingers were curled up with the tiny sewing around the small arm holes and I was trying to finish it as soon as possible.
10) Now you have finish the vest. Actually, it looks quite cute as a vest. You can attach a button over the back and use it as a vest if you want. For those still interested in the harness, let's continue...
Harness
11) Cut 2 piece of cotton strap of length 25" and 35" each. Take 1 end of the the 25" tape (length depend on how wide your vest will be + some allowance for extension in future) and put it through the buckle on the female side (the hollow side) from top in.
12) I've actually used my serger to sew the edge first before I sew the ends down. To secure the stitch, I've sewn a box stitch. It's quite thick so be sure to use a bigger needle and increase the tension slightly when you sew.
13) Place the strap over the vest so that you get the placement of the strap on the vest. Be sure that you dont' twist the strap. The buckle will be at the back of the vest. See illustration below for explanation.
 |
| for the other end of the strap, pull strap through the upper bracket (above middle bar) of the slider |
 |
| slide the strap over the middle bar and into the next slot |
 |
| Pull the strap taut. |
 |
| Insert the rotatable clip (not sure what's this call officially). This is for you to attach the hand strap later. |
 |
| Then, insert the strap through the male part of the buckle from below and out from the other slot. |
 |
| Pull the strap down. You should adjust the length now to be the width of your child |
 |
| Pull the extra strap through the rotatable clip as shown |
 |
| Pull the strap through the slider on the right |
 |
| The extra length of strap is now nicely secured. I've used the serger to sew the ends to keep them from fraying. |
 |
| Pin the strap in position at the front of the vest. Make sure that the strap is not twisted at the back. |
 |
| Sew the strap along the two long edges with straight stitch to the vest. You only need to sew on the front vest. |
 |
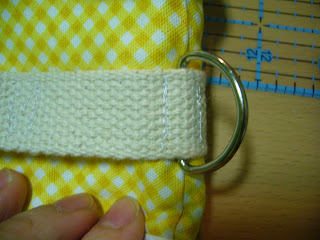
| At the side of the strap, I've inserted a D-ring so that I can attach the hand strap sideway. Secure the D-ring by sewing down on the 2 sides |
Hand Strap
14) Now you can make the removeable hand strap to attach to the vest. I've used the use the other cotton twill tape of 35" and inserted the rotatable clip to it.
 |
| Put the clip through and sew down the ends. You can also serge the end to keep from fraying. |
15) For the other end of the strap, I've fold in about 6" to create a loop for ease of holding on to the strap. Sew down the ends.
| Fold over 6" to form a big loop and sew down the ends with box stitch. I've added a strip of left over cotton fabric on the joint to decorate it. |
16) The finished vest (back view)!
 |
| The removeable strap can be attach to the back of the vest. Vest size is adjustable with the slider and buckle. |
 |
| Or, if you like, you can also attach to the side! |
Here's a picture of her with the vest. She loves it and we got many curious looks and amused comments from the neighbours at the coffee shops!


1 comment:
Thank you for the tutorial. A vest! I like this idea. I need to make one of this.
Post a Comment