

Have you tried the Reversible Bucket Hat from Oliver + S's "Little Things to Sew"? I love it that it comes with many sizes. I've made 3 sizes in all - Large, Medium and Small.
Why 3 hats when I only have 2 girls you may asked? Well, the Small that I made was a tad tight on my 2 year old so I decided that it would fit Dora the doll better.

And, off I went to sew up 2 more. My girls insisted to have the same pink fabric so in the end, I had 3 hats in the same shades but different sizes!

And, off I went to sew up 2 more. My girls insisted to have the same pink fabric so in the end, I had 3 hats in the same shades but different sizes!

This being the 2nd time sewing up the hat, I decided to do something different which I think helps to speed up the process and make the hat easier to sew.
Interfacing
The pattern call for interfacing only the the Brim of Fabric B but I find it to be too weak and the hat didn't stand up well. Maybe it's the fabric that I chose is more light weight so if you are like me, you can use medium interfacing and interface on the top, sides and brim of Fabric B. It makes the hat sturdier. Didn't interface the Fabric A as I'm afraid it will be too stiff.
My modification
When sewing the side panel of Fabric A together, leave a 2" gap in one of the side seams. For the other side seams, follow the instruction to stitch the whole side seams. Then pin the side panel to the crown and sew. You will need to clip the curves of the side panel in order to fit to the crown. Do the same for Fabric B but don't leave any gap in the seams.

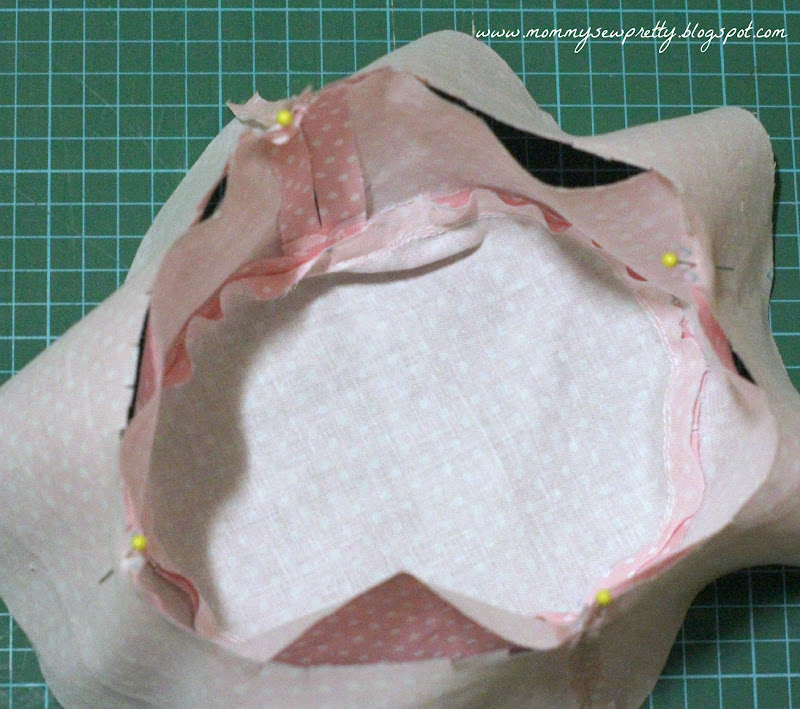
After you have sewn the side panel to the crown, sew the brims as per instruction. Like the side panel, you will need to pin a lot and clip the curves on the brim to get them to fit. First pin the side seams and notches and then later add 2 more pins between the 2 pins.

The next step, I did differently from the book. I put the 2 hats of Fabric A and B, Right Side facing, into each other, align the seams.

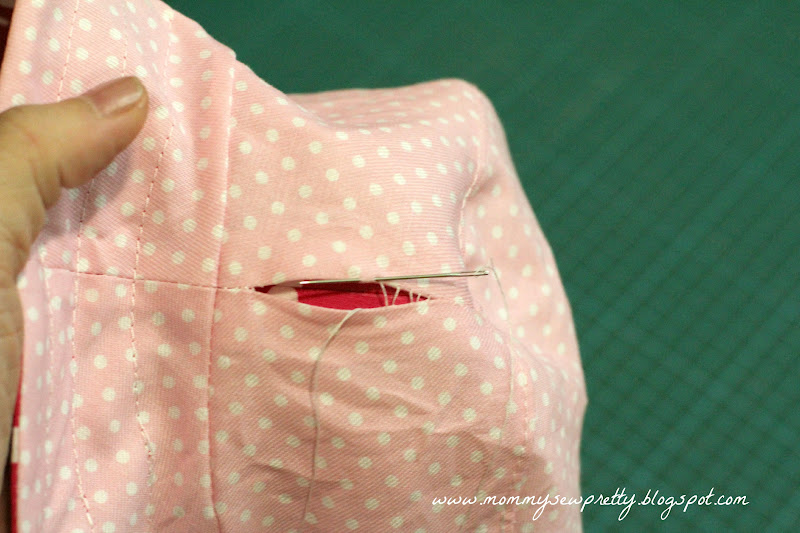
Sew up the full brim with 0.25" seams allowance. Clip the curves and turn the hat Right side out through the gap in the side panel.


Use pins to press the edge before pressing it with iron. Then, topstitch to make the edge neat. Stitch the gap close with whipstitch. I did a few rounds of stitches around the brim so that it will have more body.
The next step, I did differently from the book. I put the 2 hats of Fabric A and B, Right Side facing, into each other, align the seams.

Sew up the full brim with 0.25" seams allowance. Clip the curves and turn the hat Right side out through the gap in the side panel.


Use pins to press the edge before pressing it with iron. Then, topstitch to make the edge neat. Stitch the gap close with whipstitch. I did a few rounds of stitches around the brim so that it will have more body.


See, this is much easier than the recommended method to hand stitch the external cap to the brim. Or maybe it's just me that don't like to hand stitch since my workman ship is not so neat. In any case, the instruction by Oliver + S is really clear and I love to try more of the projects in the book soon!


4 comments:
its really awesome... u made it so simple...
Thanks for the great tip! There is a more popular version to make the hat no-hand sewing, but I think I prefer your method. Thanks a lot for posting this. xx
Hi, just wanted to let you know I tried your method of doing the hat and definitely prefered it to the original! I had to just make sure than the hat seams matched up for the last edge stiching. Otherwise it was much easier! Thanks for this post!
Loved your tip. I make hats for cancer patients. Thanks!
Post a Comment